序言#
这是家用迷你主机服务搭建的第四篇,这一篇回归初心,也比较精简,主要介绍了 istoreos 和 n8n
前者解决了 openwrt 难看以及不易使用的问题,后者解决了初始需求之一,即自动工作流的一部分
距本系列上一篇文章发布已经过去了 14 天,下一篇将不知道什么时候更新~鸽了 (bushi~
我的本命年也终于要结束了,我是 24,不是 12,也不是 36,更不是 48,谢谢~我不是真的中年人~
祝读到本文的人新的龙年
余额后面加个 0
身体一天比一天行!
~ 真挚而美好的祝福 (~
ikuai,拜拜#
之前第二篇中按照教程视频N100 安装 PVE8.0, 核显 SRIOV, 核显 HDMI 直通,All In One 保姆级教程,ikuai+op + 黑群晖 + win11 + 私人流媒体设置了 pve + ikuai + op 的复杂操作
经过一段时间的实践~重装~之后,突然理解了不需要把机器设置网关指向 op,需要的应用直接设置代理就好
排查发现我使用的所有软件都支持代理,并且直接使用代理比把虚拟机网关指向 op 好得多,不影响正常访问,世界互通也快速稳定
那么 ikuai 的存在就显得很多余了,因为我没有多条网线需要负载均衡,也不需要管理 AP,也不需要智能分流
于是一套连招触发:清空 ikuai 静态地址,回收所有 IP 地址,删除 DHCP 服务,停止应用,删除应用,所有虚拟机网关指向路由器,重启 pve,实现了人生的圆满
istoreos#
op 分支非常多,但是接近原生的 op 分支操作都很难用,页面也不够简单易用
istoreos 作为 op 的其中一个分支,继承了 op 的基础功能,并且由国内专业团队~团伙~维护,稳定且更新频繁
安装软件界面非常舒适,即输出了关键信息防止报错你找不到问题,又快速简单
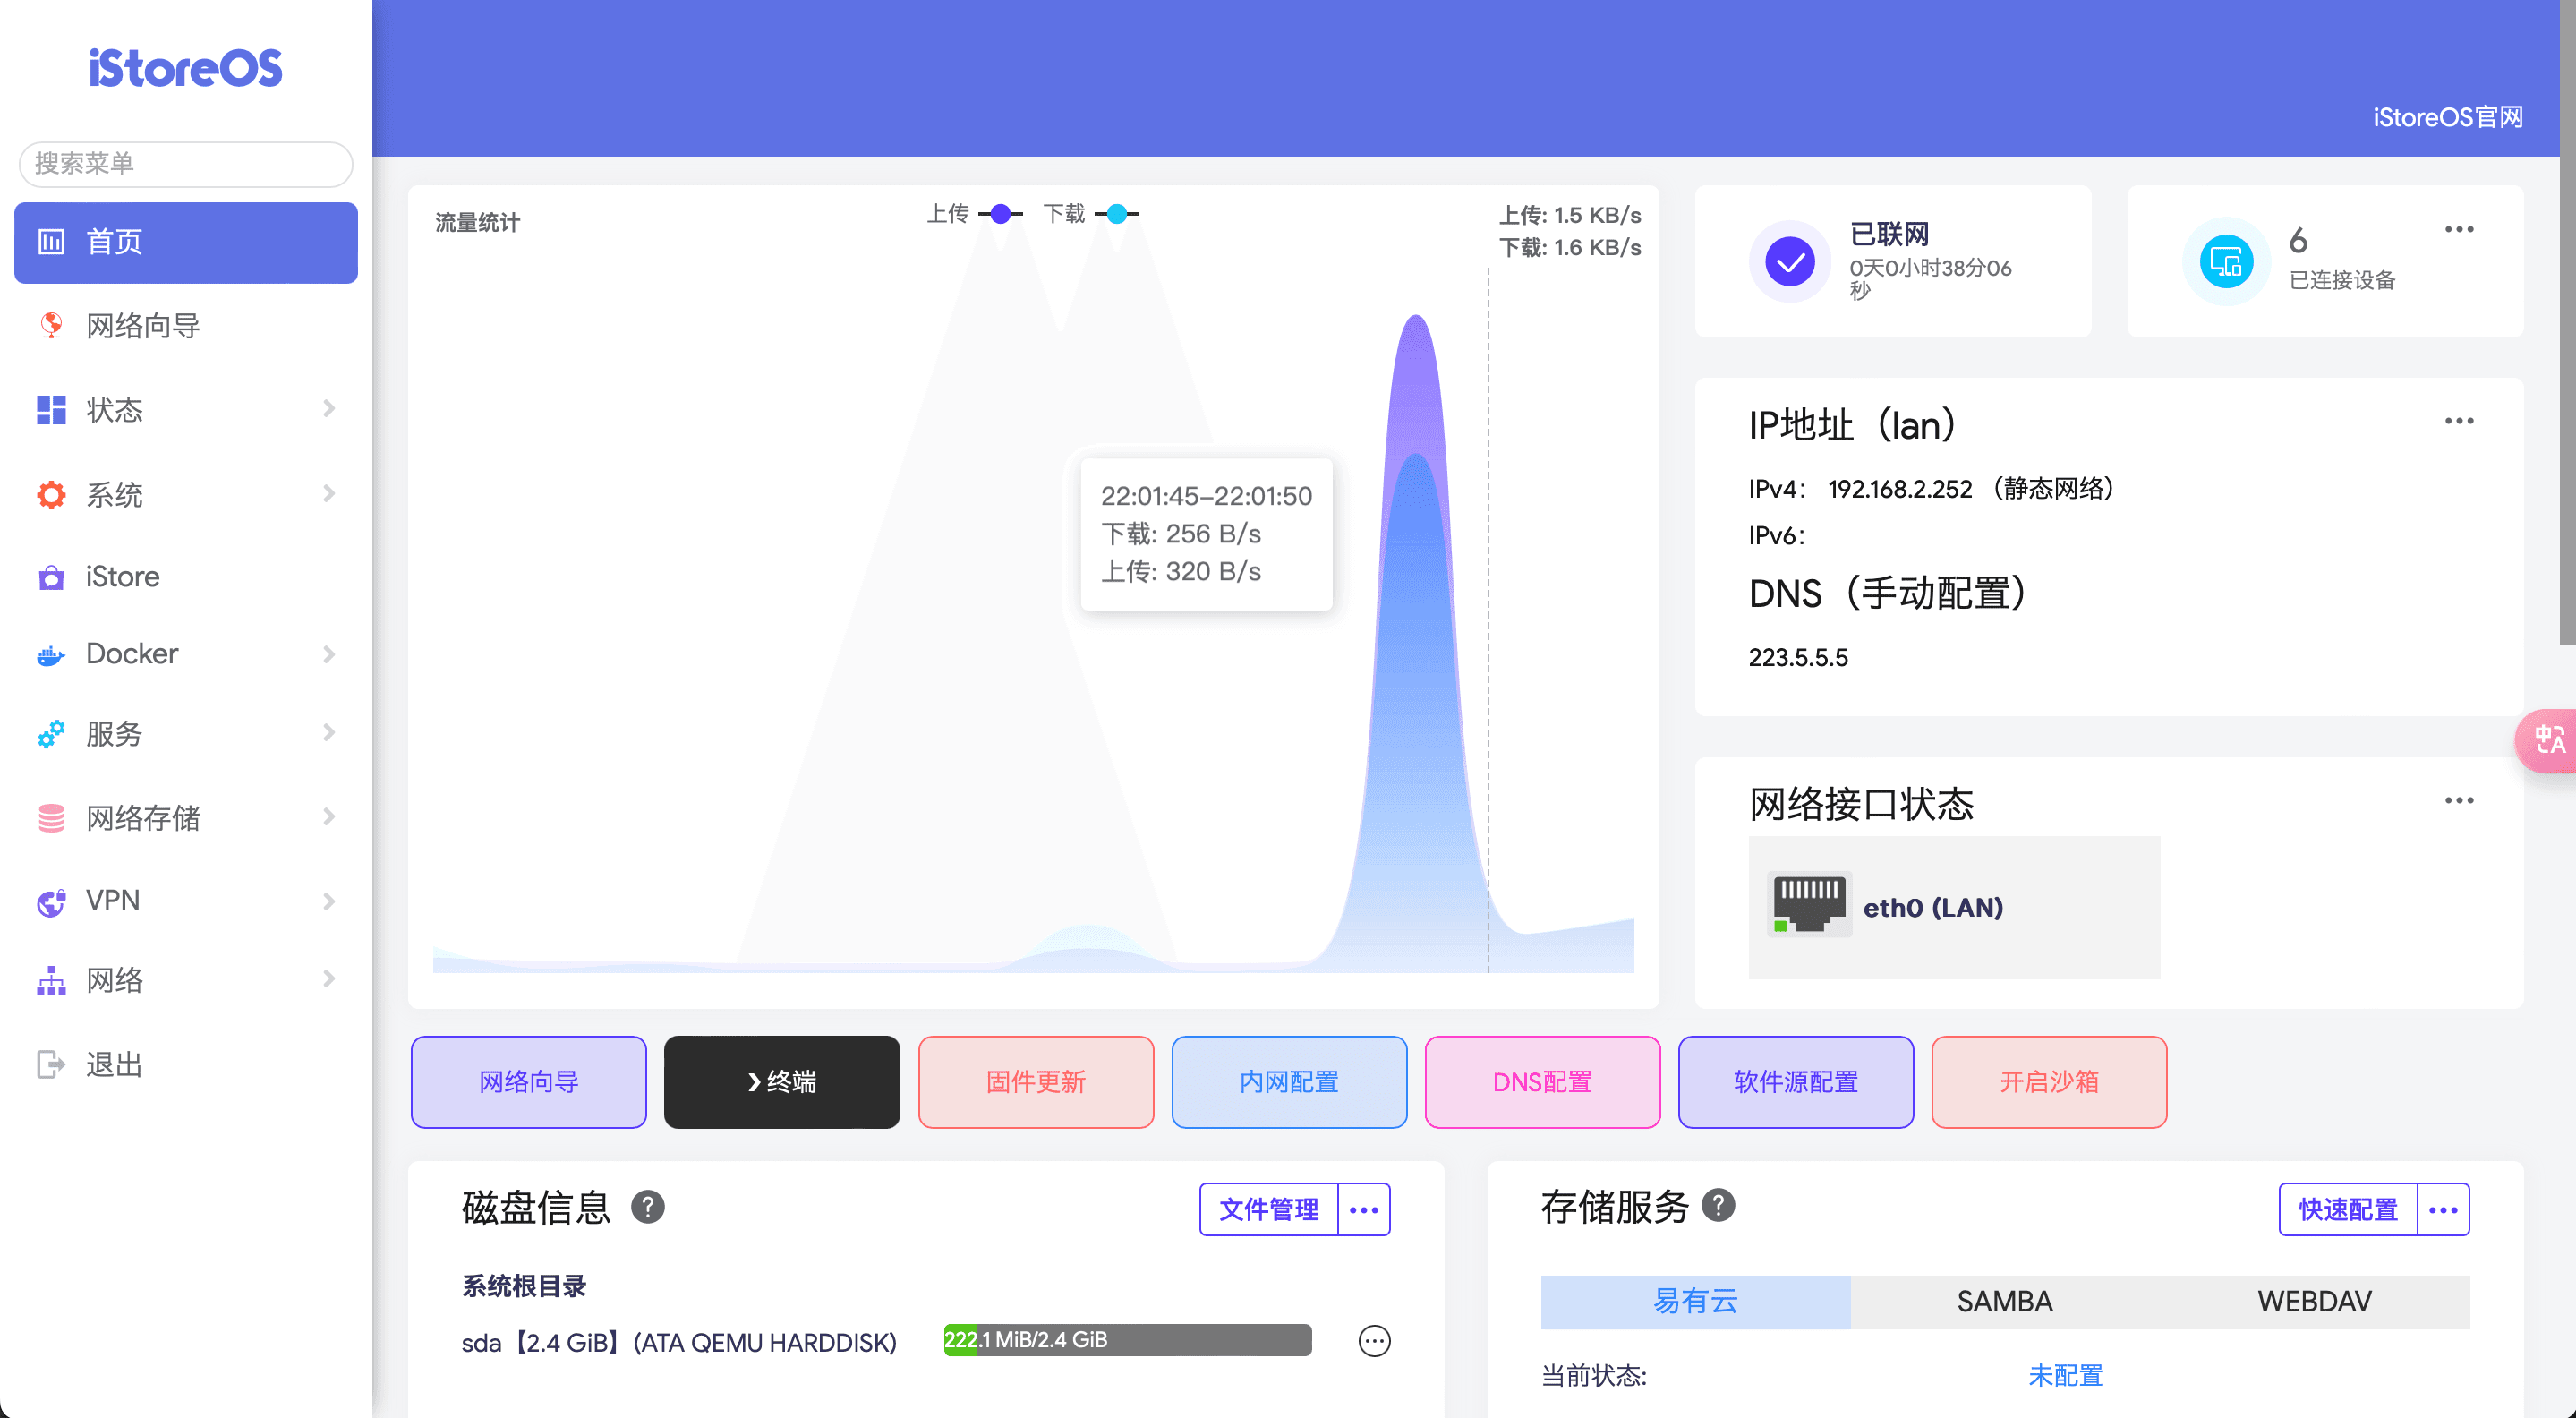
黑色输出框右上角变绿色就表示安装完了,再配合上国产下载源,安装应用的舒适性比起上一期openwrt 安装 adguard home 核心好多了
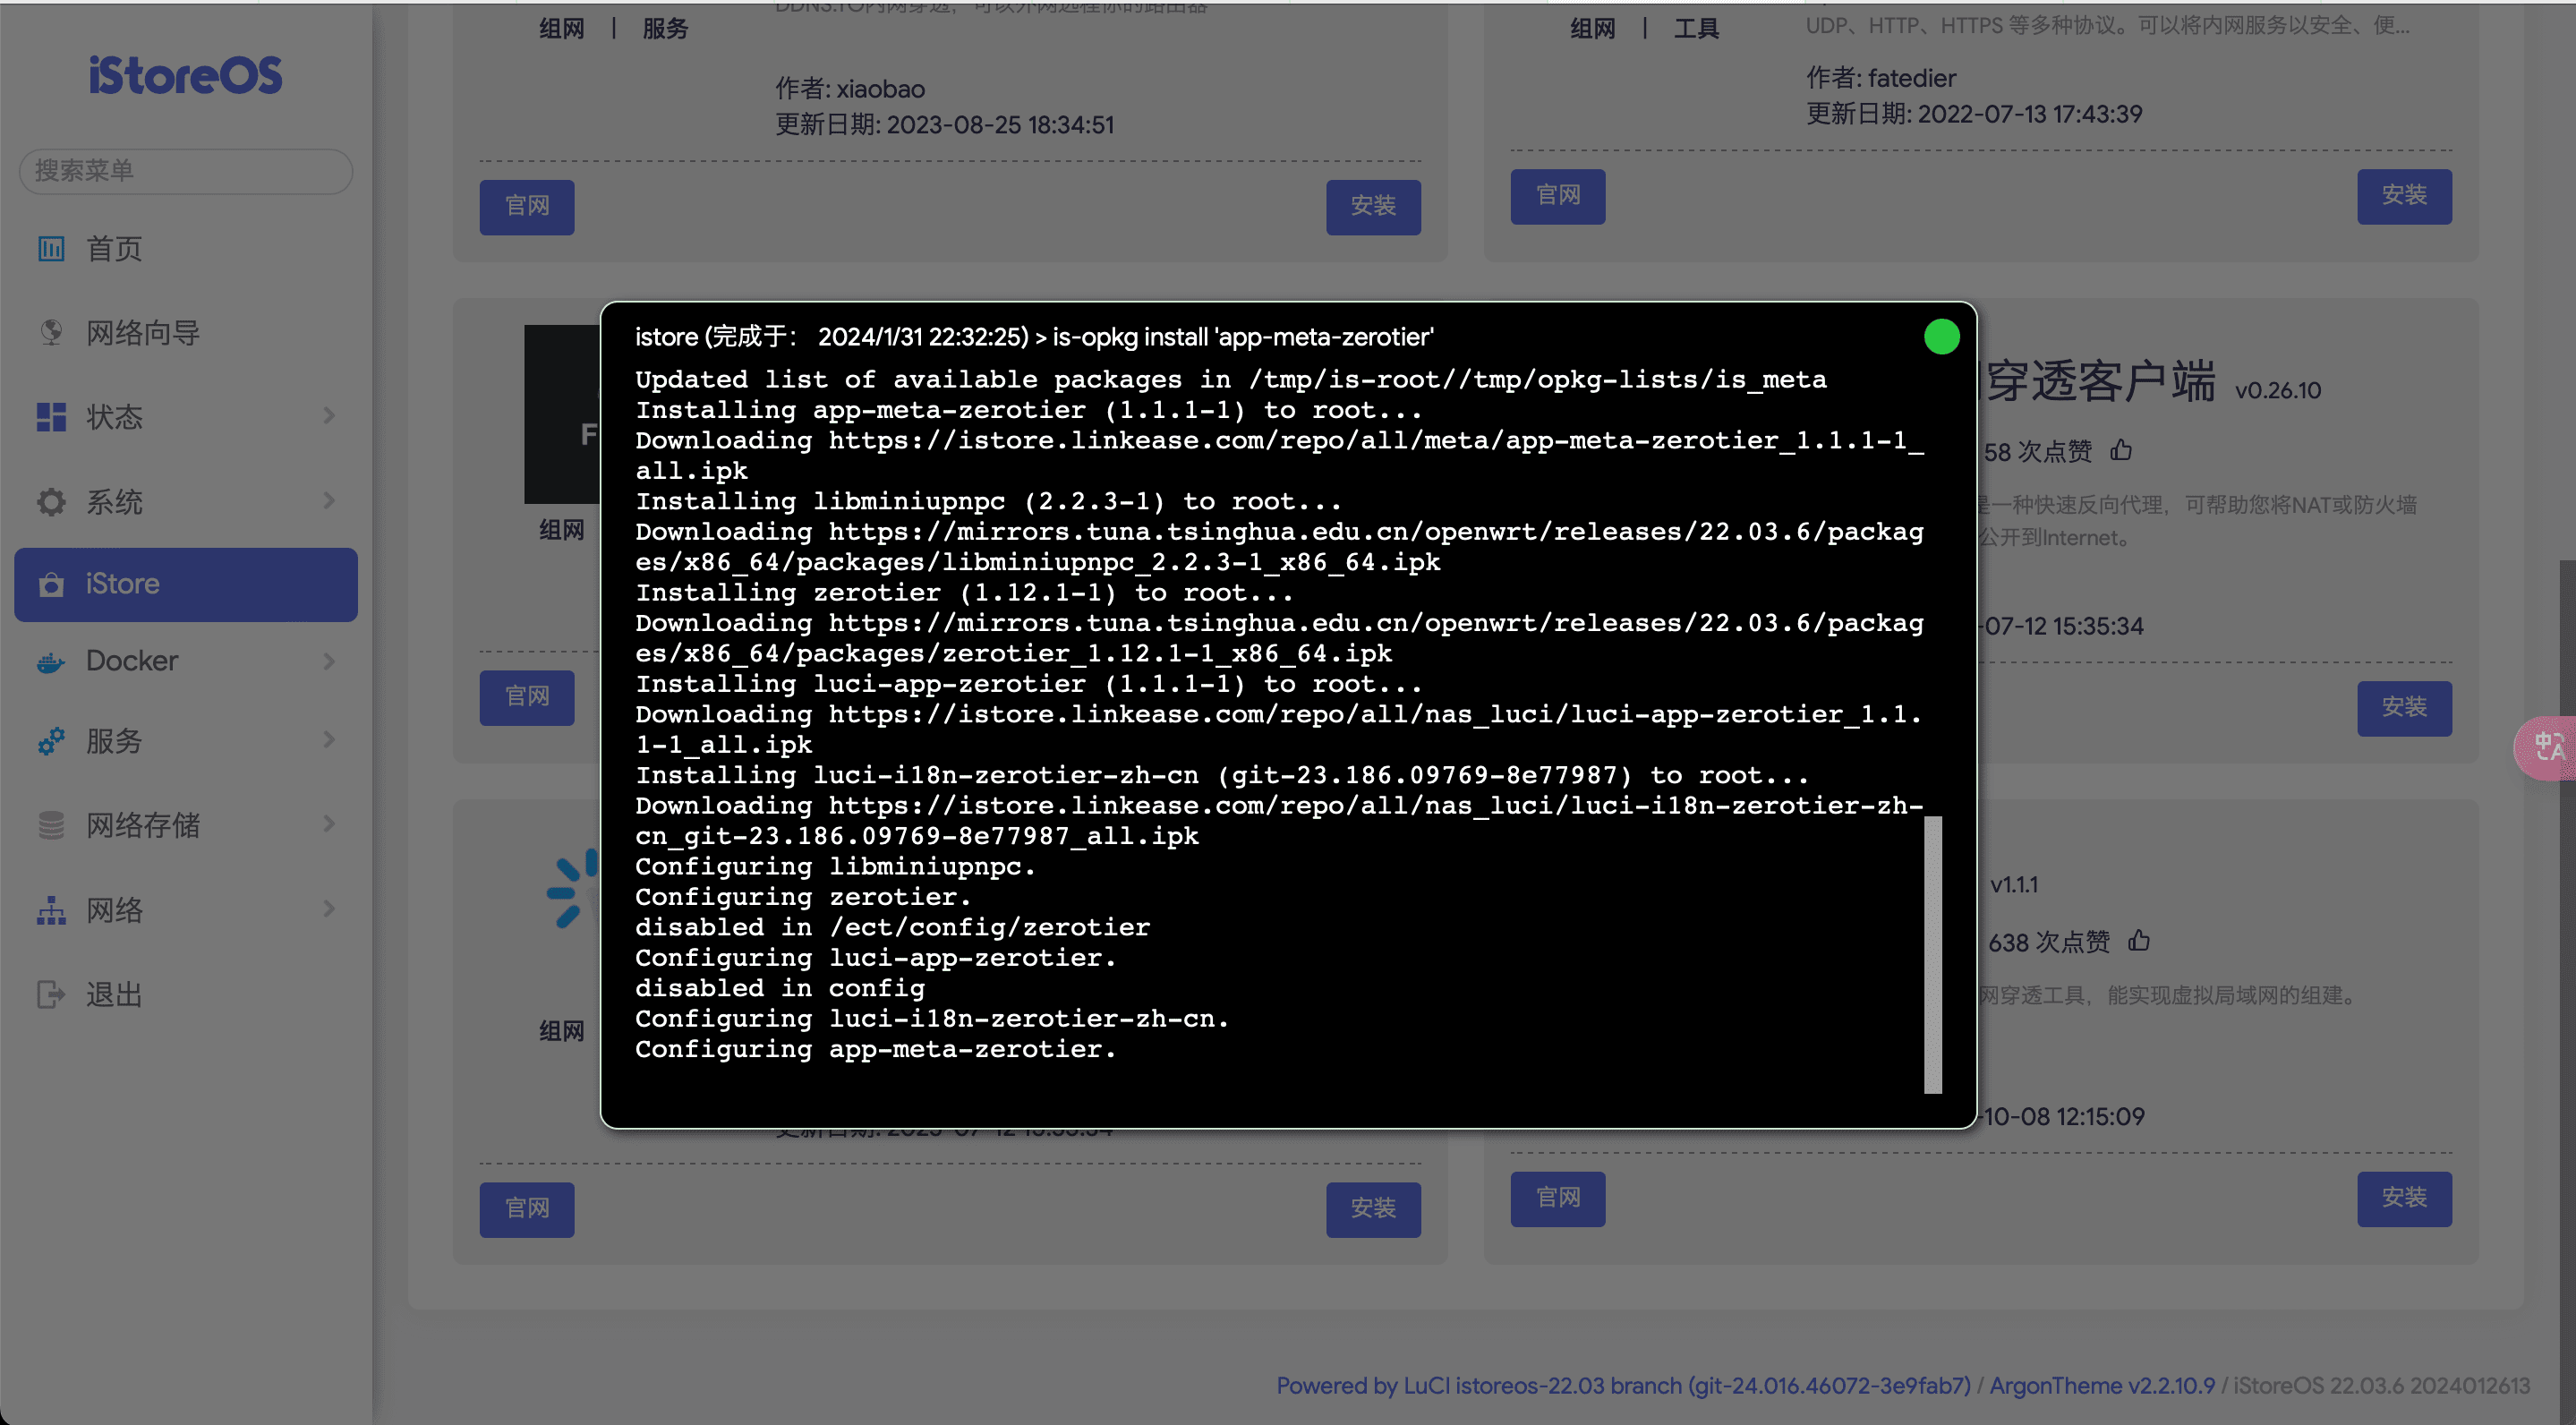
istoreos 安装 zerotier 实现公网访问内网服务#
内网穿透工具 ZeroTier,从简单到复杂的玩法,无保留,一期全放送这个视频讲得非常好,直接又详细
zerotier 服务器毕竟在国外,国内 ipv4 速度肯定达不到百兆水平,但是访问下服务页面做下配置绰绰有余
如果你也像我一样 istoreos/op 只是用来上网 / 旁路由,那么只需要参考视频教程做以下几个操作:
- istoreos 上创建新的接口,指向新的防火墙,防火墙进出全开,视频里有
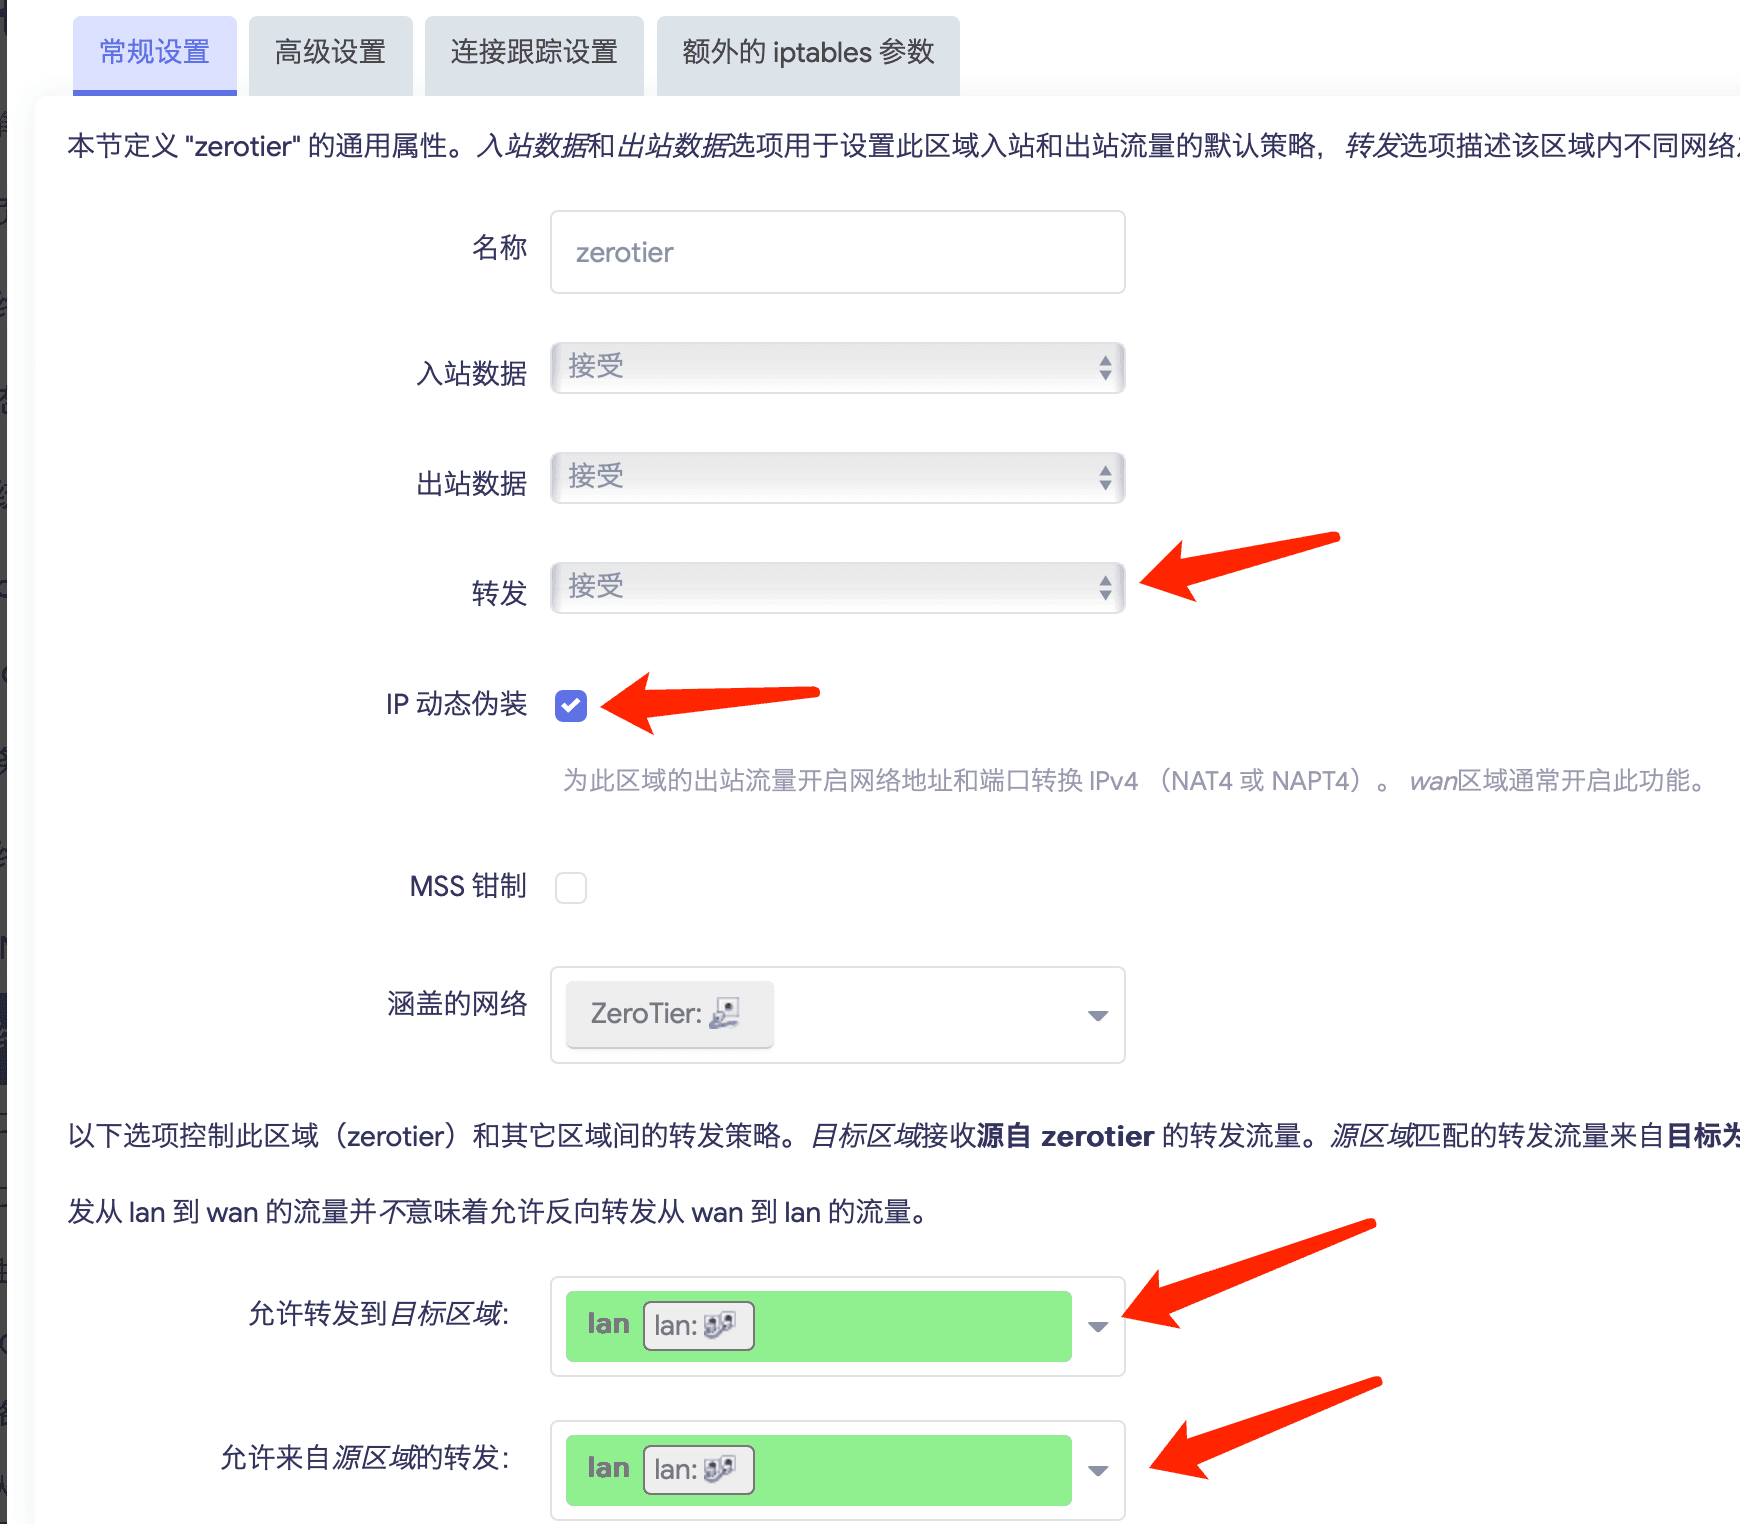
- istoreos 防火墙配置中把你的原本的 LAN 口勾选上伪装 IP 地址,其实就是开启 NAT,视频里有
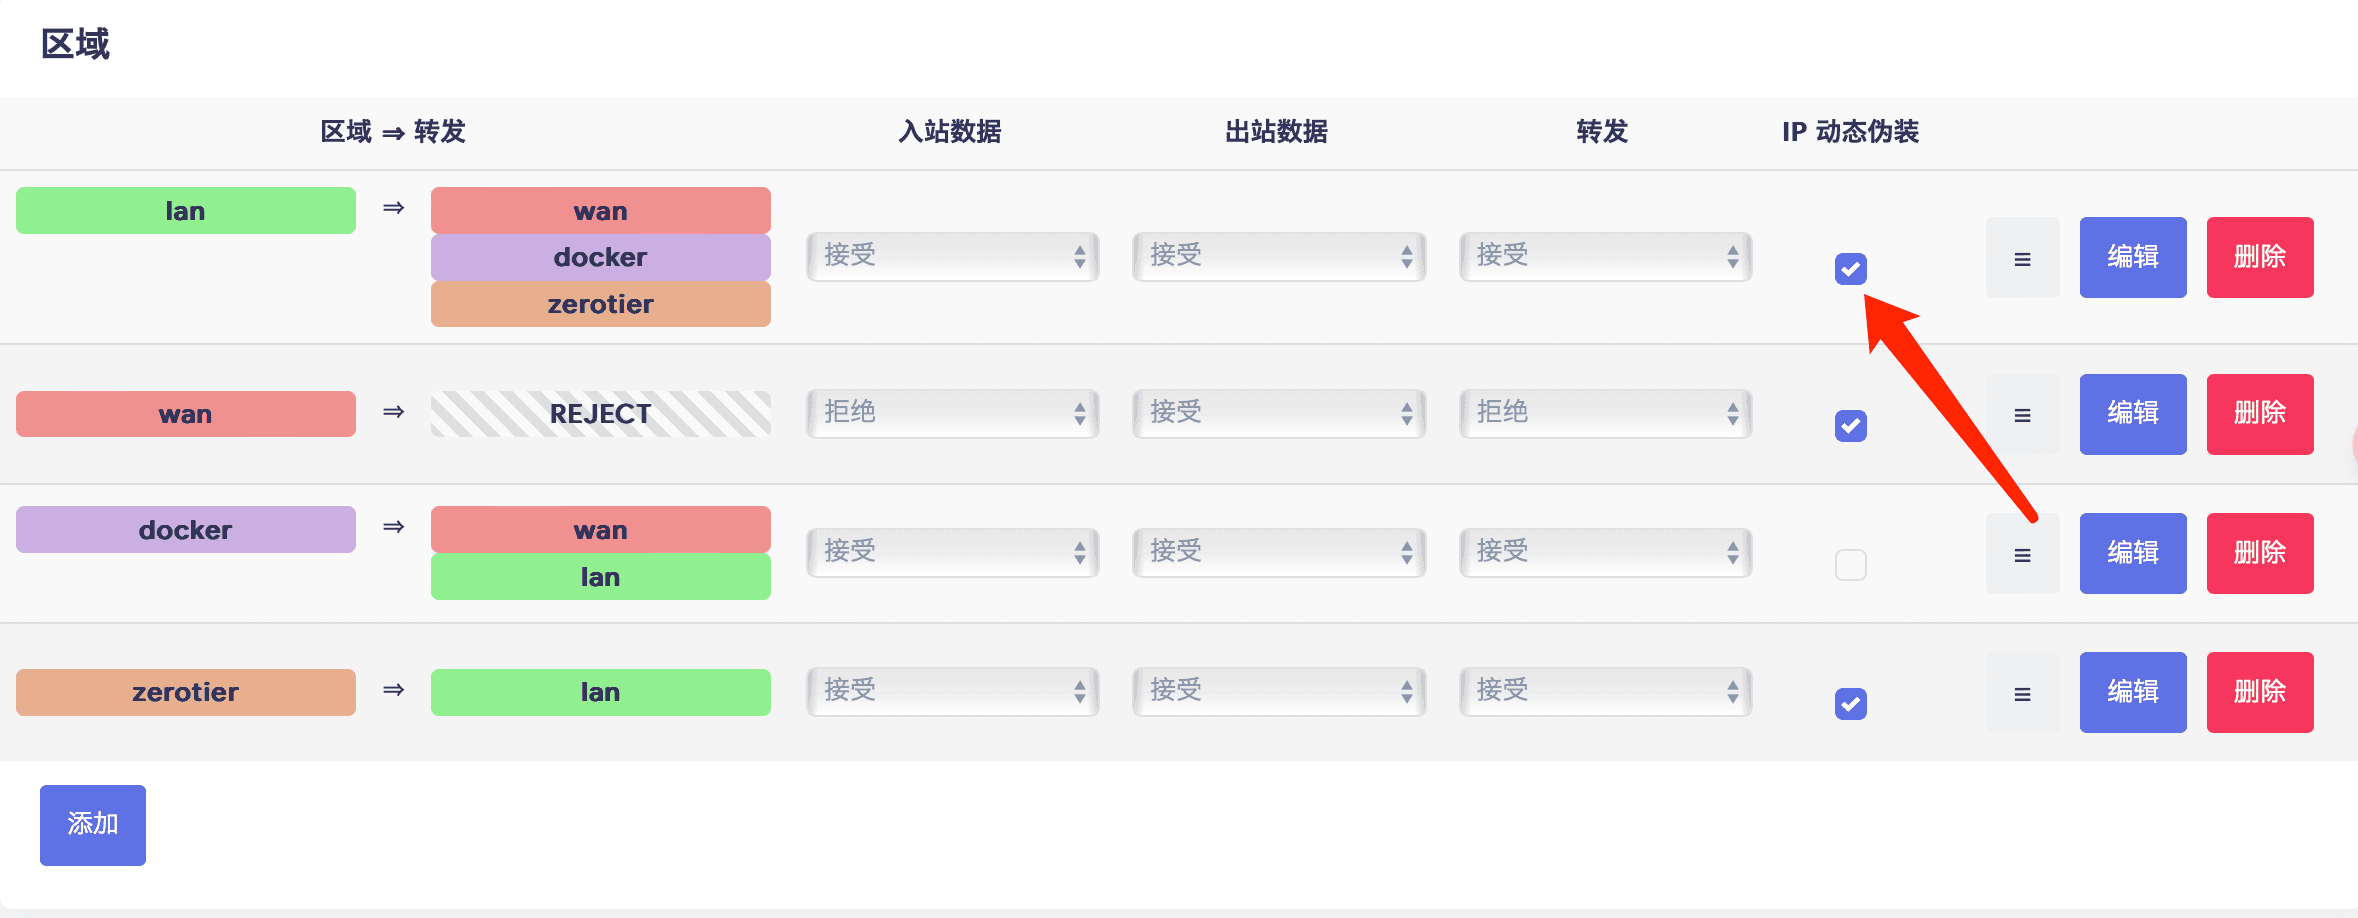
- istoreos 防火墙通信规则创一条入 9993 端口规则,视频里有
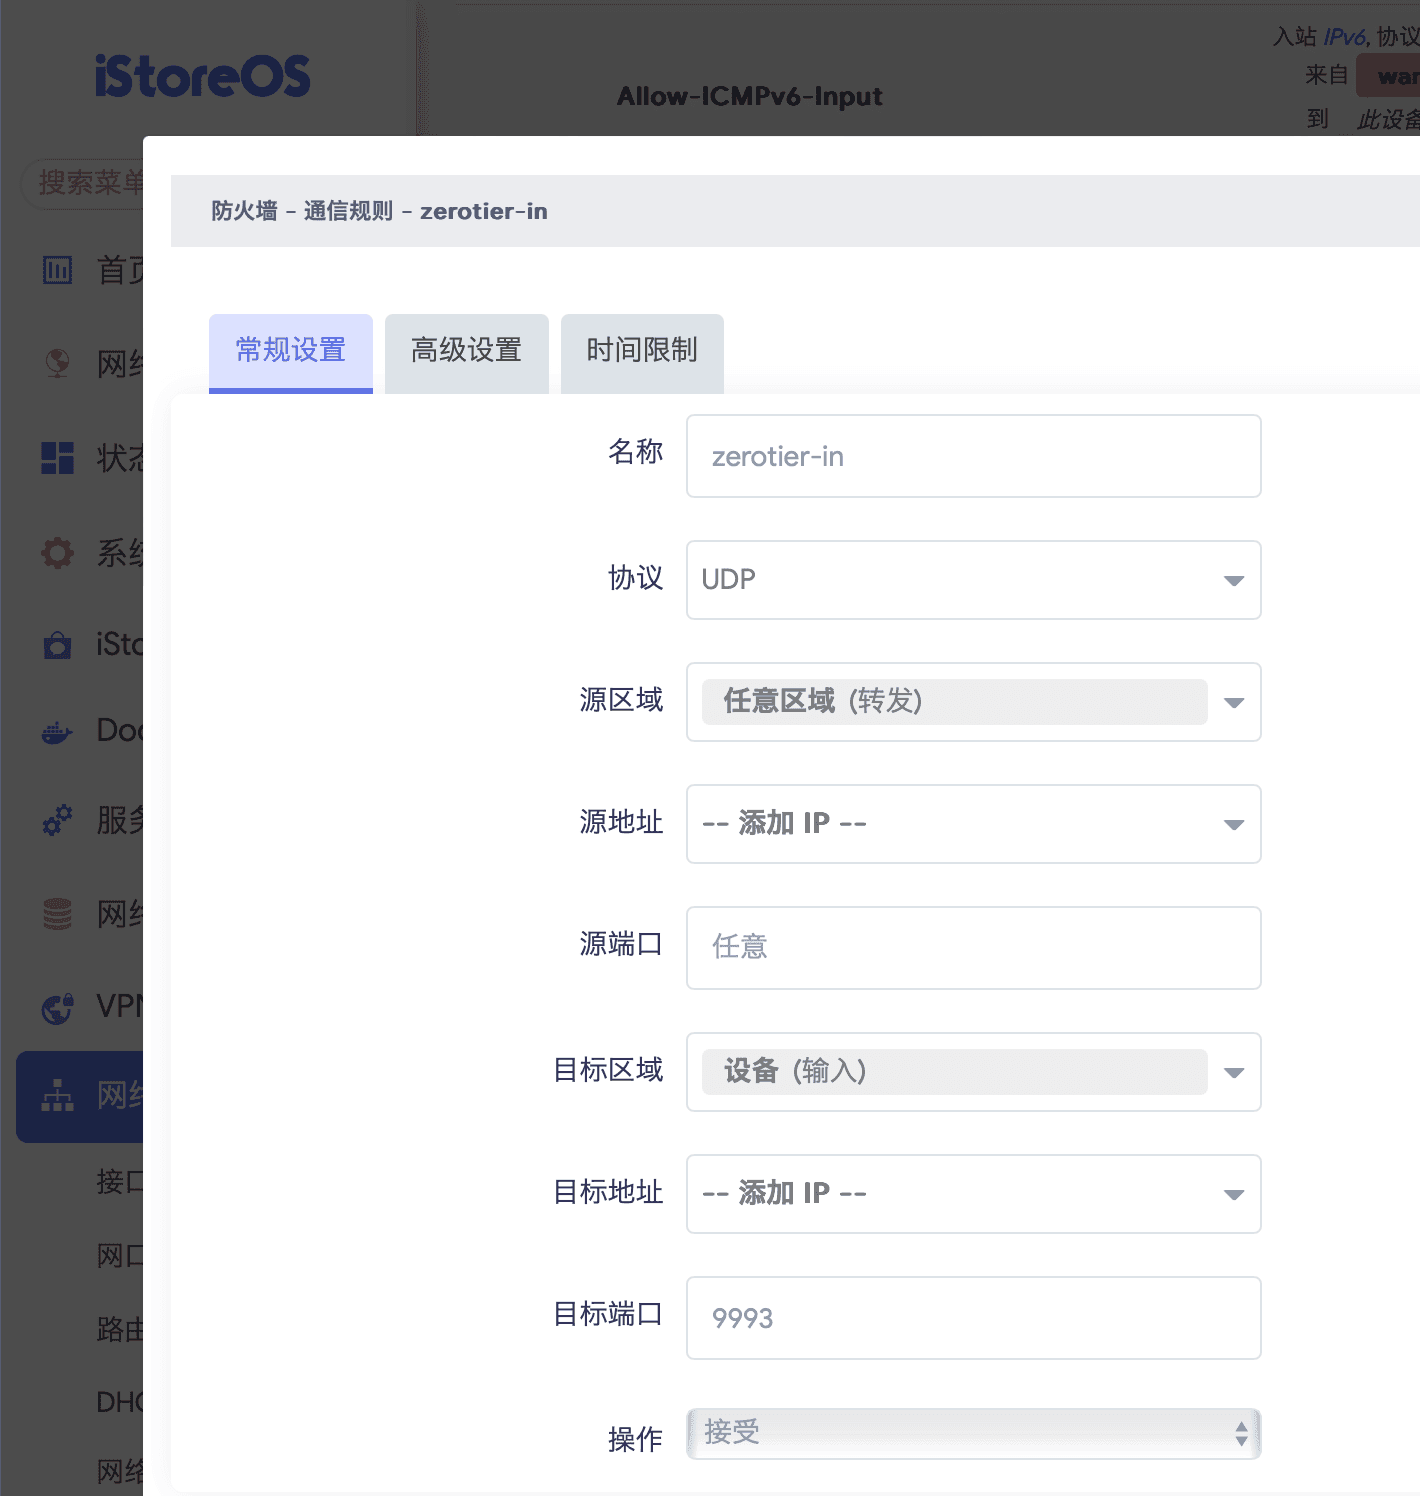
- zerotier 官网页面配置除了将新加入的设备全部勾选外,配置一条路由,路由内容为你内网网段,路由网关指向你的 istoreos/op 在 zerotier 官网分配得到的 ip
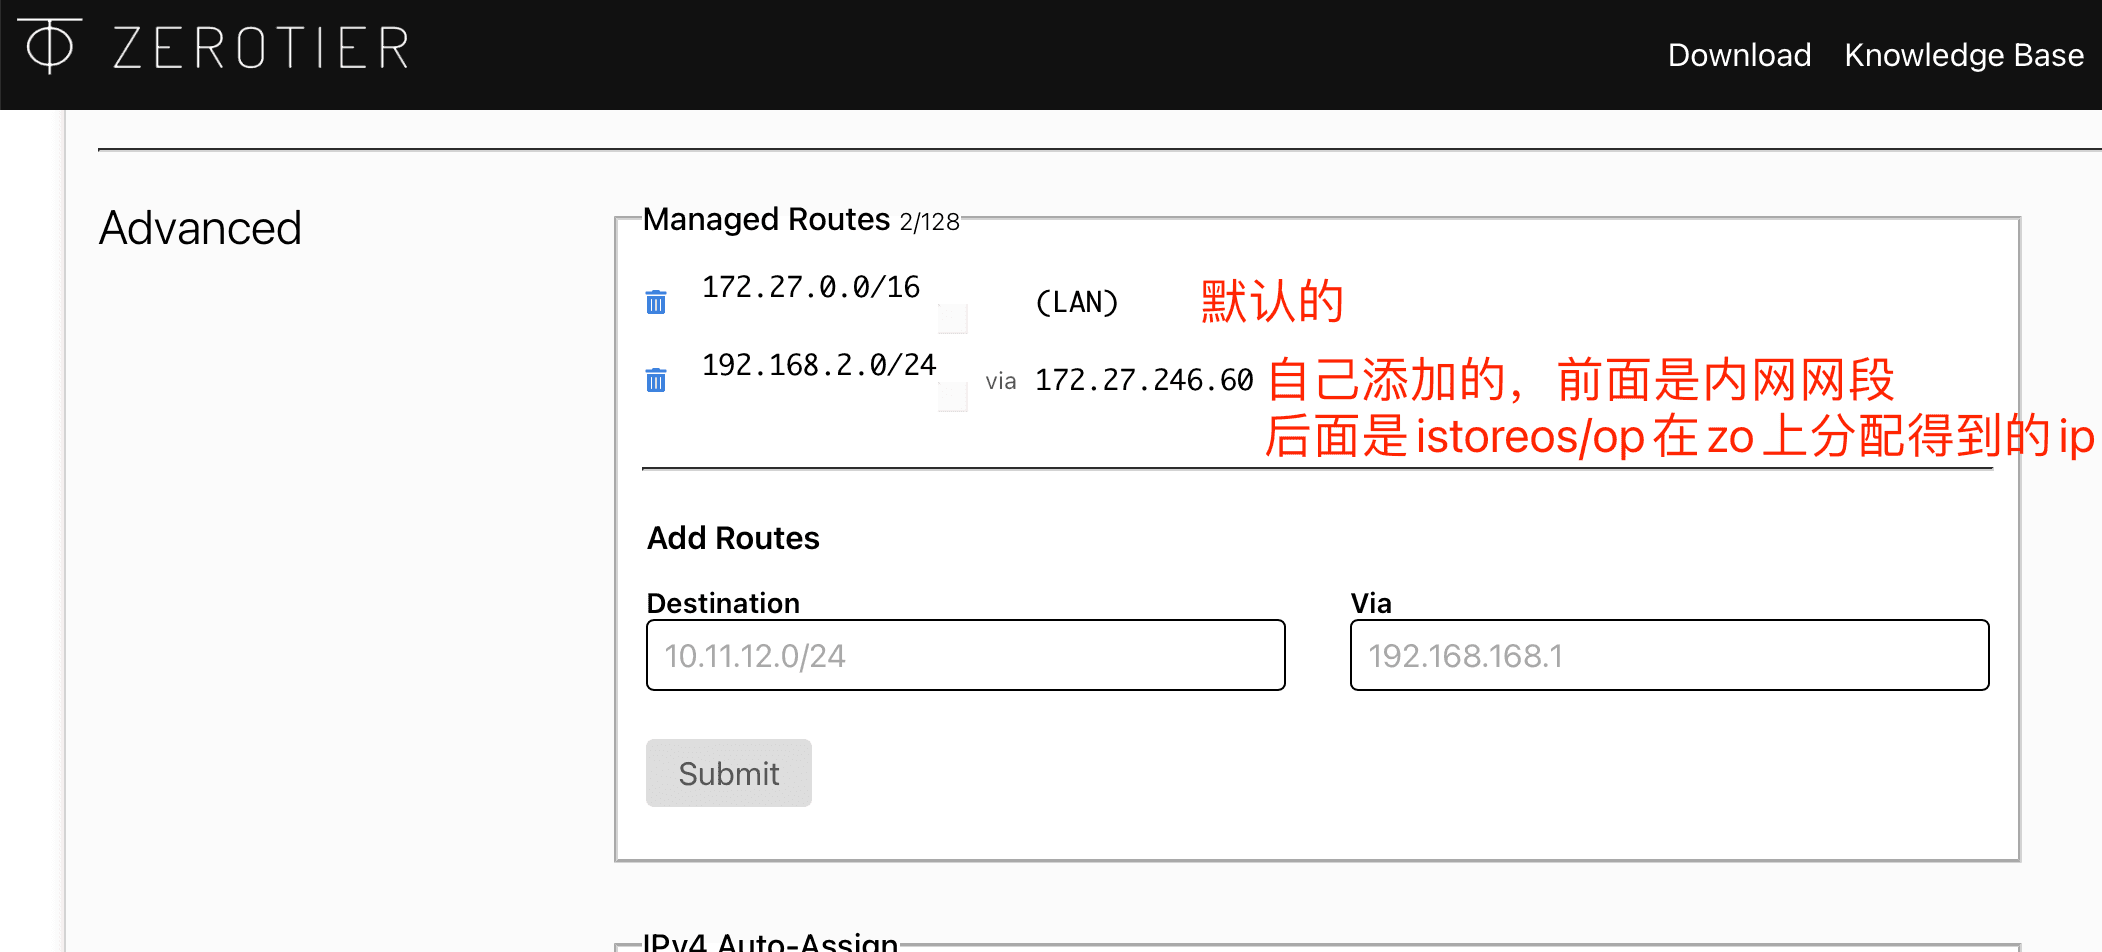
然后你就莫名其妙可以手机 4G 开着 zerotier vpn 访问你的 192 内网服务地址了
懒得~不会~打码视频,就不放了
嘿嘿,互联网很神奇吧,记得重启完还能正常使时创建个快照
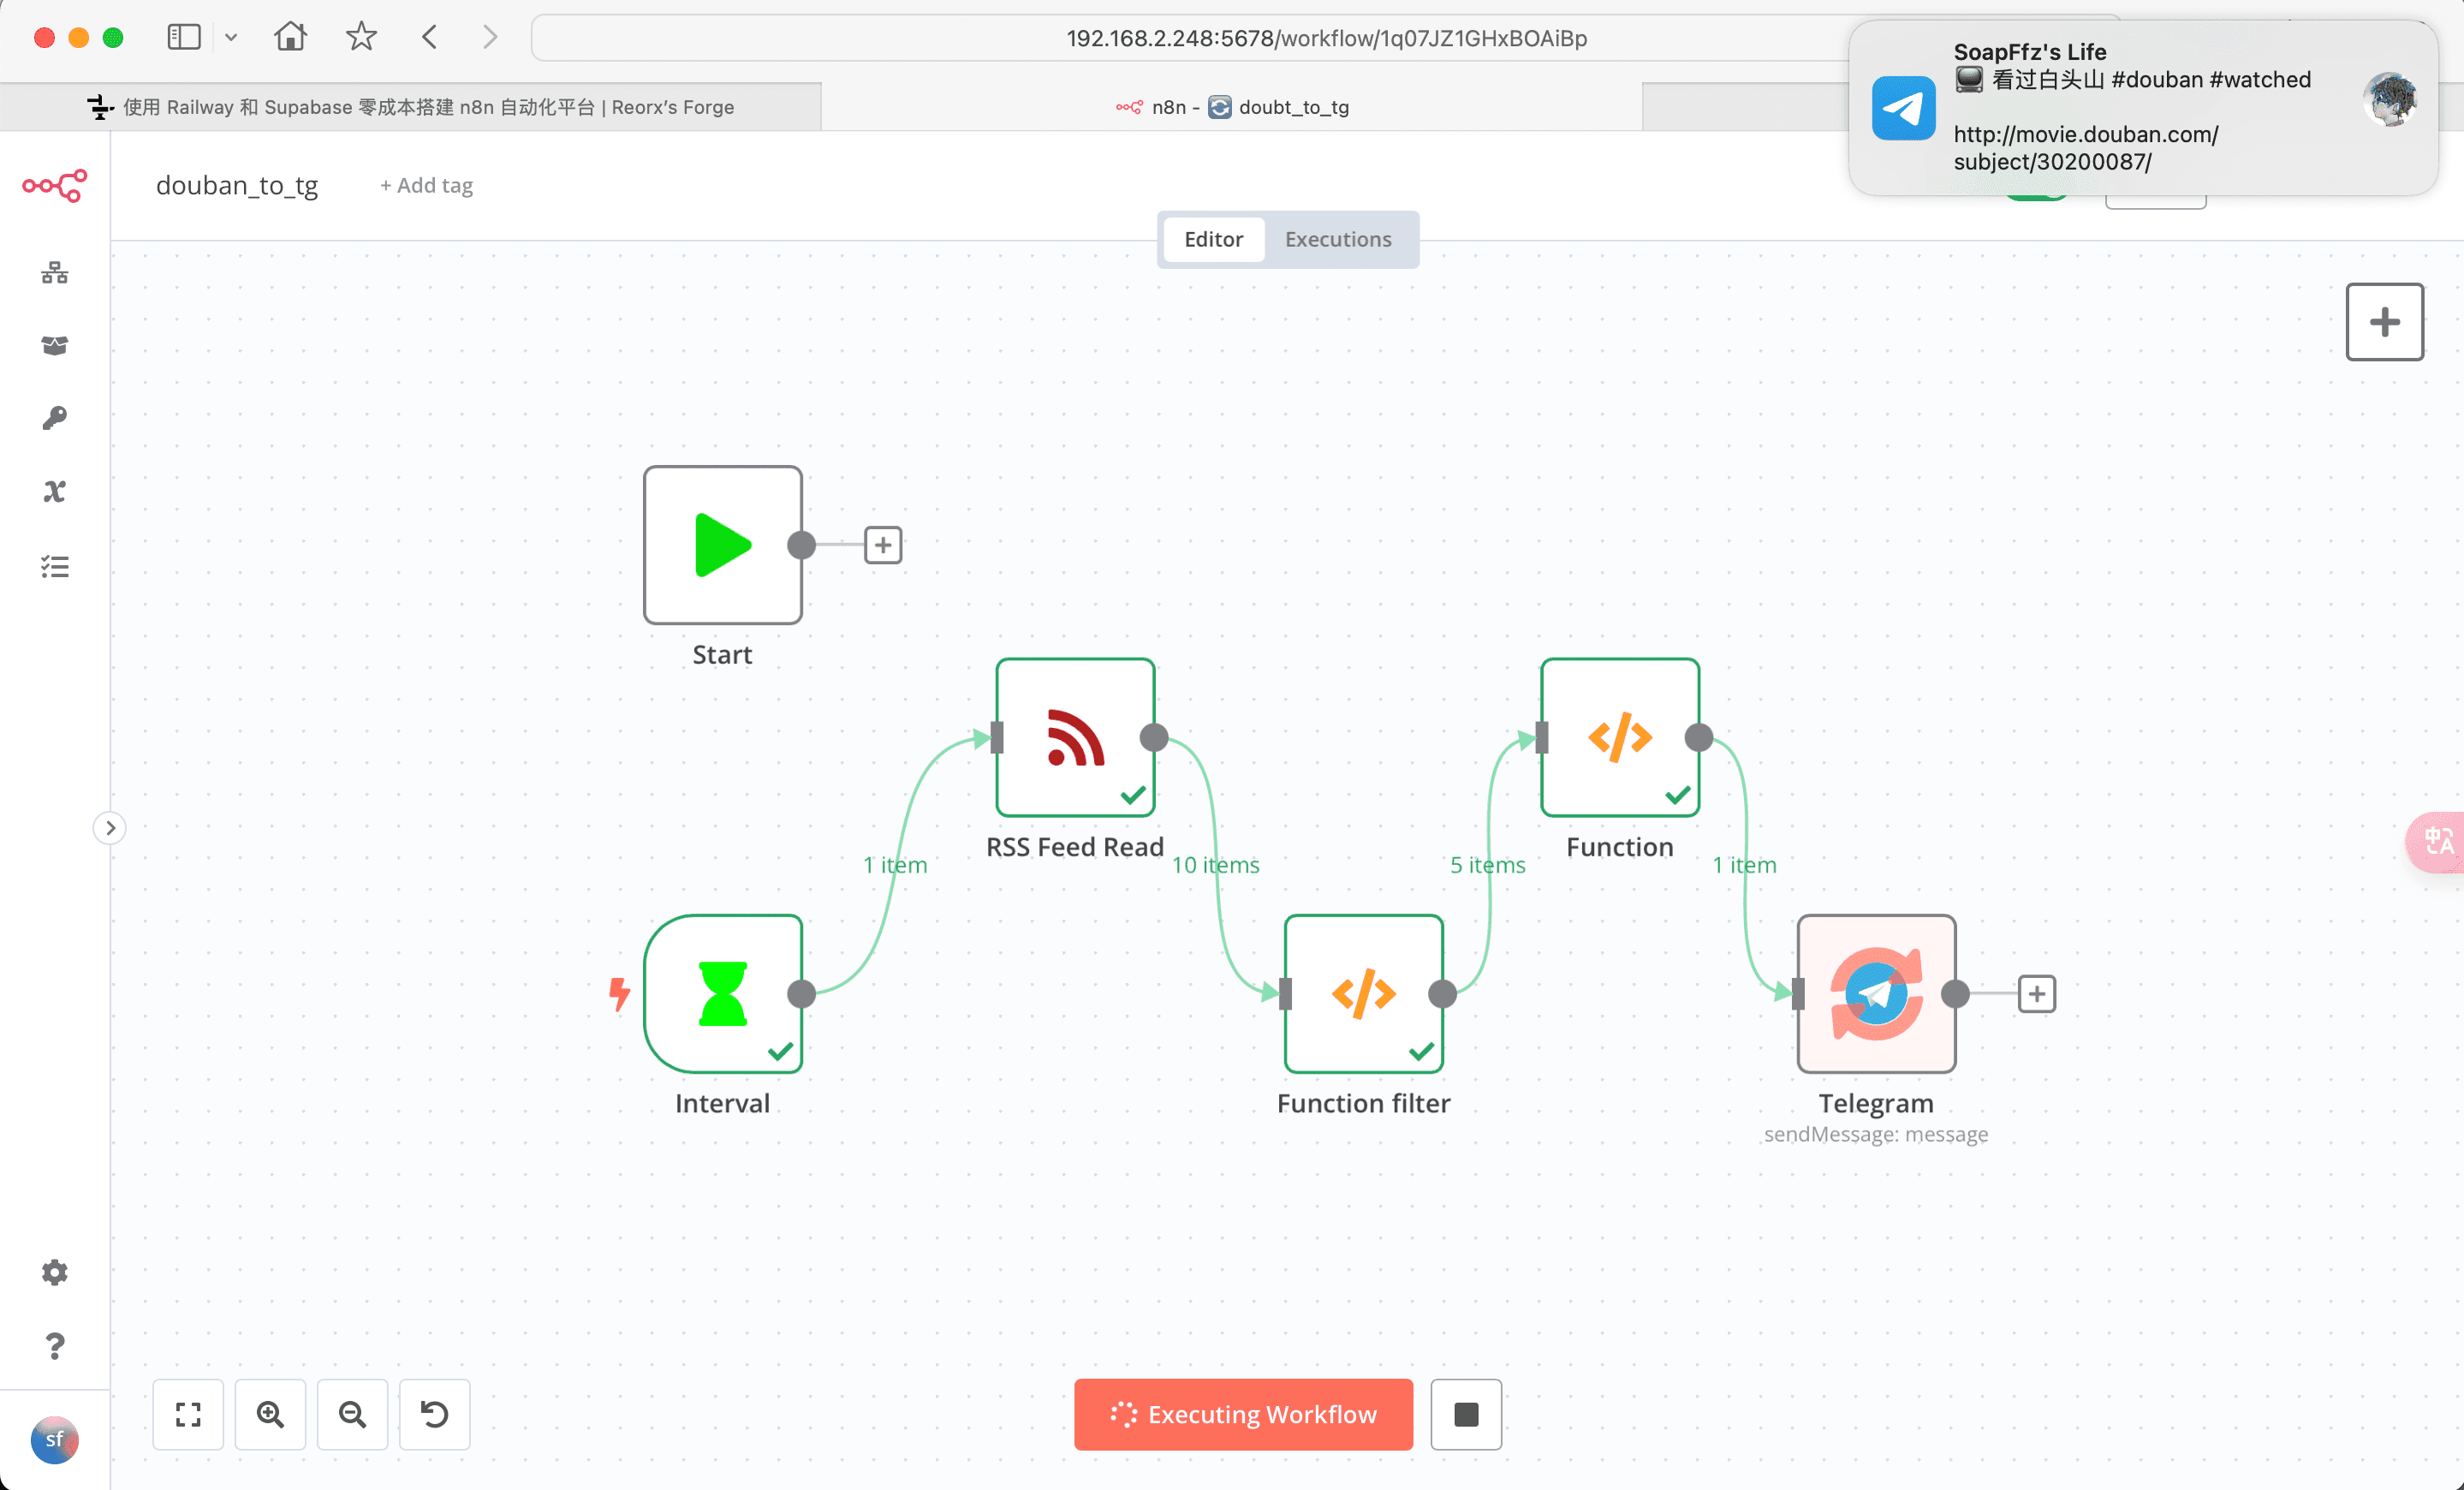
n8n 搭建及初始化#
n8n 是一个基于节点的工作流自动化工具。
不折腾argo-workflows的原因是因为我太菜了,k8s 入门太难了
- 由于使用 docker 或者 docker-compose 等方式安装的 n8n,如果要使用外部工具需要在 docker 容器内安装,所以建议使用 cnpm 安装在本机
apt-get install npm nodejs && npm cache clean --force && npm config set registry https://registry.npmmirror.com && npm install -g cnpm && cnpm install n8n -g && cnpm install pm2 -g
- 创建一个名为 start-n8n.sh 的脚本文件,并添加以下内容:
#!/bin/bash
n8n start --tunnel
- 确保这个脚本有执行权限:
chmod +x start-n8n.sh
- 使用 PM2 启动这个脚本:
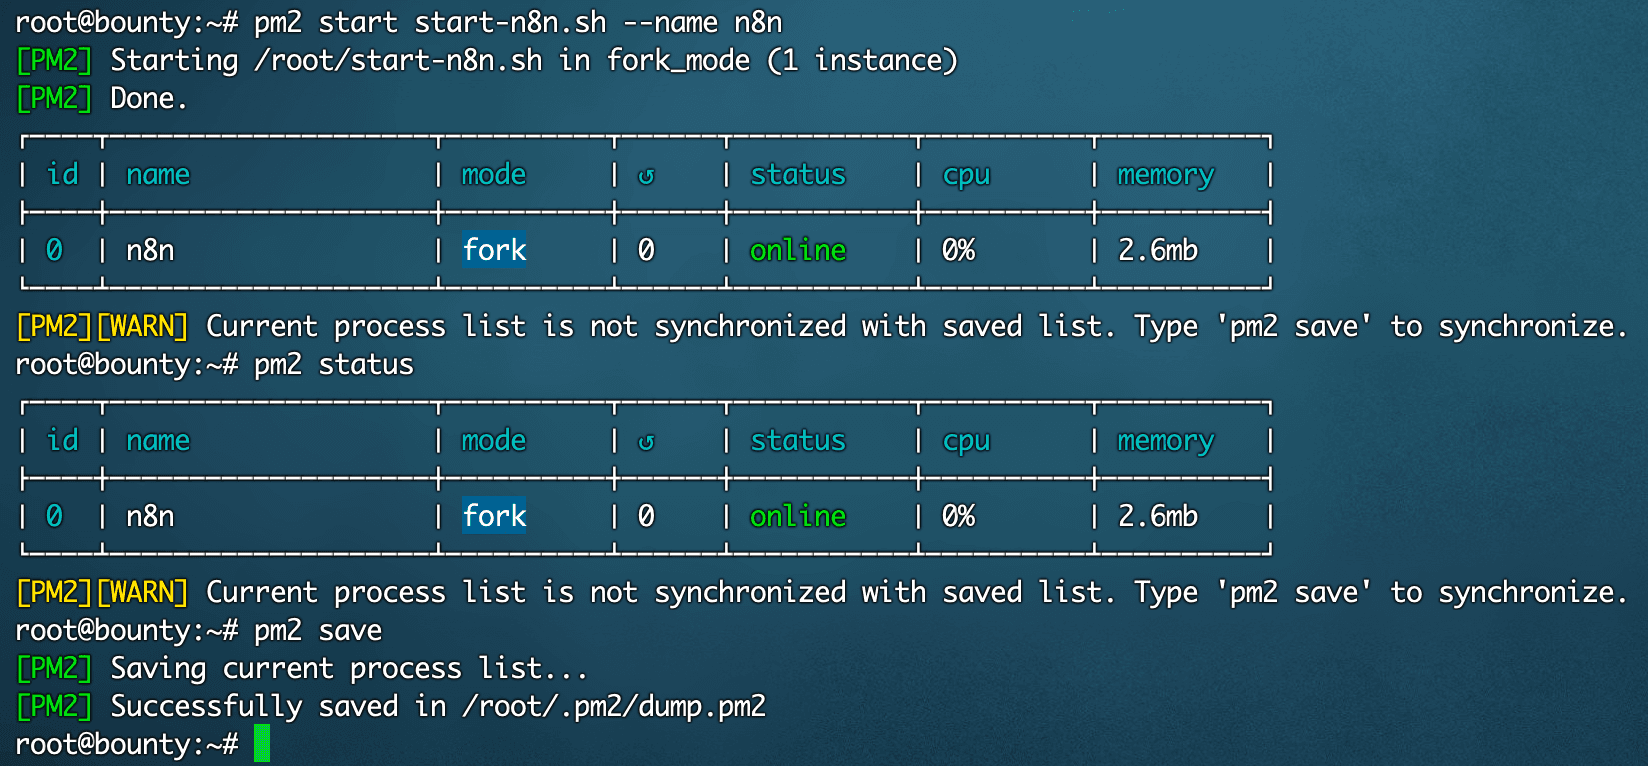
pm2 start start-n8n.sh --name n8n
- 这样,PM2 将直接管理这个 shell 脚本,而脚本则负责启动 n8n。这可以避免直接通过 PM2 启动 n8n 时可能遇到的脚本兼容性问题。
- 保存 PM2 进程列表:为了确保在系统重启后 PM2 能够记住并重新启动 n8n,你需要保存当前的 PM2 进程列表。使用以下命令来保存:
pm2 save
- 这条命令会将当前运行的 PM2 进程列表保存下来,包括你刚刚启动的 n8n 进程。
pm2 status
- 这条命令会显示所有由 PM2 管理的进程的状态。你应该能在列表中看到名为 n8n 的进程,并且状态应该是在线(online)。
- n8n 在长期的使用过程中,可能会需要一些自定义的环境变量,所以我们先停止,这里是为了顺便让你知道怎么停止(doge
pm2 delete n8n
- 修改 start-n8n.sh 脚本内容为
#!/bin/bash

# 加载.env文件中的环境变量
set -a # 自动导出变量
source .env
set +a # 关闭自动导出变量

# 启动n8n
n8n start --tunnel
- 在start-n8n.sh 同目录新建.env 文件,根据个人需求修改内容
# 代理设置
HTTP_PROXY=http://192.168.2.252:7890
HTTPS_PROXY=http://192.168.2.252:7890
NO_PROXY="0.0.0.0/8,10.0.0.0/8,100.64.0.0/10,127.0.0.0/8,169.254.0.0/16,172.16.0.0/12,192.168.0.0/16,224.0.0.0/4,240.0.0.0/4"

# 时区设置
TZ=Asia/Shanghai

# n8n日志级别
N8N_LOG_LEVEL=verbose

# n8n API和Webhook的基础URL
VUE_APP_URL_BASE_API=http://n8n-local:5678/
WEBHOOK_URL=http://n8n-local:5678/
-
重新使用
pm2 start start-n8n.sh --name n8n启动即可 -
VUE_APP_URL_BASE_API 和 WEBHOOK_URL 主要用于配置 n8n 实例的访问路径,对于确保外部服务能够正确回调到你的 n8n 实例至关重要。
-
这些设置对于 n8n 向外部服务发起请求的能力没有直接影响。n8n 访问外部服务的能力主要通过节点配置实现,而不是通过这些 URL 设置。
-
在需要外部服务回调到 n8n 的场景下,确保 WEBHOOK_URL 正确设置是必要的。
-
n8n start --tunnel 命令启动 n8n 时,会创建一个临时的公网可访问的 URL,通过 n8n 提供的隧道服务实现。这个 URL 主要用于开发和测试目的,使得在没有固定公网 IP 或域名的情况下,外部服务可以临时访问到你的 n8n 实例。

备忘:istoreos 安装 oc/pw#
到 oc最新版本界面下载 oc
到openwrt 官方下载地址下载核心,格式为 kernel_xxx_x86_64.ipk
并参考 oc 的 release 界面在控制台需要的组件
opkg update && opkg install coreutils-nohup bash iptables dnsmasq-full curl ca-certificates ipset ip-full iptables-mod-tproxy libcap libcap-bin ruby ruby-yaml kmod-tun kmod-inet-diag unzip luci-compat luci luci-base kmod-nft-tproxy
系统 - 文件传输,上传并复制文件路径终端中安装
opkg install /tmp/upload/kernel_6.1.74-1-83764a037d5da4b65844fa9bc9d55bc3_x86_64.ipk
opkg update
opkg install /tmp/upload/luci-app-openclash_0.45.157-beta_all.ipk
安装完可能会假死,重启所需应用就在服务中了。如果订阅更新不成功可以尝试将覆写设置中的 github 地址修改为加速地址,或者降级 clash。
也可以在这个页面去下载 pw,选择 istore - 手动安装即可。