Cause#
Originating from the computer network course design at the end of the semester, the original topic was to implement FTP protocol-related functions based on DELPHI.
Since I could choose any language, I decided to use the world's best Python (no rebuttals accepted) #(blushing)
This article will reproduce a communication software based on socket communication according to the reference article.
** Since the socket communication part is not too difficult, this article will not explain too much **
Reference article:
The Simplest Socket Communication#
server side code is as follows:
# -*- coding: utf-8 -*-
'''
@author: soapffz
@function: Simple socket communication (server)
@time: 2019-07-07
'''

import socket
host = ''
port = 50007
s = socket.socket(socket.AF_INET, socket.SOCK_STREAM)  # Create a socket tcp communication instance,
s.bind((host, port))  # Bind ip and port, note that bind only accepts one parameter, (host, port) as a tuple
s.listen(5)  # Start listening, the number inside represents the maximum number of connections the server can hold before rejecting new connections, but it has been tested and is not useful, so just write 1

while True:
    conn, addr = s.accept()  # Accept connection and return two variables, conn represents a new instance generated by the server for each new connection, which can be used for sending and receiving later, addr is the address of the incoming client, the accept() method will return conn, addr when a new connection comes in, but if there is no connection, this method will block until a new connection comes.

    print('Connected by', addr)
    while True:
        data = conn.recv(1024)  # Receive 1024 bytes of data
        if not data:
            break  # If no data is received from the client (indicating the client has disconnected), disconnect
        print("Received message:", data)
        conn.sendall(data.upper())  # Convert the received data to uppercase and send it back to the client
    conn.close()  # Close the connection
client side:
# -*- coding: utf-8 -*-
'''
@author: soapffz
@function: Simple socket communication (client)
@time: 2019-07-07
'''

import socket
host = '192.168.2.1'  # Remote socket server ip
port = 50007
s = socket.socket(socket.AF_INET, socket.SOCK_STREAM)  # Instantiate socket
s.connect((host, port))  # Connect to socket server

while True:
    msg = input("Please input:\n").strip().encode('ascii')
    s.sendall(msg)  # Send message to server
    data = s.recv(1024)  # Receive message from server

    print("Received:", data)
s.close()
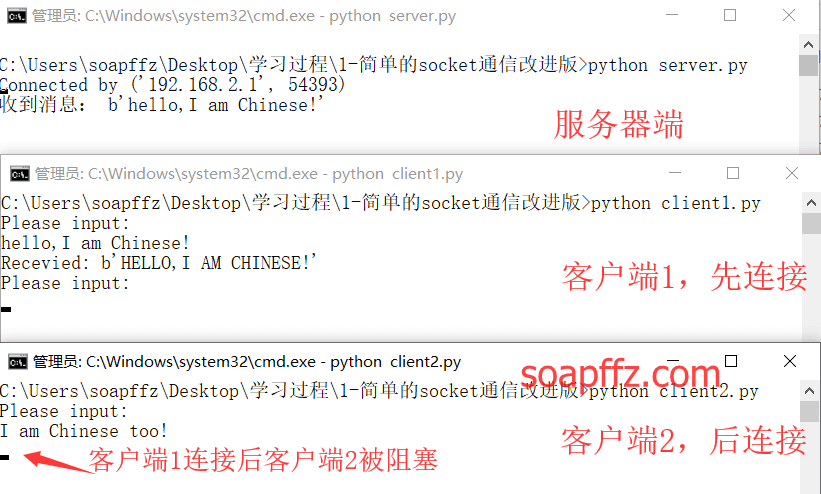
The demonstration effect is as follows:

SocketServer Multithreaded Version#
When we start 2 clients simultaneously, we find that only one client can continuously communicate with the server, while the other client remains in a suspended state.
When the communicable client disconnects, the second client can then communicate with the server.
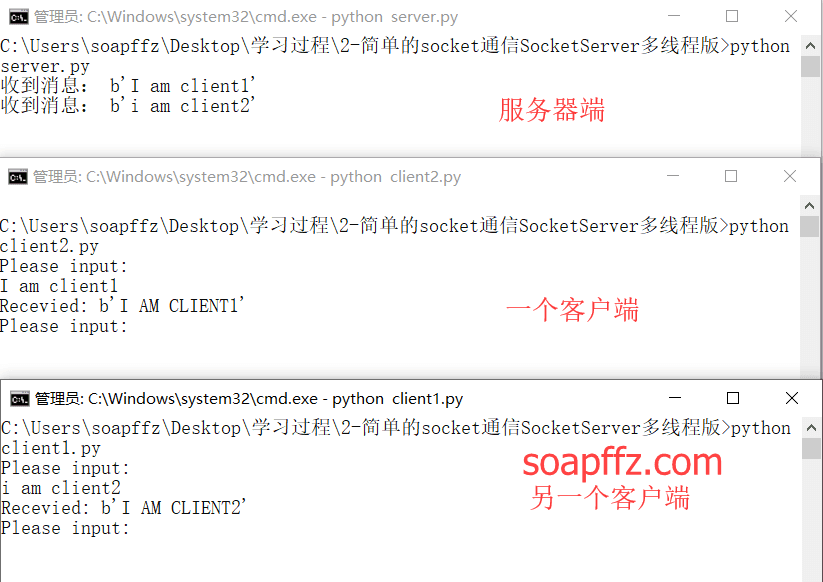
To allow the server to communicate with multiple clients simultaneously, we call a module called SocketServer.
server side code:
# -*- coding: utf-8 -*-
'''
@author: soapffz
@function: Simple socket communication (server)
@time: 2019-07-07
'''

import socketserver


class MyTCPHandler(socketserver.BaseRequestHandler):
    # Inherit from BaseRequestHandler, and must override the handle method, implementing all interactions with the client in the handle method
    def handle(self):
        while True:
            data = self.request.recv(1024)  # Receive 1024 bytes of data
            if not data:
                break
            print("Received message:", data)
            self.request.sendall(data.upper())


if __name__ == "__main__":
    host, port = "localhost", 50007

    # Pass the class we just wrote as a parameter to the ThreadingTCPServer class, the following code creates a multithreaded socket server
    server = socketserver.ThreadingTCPServer((host, port), MyTCPHandler)

    # Start this server, it will run continuously unless stopped by pressing ctrl+c
    server.serve_forever()
client code:
# -*- coding: utf-8 -*-
'''
@author: soapffz
@function: Simple socket communication (client)
@time: 2019-07-07
'''

import socket
host = 'localhost'  # Remote socket server ip
port = 50007
s = socket.socket(socket.AF_INET, socket.SOCK_STREAM)  # Instantiate socket
s.connect((host, port))  # Connect to socket server

while True:
    msg = input("Please input:\n").strip().encode('ascii')
    s.sendall(msg)  # Send message to server
    data = s.recv(1024)  # Receive message from server

    print("Received:", data)
s.close()
The demonstration effect is as follows:

Simulating FTP Server Implementation#
server side code is as follows:
# -*- coding: utf-8 -*-
'''
@author: soapffz
@function: Simple socket communication to implement ftp transmission (server)
@time: 2019-07-07
'''

import socketserver
import os


class MYTCPHandler(socketserver.BaseRequestHandler):
    def handle(self):
        instruction = self.request.recv(
            1024).strip().decode("ascii")  # Receive client command
        if not instruction:
            exit(0)
        # Split the message sent by the client, the message is in this format "FileTransfer|get|file_name"
        instruction = instruction.split("|")
        if hasattr(self, instruction[0]):  # Check if the class has this method
            func = getattr(self, instruction[0])  # Get the memory object of this method
            func(instruction)  # Call this method

    def FileTransfer(self, msg):  # Responsible for sending and receiving files
        print("--filetransfer--", msg)
        if msg[1] == "get":
            print("client wants to download file:", msg[2])
            if os.path.isfile(msg[2]):  # Check if the file name sent by the client exists and is a file
                file_size = os.path.getsize(msg[2])  # Get file size
                res = "ready|{}".format(file_size)  # Inform the client of the file size
            else:
                res = "file not exist"  # The file may not exist
            send_confirmation = "FileTransfer|get|{}".format(
                res).encode("ascii")
            self.request.send(send_confirmation)  # Send confirmation message to client
            # Wait for client confirmation, if we don't wait for client confirmation and immediately send the file content, to reduce IO operations, socket sending and receiving has a buffer, it will only send when the buffer is full, so the previous message may be merged with part of the file content and sent to the client, forming a sticky packet, so we wait for a confirmation message from the client to separate the two sends, avoiding sticky packets
            feedback = self.request.recv(100)
            if feedback == "FileTransfer|get|recv_ready":  # If the client says it is ready to receive
                with open("{}".format(msg[2], 'rb')) as f:
                    size_left = file_size
                    while size_left > 0:
                        if size_left < 1024:
                            # If the remaining part is less than 1024 bytes, send it directly
                            self.request.sendall(f.read(size_left))
                            size_left = 0
                        else:
                            # If the remaining part is greater than 1024 bytes, send 1024 bytes at a time
                            self.request.sendall(f.read(1024))
                            size_left -= 1024
                    print("--send file:{}done".format(msg[2]))


if __name__ == "__main__":
    host, port = "", 9002
    server = socketserver.ThreadingTCPServer((host, port), MYTCPHandler)
    server.serve_forever()
client side:
# -*- coding: utf-8 -*-
'''
@author: soapffz
@function: Simple socket communication to implement ftp transmission (client)
@time: 2019-07-07
'''

import socket
import os


class FTPClient(object):
    def __init__(self, host, port):
        self.sock = socket.socket(socket.AF_INET, socket.SOCK_STREAM)
        self.sock.connect((host, port))  # Connect to server

    def start(self):  # After instantiating the client class, this method needs to be called to start the client
        self.interactive()

    def interactive(self):
        while True:
            user_input = input(">>.").strip()
            if len(user_input) == 0:
                continue
            user_input = user_input.split()  # Split the user input command, the first parameter is the action to perform, e.g., get remote_filename
            if hasattr(self, user_input[0]):  # Check if the class has the method for get or other inputs
                func = getattr(self, user_input[0])  # Get the memory object of the corresponding method in the class
                func(user_input)  # Call this memory object
            else:
                print("Wrong cmd usage")

    def get(self, msg):  # Download file from server
        print("---get func---", msg)
        if len(msg) == 2:
            file_name = msg[1]
            instruction = "FileTransfer|get|{}".format(
                file_name).encode("ascii")  # Inform the server which file to download
            self.sock.send(instruction)
            feedback = self.sock.recv(100).decode("ascii")  # Wait for confirmation message from server
            print("-->", feedback)
            # Indicates that the file exists on the server, and the server is ready to send this file to the client
            if feedback.startswith("FileTransfer|get|ready"):
                # The last value in the confirmation message from the server is the file size, which must be known to determine how much content to receive
                file_size = int(feedback.split("|")[-1])
                self.sock.send("FileTransfer|get|recv_ready".encode(
                    "ascii"))  # Inform the server that it is ready to receive
                recv_size = 0  # Since the file may be large and cannot be received all at once, we will loop to receive, counting each time we receive
                # Create a new file locally to store the content of the file to be downloaded
                with open("client_recv/{}".format(os.path.basename(file_name)), 'wb') as f:
                    print("__>", file_name)
                    recv_size = 0
                    while recv_size != file_size:
                        if file_size - recv_size > 1024:
                            data = self.sock.recv(1024)
                        else:
                            data = self.sock.recv(file_size - recv_size)
                        recv_size += len(data)
                        f.write(data)
                    print("--recv file:{}".format(file_name))
            else:
                print(feedback)
        else:
            print("\033[31;1mWrong cmd usage\033[0m")


if __name__ == "__main__":
    f = FTPClient("localhost", 9002)
    f.start()
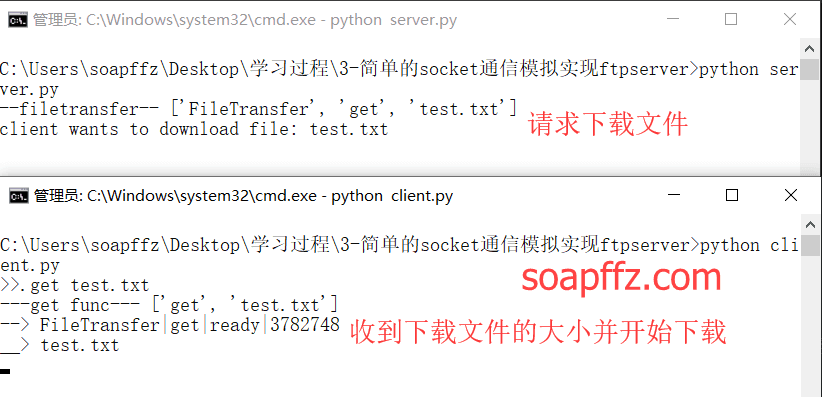
The effect is as follows:

At this point, we have a general understanding of the socket part, and next is to design the GUI and simultaneously design the logic.
Course Design#
Since using the socketserver library requires the use of the server.serve_forever() statement to keep the server running,
And in the GUI operation, it also requires the use of sys_exit(app.exec_()) statement to keep the interface running.
Both of these statements are similar to While True, which keeps running in an internal loop, so whichever loop is used first,
It will continue to run in that loop and cannot execute the subsequent code.
The direct result of this defect is that the server and GUI cannot run simultaneously, so in the end, I gave up the GUI interface for the server side.
The tutorial for PyQt5 has already been introduced in the UI design part of the article "Building a Local IP Proxy Pool (Completed)".
Here we will supplement some additional information.
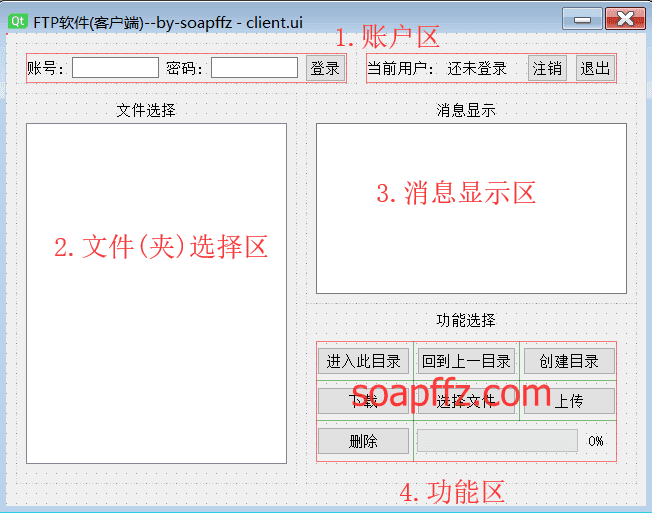
First, here is a UI design diagram:

As I mentioned in the article about building a local proxy pool, it is strongly recommended to wrap each part with a Frame framework.
Of course, for alignment purposes, I used two Frames for the top login area.
After dividing the areas and placing the components, I modified the commonly used names for the buttons, and then followed the "UI and Code Logic Separation" operation introduced in the proxy pool article to start writing code.
Below are a few small issues encountered while using PyQt5.
Progress Bar#
This was my first time encountering a progress bar, and I thought the effect was okay, but I couldn't find many settings, only one:
setRange to set the range and setValue, but these two are enough, my usage is as follows:
# Set the range of the progress bar
self.progressBar.setRange(0, 1)

# Insert where it is used
self.progressBar.setValue(int(recv_size / file_size))
The socket transfers files locally super fast, so the effect is not noticeable; you can check the speed during the later demonstration.
Missing Qt5Core.dll#
I encountered this issue during packaging, in a brand new Python installation environment.
After sequentially pip installing pipreqs, PyQt5, pyinstaller and other libraries,
When packaging, it said that the Qt5Core.dll file was missing, and it couldn't be found in the system files.
So I found a download provided by someone online, the safety is unknown, but it works for me.
Click here to download, after downloading, place it in a location in the system environment variable, such as:
C:\Windows\System32
C:\
C:\Anaconda
That will work.
Update: When I downloaded from csdn, this file didn't require points, but now it does; I will share the one I downloaded here.
Icon Not Displaying After Packaging#
I encountered this issue when I was writing the local proxy pool, but I forgot to mention it, so here it is.
- Create a qrc file and write the following content (note that the code format will throw an error if not correct):
<RCC>
  <qresource prefix="/">
    <file>favicon.ico</file>
  </qresource>
</RCC>
- Generate a py file, this py file saves the image as binary:
pyrcc5 -o image.py image.qrc
- Import the module and set the icon:
import image
MainWindow.setWindowIcon(QtGui.QIcon(':/favicon.ico'))
Just add ; before the original icon name.
Salted Hash Library#
To add a gimmick for the teacher's acceptance, the client side uses encrypted hash for encrypted transmission.
The server side checks if the username is in the database after receiving the username and hash, then uses the decryption algorithm to compare the transmitted hash with the plaintext password in the database.
Reference article: Using Salted Hash Functions to Encrypt Passwords in Python
Installation: pip install werkzeug
The client side uses the generate_password_hash function for encryption:
generate_password_hash(password, method='pbkdf2:sha256', salt_length=8)

password is the plaintext password
method is the hashing method, formatted as pbpdf2:<method>, mainly sha1, sha256, md5
salt_length is the length of the salt, default is 8
Generally, the latter two parameters can be omitted, just use it directly.
The server side uses check_password_hash for decryption:
check_password_hash(pwhash, password)

pwhash is the ciphertext
password is the plaintext

Returns True if they match, False if they do not.
Final Effect Demonstration#
- Login and Logout

- Directory Operations

- Download

- Upload

- Delete

The article ends here.