Anaconda#
Anaconda 是啥?#
一个优秀的 Python 集成开发环境
为啥要用它 (优点)#
- 解决繁琐的环境与包的问题:lxml,PIL 等复杂难装的包
- 方便地配置多个环境:可以实现 Python2.x 系列和 3.x 系列的自由转换
- 内置很多数据分析实用工具:包含了多个数据科学相关的开源包(如 Pandas,Scipy 等),在数据可视化、机器学习、深度学习等多方面都有涉及。
- 内置了 Jupyter NoteBook 工具:开发,调试,还是记录学习笔记,都可以在上面完成
下载、安装与配置#
- 下载:建议使用清华镜像下载:点我去下载,注意排序时间是乱序,点击时间这一栏的 Date 修改排序方式:
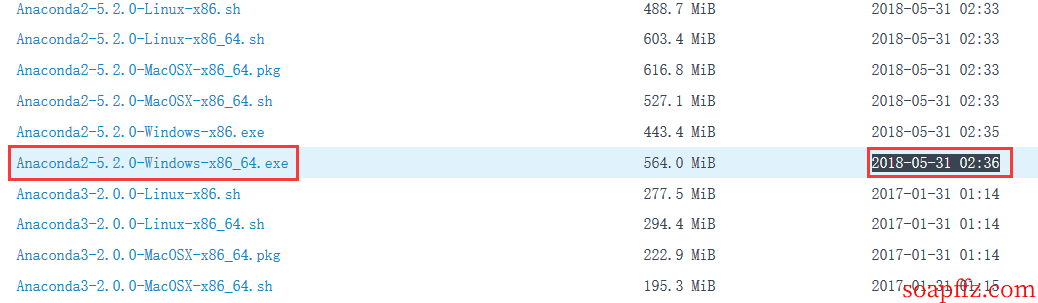
你也可以直接在清华大学镜像站主页的常用发行版 iso 和应用工具安装包下载界面:
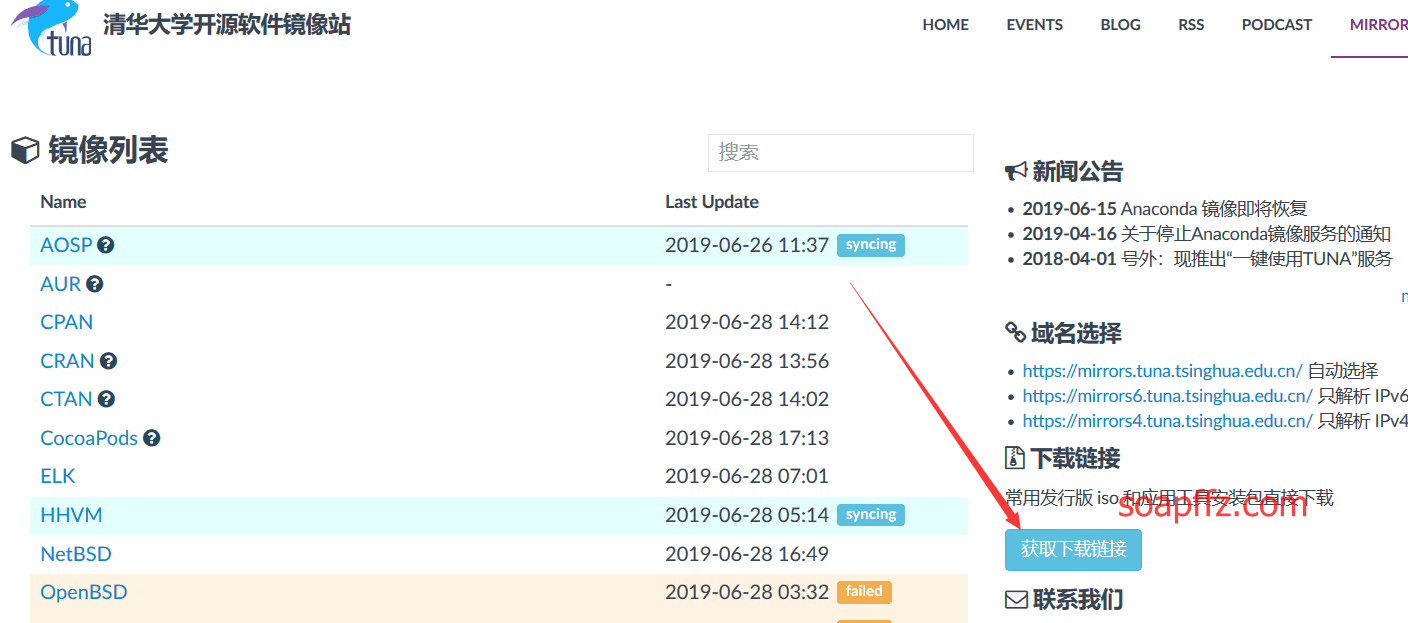
选择应用软件 ->conda,下载最新的版本:

- 安装:默认安装在
C:\Users\你的用户名\Anaconda3,建议改为C:\Anaconda
这里记住两个都要勾选上:

- 配置:
Anaconda 换源#
(19-06-16 更新) 国内的清华源和中科大源都于 2019 年 05 月因版权问题停止服务,请使用梯子
(19-06-28 更新) 清华大学镜像获得授权,于2019-06-27重新恢复:
经与 Anaconda, Inc. 的沟通,我们获得了镜像的授权,将于近期恢复 Anaconda 相关服务,感谢各位用户的理解和支持。
根据我们的理解,Anaconda, Inc. 方面 有意愿 在镜像站同意提供流量信息的前提下将镜像权限开放给教育科研机构。但请有意愿架设 Anaconda 镜像站(包括成为 TUNA 下游)的个人及团体注意,根据 Anaconda 软件源上的说明,Anaconda 和 Miniconda 是 Anaconda, Inc. 的商标,任何未经授权的公开镜像都是不允许的。请严格遵循 Anaconda, Inc. 官方正式公布的规定进行镜像,TUNA 不对因此产生的法律后果负责。
感谢您的理解与支持!
于是重新贴上Anaconda换源教程:
在conda安装好之后,默认的镜像是官方的,由于官网的镜像在境外,访问太慢或者不能访问,为了能够加快访问的速度,这里选择了清华的的镜像。在命令行中运行 (设置清华的镜像):
conda config --add channels https://mirrors.tuna.tsinghua.edu.cn/anaconda/pkgs/main/
conda config --add channels https://mirrors.tuna.tsinghua.edu.cn/anaconda/cloud/bioconda/
conda config --set show_channel_urls yes
- 二. CondaHTTPError 问题 (没出现就不用看了)
.condarc(conda 配置文件)以点开头,一般表示 conda 应用程序的配置文件,是一种可选的(optional)运行期配置文件。
其默认情况下是不存在的,但当用户第一次运行 conda config 命令时,将会在用户的家目录创建该文件
windows:C:\\users\\username\\
linux:/home/username/
在用户 home 目录下,找到 .condarc 文件,删掉就好
想要删除清华源把 add 改成 remove 就行
常用使用方法:#
conda list:查看安装的包
conda install Package-Names:安装某个包,与pip使用方法一致
conda --version:查看Anaconda版本
conda info -e:查看当前创建的环境
conda update --prefix C:\Anaconda anaconda(这里为安装目录):对anaconda进行更新
如果懒得去查安装目录就直接输入conda update,它会提示你补齐后的语句,直接复制执行就行
conda update --all:对包进行更新
升级pip(升级后可使用pip3):python -m pip install --upgrade pip
Py3.6 版本添加 Py2.7 环境#
-
安装完 Anaconda 后,会有一个叫做 Anaconda Navigator 的应用,可以在 windows 菜单中搜索:

-
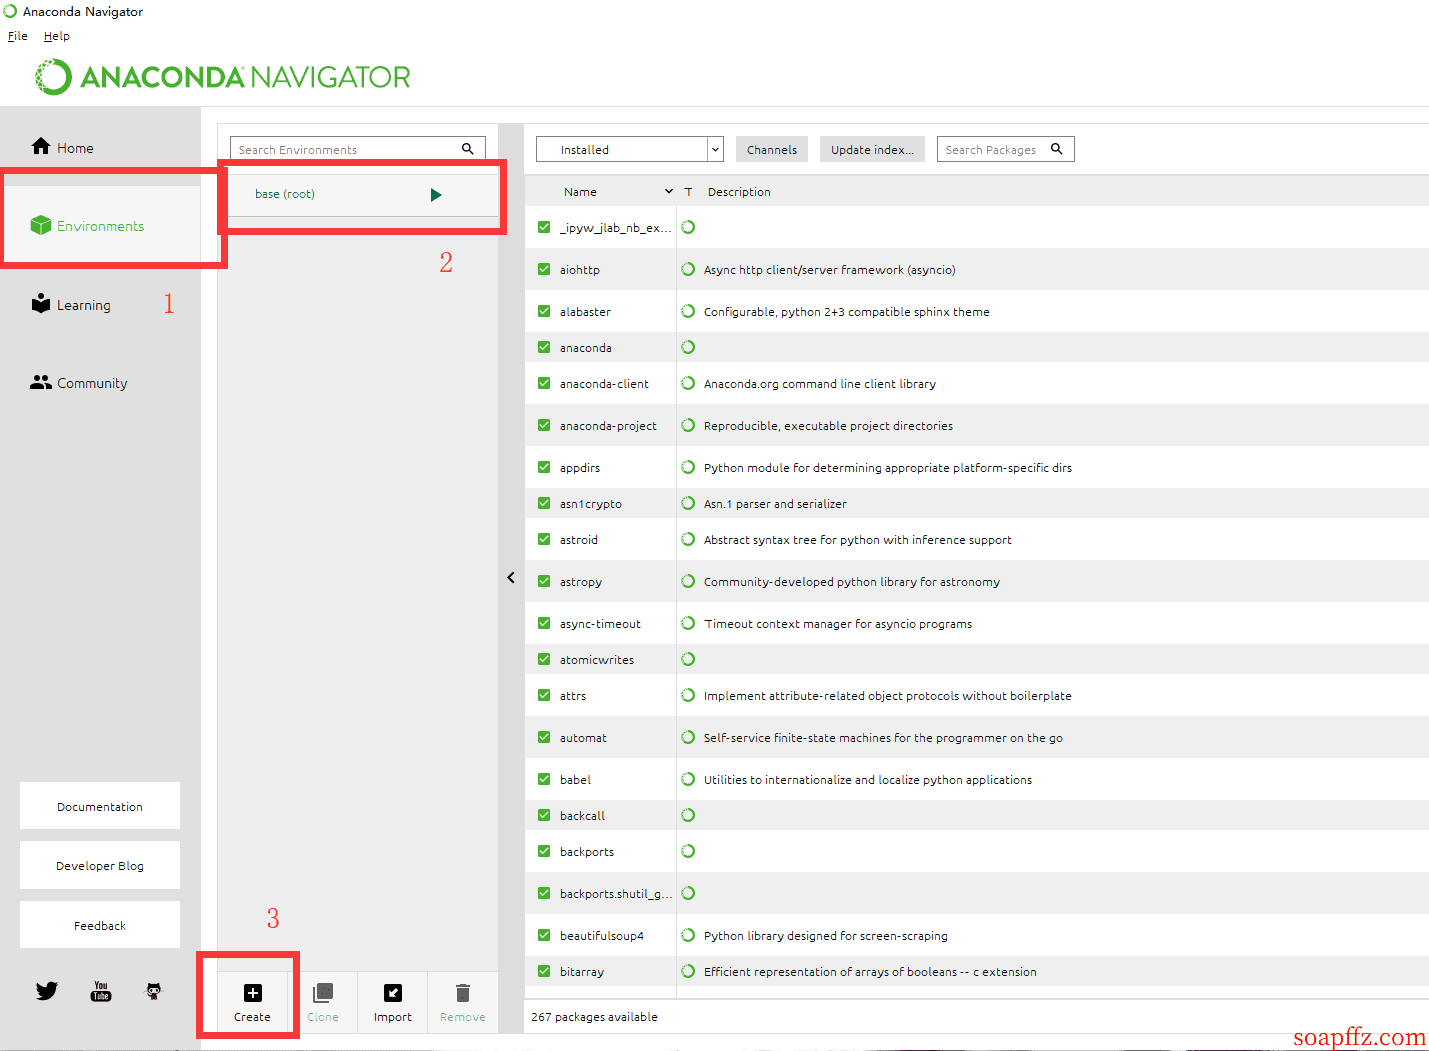
打开并运行它,选中 Enviroments 这个选项:
-
可以看到默认只有一个 ROOT 环境,这点我们也可以在 cmd 中输入 conda info -e 命令来查看
-
接下来就是配置我们的 Python2 环境,点击 Create:

-
点击 Create,等待一会环境就创建完了:

一般来说,Python3 系列才是未来的主宰,那么我们创建 Python2.7 只是为了一些实例的比较
所以在这里不需要去 “添加系统变量以及修改 exe 文件名使得可以在 cmd 窗口中使用 Python2 和 Python3 命令进入对应的环境” 这样的操作,Anaconda 为我们提供了便捷的方案:
我们只需要在 cmd 中输入 activate Python2.7 (这个名字就是上面创建环境时的名字) 即可激活 Python2.7 环境
在 cmd 中输入 deactivate 即可取消激活 Python2.7 环境,回到 Python3.6 环境
下面是示例:

Pycharm#
Tips:这篇文章由于是较早时间创建,后期soapffz才意识到 Pycharm 实在是太强大了,但同时带来的问题就是:
- 软件占用内存较大 (我的电脑默认分配 725M 都会提示内存小会影响运行建议我改为 1125M)
- 初始化时占用 CPU 过高 (开启时 CPU 占用率急剧升高又落下,开省电模式启动也能跑到 50%)
- 每次启动会加载之前的虚拟环境,基本要耗时 1 分钟。
所以,对于新手来说并不是太友好 (超高配机请忽略),只适合经常编写大型工程的专业人员,后期我会出一篇 VSC 作为编写 Python 代码主力工具的文章
VSC 传送门:
Pycharm 下载地址:点我去下载
激活#
- host 中添加:
0.0.0.0 account.jetbrains.com - Windows 中位置:
C:\Windows\System32\drivers\etc,如果权限不够则复制出来添加上再粘贴回去覆盖掉 - linux,mac:/etc
- 然后打开:http://idea.lanyus.com/,得到激活码,附件中有,但是网站上是一直更新的
配置#
-
设置主题字体
File -> Settings -> Editor -> Color Scheme -> Console Font,注意记得先备份再修改

-
设置编辑器字体
File -> Settings -> Editor -> Font 中设置,跟上面差不多:

-
配置编译器及格式化插件
一般来说,如果你先装好 Anaconda 再打开的 Pycharm,则会自动识别编译器 (Anaconda 添加到 PATH 环境变量的前提下),如下图:

如果未配置过解释器时,在编辑代码时,在代码上方便会提示你No Python interpreter configured for the project

点击进去就能到这个配置处,然后选择装好的 Python 解释器,记住勾选下面的两个选项,意义分别是 “继承包” 和 “对所有的项目通用 (无需再次配置)” 即可

等待一会就会自己创建好虚拟环境并读取安装好的包,下次重新打开项目时便会自定读取。
PS:这里你看到下面有个 Existing environment,字面意思是使用已经存在的环境,或许你会和我一样想到在第一次创建完环境之后,重启然后选择第一次创建的环境不就行了吗?I tried,但是还是回去扫描环境以及包,而且在解释器中多出来一个 (venv)(1),貌似是不该这样做的,我也没搞懂这个 Existing environment 实用的环境。
在 settings -> Project Interpreter 右上角的下拉小三角中会显示当前电脑中的所有配置了环境变量的 Python 版本,可以自由切换
格式化工具 Black (Python3.6 以上)#
介绍部分#
引言:
代码可读性是评判代码质量的标准之一,有一个衡量代码质量的标准是 Martin 提出的 “WFT” 定律,即每分钟爆出 “WTF” 的次数。你在读别人代码或者做 Code Review 的时候有没有 “WTF” 冲动呢?为了帮助开发者统一代码风格,Python 社区提出了 PEP8 代码编码风格,它并没有强制要求大家必须遵循,Python 官方同时推出了一个检查代码风格是否符合 PEP8 的工具,名字也叫 pep8,后来被重命名为了 pycodestyle。
看如下代码:
import time, datetime
class ListNode:
def __init__(self, val):
self.val = val
self.next = None
# in python next is a reversed word
def reverse(self, head):
prev = None
while head:
temp = head.next
head.next = prev
prev = head
head = temp
a = [
[
1,
u'hello world',
0
],
[
2,
"hello python",
0
],
]
这是一个不符合 PEP8 的代码段,用 pycodestyle 可检测有哪些地方不符合 PEP8 风格
$ pycodestyle link.py
link.py:1: [E401] multiple imports on one line
link.py:3: [E302] expected 2 blank lines, found 1
pycodestyle 提示我们有两处地方不符合规范,第一个是单行有多个 import,第二个是类与模块之间需要空两行,这只是一个简单代码示例,真正的业务代码可能有上百行甚至几百行,如果我们要根据 PEP8 规范逐个进行修改建议会非常耗时,而我们的开发过程中,如果时刻关注每一行代码是否完全遵循 PEP8,将影响开发效率。
而有这么一款工具 Black,号称不妥协的代码格式化工具,为什么叫不妥协呢?因为它检测到不符合规范的代码风格直接就帮你全部格式化好,根本不需要你确定,直接替你做好决定。它也是 requests 作者最喜欢的工具之一
使用非常简单,安装成功后,和其他系统命令一样使用,只需在 black 命令后面指定需要格式化的文件或者目录就 ok:black link.py

这是一款小而美的工具,它并不是完全按照 PEP8 规范来格式化,比如默认每行代码的字符数是 88 个,当然你可以通过参数 -l 自定义长度,能一行显示完成的代码会放在一行,比如有多个元素的列表
# in:
l = [1,
2,
3,
]
# out:
l = [1, 2, 3]
后者把多个元素放在一行,显然更易读,而且代码更紧凑(如果你的工资是按照代码行数来算的话,不建议这么做),Black 是 PEP8 的严格子集。我的最佳实践方式就是使用 PyCharm 自带的格式化工具配合 Black 使用。因为 Black 也支持集成到 Pycharm 中。
如何集成到 Pycharm#
-
安装 black (这里 conda 不行就用 pip):
pip install black -
找到 black 的安装路径:
where black(windows)/which black(linux/mac):
-
添加扩展工具,打开 Settings -> Tools->External Tools ,添加一个新的扩展工具,Program 填 black 的安装路径,Arguments 填
$FilePath$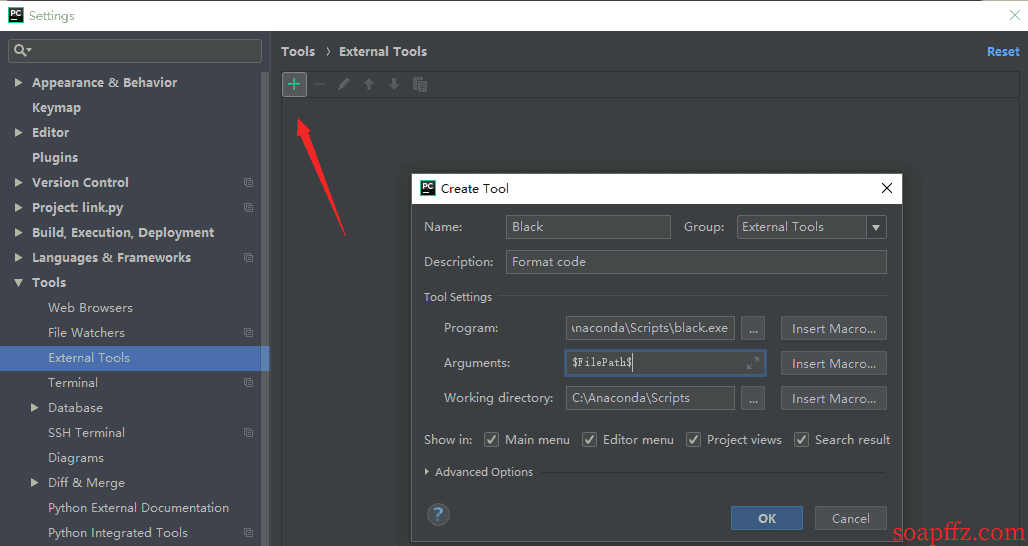
-
选择 Tools-> External Tools-> Black 即可对当前打开的文件及代码格式化,当然,你还可以为其指定一个快捷键,使操作起来更方便。

更多信息可参考文档:github 传送门