Source of Motivation for This Article
- https://mp.weixin.qq.com/s/Pim3yYbDswob8CkSGIZ49g 2. https://mp.weixin.qq.com/s/XJ-CP0wiXaJciRgEWKzATg
What is pkuseg?#
pkuseg is a brand new Chinese word segmentation toolkit developed by the Language Computing and Machine Learning Research Group at Peking University.
pkuseg has the following features:
- High word segmentation accuracy. Compared to other segmentation toolkits, our toolkit significantly improves segmentation accuracy across data from different fields. According to our test results, pkuseg reduced the word segmentation error rate by 79.33% and 63.67% on the sample datasets (MSRA and CTB8) respectively. 2. Multi-domain segmentation. We have trained segmentation models for various fields. Users can freely choose different models based on the characteristics of the domain to be segmented. 3. Support for user-trained models. Users can train using new annotated data.
GitHub address: https://github.com/lancopku/PKUSeg-python
Installation: pip3 install -i https://pypi.tuna.tsinghua.edu.cn/simple pkuseg
My Anaconda environment reported an error with the numpy library after the first run. You can uninstall numpy with pip3 uninstall numpy and then reinstall it with pip3 install numpy.
Update: pip3 install -i https://pypi.tuna.tsinghua.edu.cn/simple -U pkuseg
What is a Word Cloud?#
The installation of the wordcloud requires support from the Microsoft Visual C++ 14.0 runtime library.
It is not recommended to install a package separately; it is better to install commonly used runtime libraries directly. There are many available online. Here is a collection of commonly used Microsoft runtime libraries packaged on the RPK Ruipai forum: https://www.lanzous.com/b143614/ (If RPK forum members see this, please remember to pay for the advertisement, thank you)
Additionally, if you directly run pip3 install wordcloud, it will download from foreign mirrors, which is slower. It is recommended to download the whl file and install it yourself: Click here to download
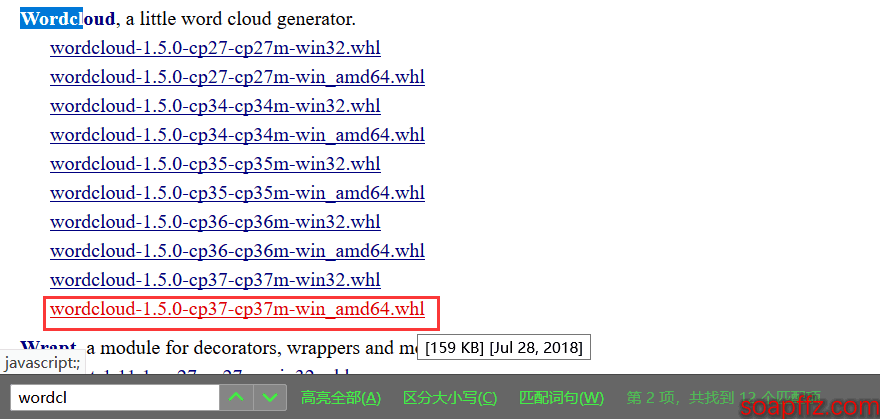
Search for wordcloud, download the corresponding version, and then run pip3 install wordcloud‑1.5.0‑cp37‑cp37m‑win_amd64.whl.
Word Cloud Code Implementation#
All code and example files in this article are packaged, and the download link is at the end of the article.
Let's start with a simple example of generating a word cloud from pure English text.
wordcloud_demo.py:
from wordcloud import WordCloud, ImageColorGenerator
import matplotlib.pyplot as plt

with open("Alice.txt") as f:
    wordcloud = WordCloud(
        background_color="white",  # Background color is white
        width=1000,  # Canvas width is 1000; setting width and height has no effect after setting a background image
        height=600,  # Canvas height is 600
        margin=2  # Margin is set to 2
    ).generate_from_text(f.read())  # Generate word cloud based on text content
# wordcloud.recolor(color_func=ImageColorGenerator(bak_pic)) # Set word cloud color to the color of the image
# Save the generated word cloud image to the current user's desktop; if generated again, it will overwrite the previous one
plt.imshow(wordcloud)  # imshow() function: displays an image on a 2D coordinate axis
plt.axis("off")  # Do not display axes
plt.show()  # Display the image
Effect demonstration:
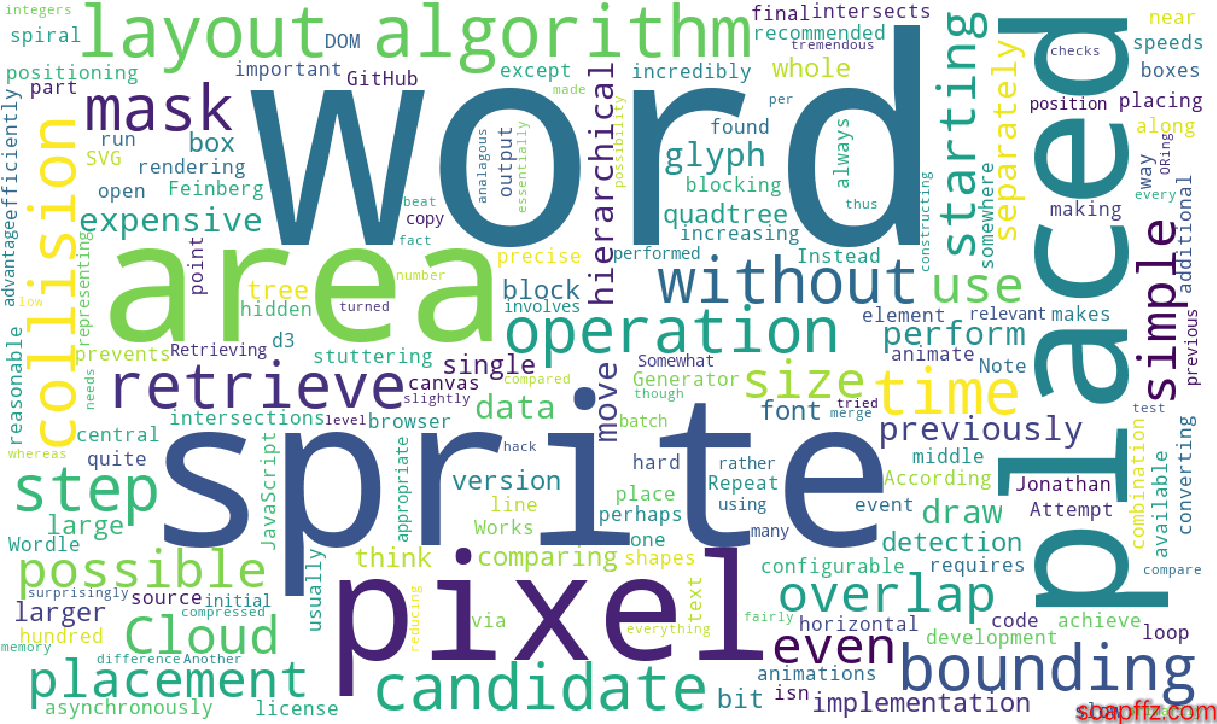
As we can see, we have already generated a word cloud image from English text, but there are several new requirements:
- Need to customize the background image, preferably using the colors of the background image
- Need to generate a word cloud for Chinese text
- The image does not look very clear; it needs to be clearer
- Need to save each generated word cloud
The second version of the code is as follows:
wordcloud_gen.py:
#!/usr/bin/python
# -*- coding: utf-8 -*-
'''
@author: soapffz
@function: Use wordcloud to read word text and generate word cloud
@time: 2019-01-31
'''

from wordcloud import WordCloud, ImageColorGenerator
import matplotlib.pyplot as plt
from os import path

# Set the export location of the word cloud image to the current user's desktop
pic_path = path.join(path.expanduser("~")+"\\"+"Desktop"+"\\")
bak_pic = plt.imread("totoro.jpg")
with open("Alice.txt") as f:
    wordcloud = WordCloud(
        font_path="C:\Windows\Fonts\simsun.ttc",  # Set font; this is for Win10, Win7 font suffix is ttf, please find it yourself
        mask=bak_pic,  # Set background image; setting width and height has no effect after setting a background image
        background_color="white",  # Background color is white
        prefer_horizontal=0.7,  # Frequency of horizontal word layout is set to 0.7 (default is 0.9)
        scale=15,  # Canvas magnification is set to 15 (default is 1)
        margin=2  # Margin is set to 2
    ).generate_from_text(f.read())  # Generate word cloud based on text content
wordcloud.recolor(color_func=ImageColorGenerator(bak_pic))  # Set word cloud color to the color of the image
# Save the generated word cloud image to the current user's desktop; if generated again, it will overwrite the previous one
wordcloud.to_file(path.join(pic_path+"wordcloud.jpg"))
plt.imshow(wordcloud)  # imshow() function: displays an image on a 2D coordinate axis
plt.axis("off")  # Do not display axes
plt.show()  # Display the image
There is a pit here. Note that in the above code, the text is opened directly without specifying the encoding. I found that the text that did not report an error was in ANSI encoding, which is the default txt format for Win10. However, when I opened a utf-8 encoded text, I encountered this error:
UnicodeDecodeError: 'gbk' codec can't decode byte 0x9d in position 809: illegal multibyte sequence
However, when using with open("content.txt") specifying the encoding: with open("content.txt", encoding="utf-8"), it can open the utf-8 encoded txt. But since laziness I often create txt files, I recommend using ANSI encoding here so that you don't have to modify the code. If there is an error, just save the txt as ANSI encoding to overwrite it.
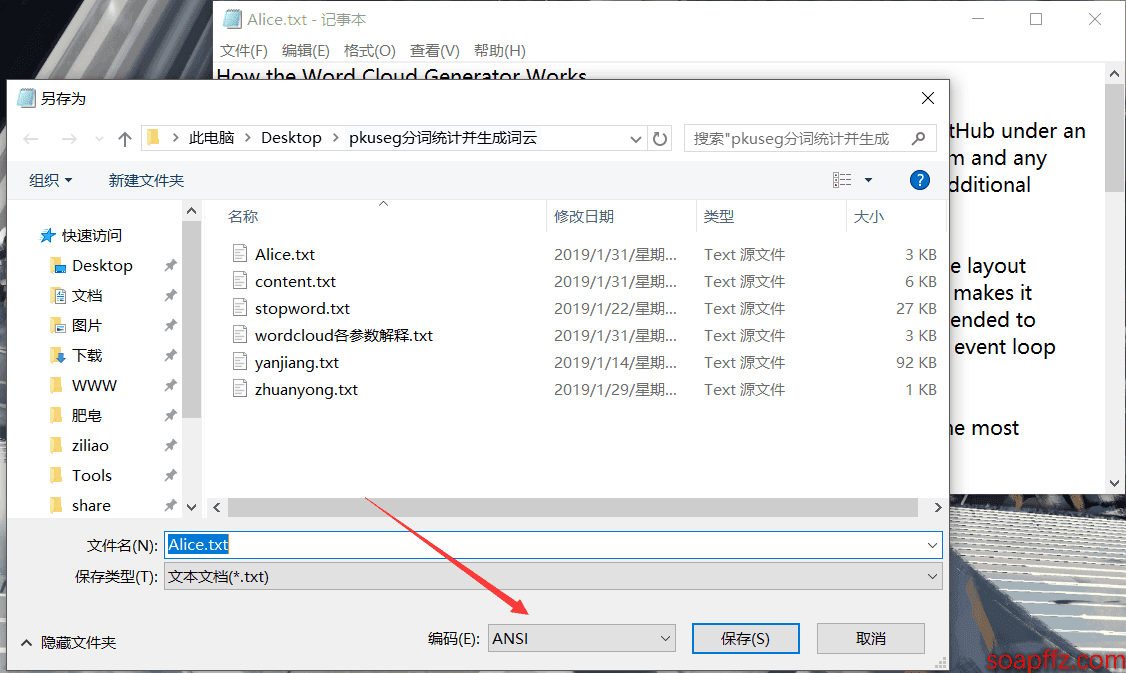
In the image, modify the encoding in the lower right corner and confirm to overwrite. Additionally, the encoding displayed in the lower right corner when first opened is the current encoding of this text.
There are several parameters that can significantly affect the word cloud's effect:
font_pathThe font of the text can be downloaded online or you can use the built-in fonts in C:\Windows\Fonts. Note that Win10 font suffix is ttc, while Win7 is ttf.background_color: Background color, default is black. If the mask image color is too light and the background is set to white, it may cause the text to appear "unclear." After testing with a light-colored mask image using both white and black background colors, it was found that the strong contrast of the black background revealed several very light and small words that were previously almost invisible due to the similarity in color between the background and text.prefer_horizontalThis parameter is used to set the frequency of horizontal word layout. The smaller the value, the more words appear horizontally, and the fewer words appear vertically. I personally think the default value of 0.9 is too large; I recommend 0.7 for a more stylish look.max_font_size: Maximum font size. The generation of the image will automatically determine the layout of words based on the maximum font size and other factors. It has been tested that even for the same image, if the image size is different (for example, enlarging a 300×300 image to 600×600), the same font size will yield different effects. This is quite natural; the font size determines the size of the text, and when the image size changes, the ratio of the maximum text size to the image size naturally changes. Therefore, it is necessary to adjust the maximum font size parameter based on the expected display effect.scaleThis is the canvas magnification factor. The larger the value, the clearer smaller words will appear, so it is recommended to set this to around ten; the default value of 1 will not be very clear, and the larger the value, the longer it takes.relative_scaling: This parameter indicates the relationship between word frequency and the size of words in the word cloud, with a default of 0.5. A value of 0 means only the order of words is considered, while a value of 1 means that words with double the frequency will also be displayed in double font size.- Additionally, regarding the
random_stateparameter, this is used to set the number of styles. However, I tried setting this parameter and found that it not only did not increase the styles but also removed the random styles of the image. You can try this yourself; it might just be my issue.
Other parameters can be added and tested as follows:
mask : nd-array or None (default=None) # If the parameter is empty, a two-dimensional mask will be used to draw the word cloud. If mask is not empty, the set width and height values will be ignored, and the shape of the mask will replace the mask shape. Only the non-white (#FFFFFF) parts will be drawn, while the rest will be used to draw the word cloud. For example: bg_pic = imread('read an image.png'), the background image canvas must be set to white (#FFFFFF), and the displayed shape must be in colors other than white. You can use Photoshop tools to copy the shape you want to display onto a pure white canvas and save it.
font_path : string  # Font path; write the font path + suffix name for the font you want to display, e.g., font_path = '黑体.ttf'
background_color : color value (default=”black”) # Background color, e.g., background_color='white', background color is white
width : int (default=400) # Output canvas width, default is 400 pixels
height : int (default=200) # Output canvas height, default is 200 pixels
prefer_horizontal : float (default=0.90) # Frequency of horizontal word layout, default 0.9 (so the frequency of vertical word layout is 0.1)
min_font_size : int (default=4) # Minimum font size displayed
max_font_size : int or None (default=None) # Maximum font size displayed
scale : float (default=1) # Magnify the canvas proportionally, default value is 1; if set to 1.5, both length and width will be 1.5 times the original canvas, the larger the value, the denser and clearer the image
font_step : int (default=1) # Font step; if the step is greater than 1, it will speed up the calculation but may lead to larger errors in the results
max_words : number (default=200) # Maximum number of words to display
mode : string (default=”RGB”) # When the parameter is “RGBA” and background_color is not empty, the background is transparent
relative_scaling : float (default=.5) # The correlation between word frequency and font size
stopwords : set of strings or None # Set the words to be masked; if empty, the built-in STOPWORDS will be used
color_func : callable, default=None # Function to generate new colors; if empty, self.color_func will be used
regexp : string or None (optional) # Use regular expressions to separate input text
collocations : bool, default=True # Whether to include collocations of two words
colormap : string or matplotlib colormap, default=”viridis” # Randomly assign colors to each word; if color_func is specified, this method will be ignored
random_state : int or None  # Returns a PIL color for each word

fit_words(frequencies)  # Generate word cloud based on word frequency
generate(text)  # Generate word cloud based on text
generate_from_frequencies(frequencies[, ...])   # Generate word cloud based on word frequency
generate_from_text(text)    # Generate word cloud based on text
process_text(text)  # Tokenize long text and remove stop words (this refers to English; Chinese word segmentation still needs to be implemented using other libraries first, using fit_words(frequencies) above)
recolor([random_state, color_func, colormap])   # Recolor the existing output. Recoloring is much faster than regenerating the entire word cloud
to_array()  # Convert to numpy array
to_file(filename)   # Output to file
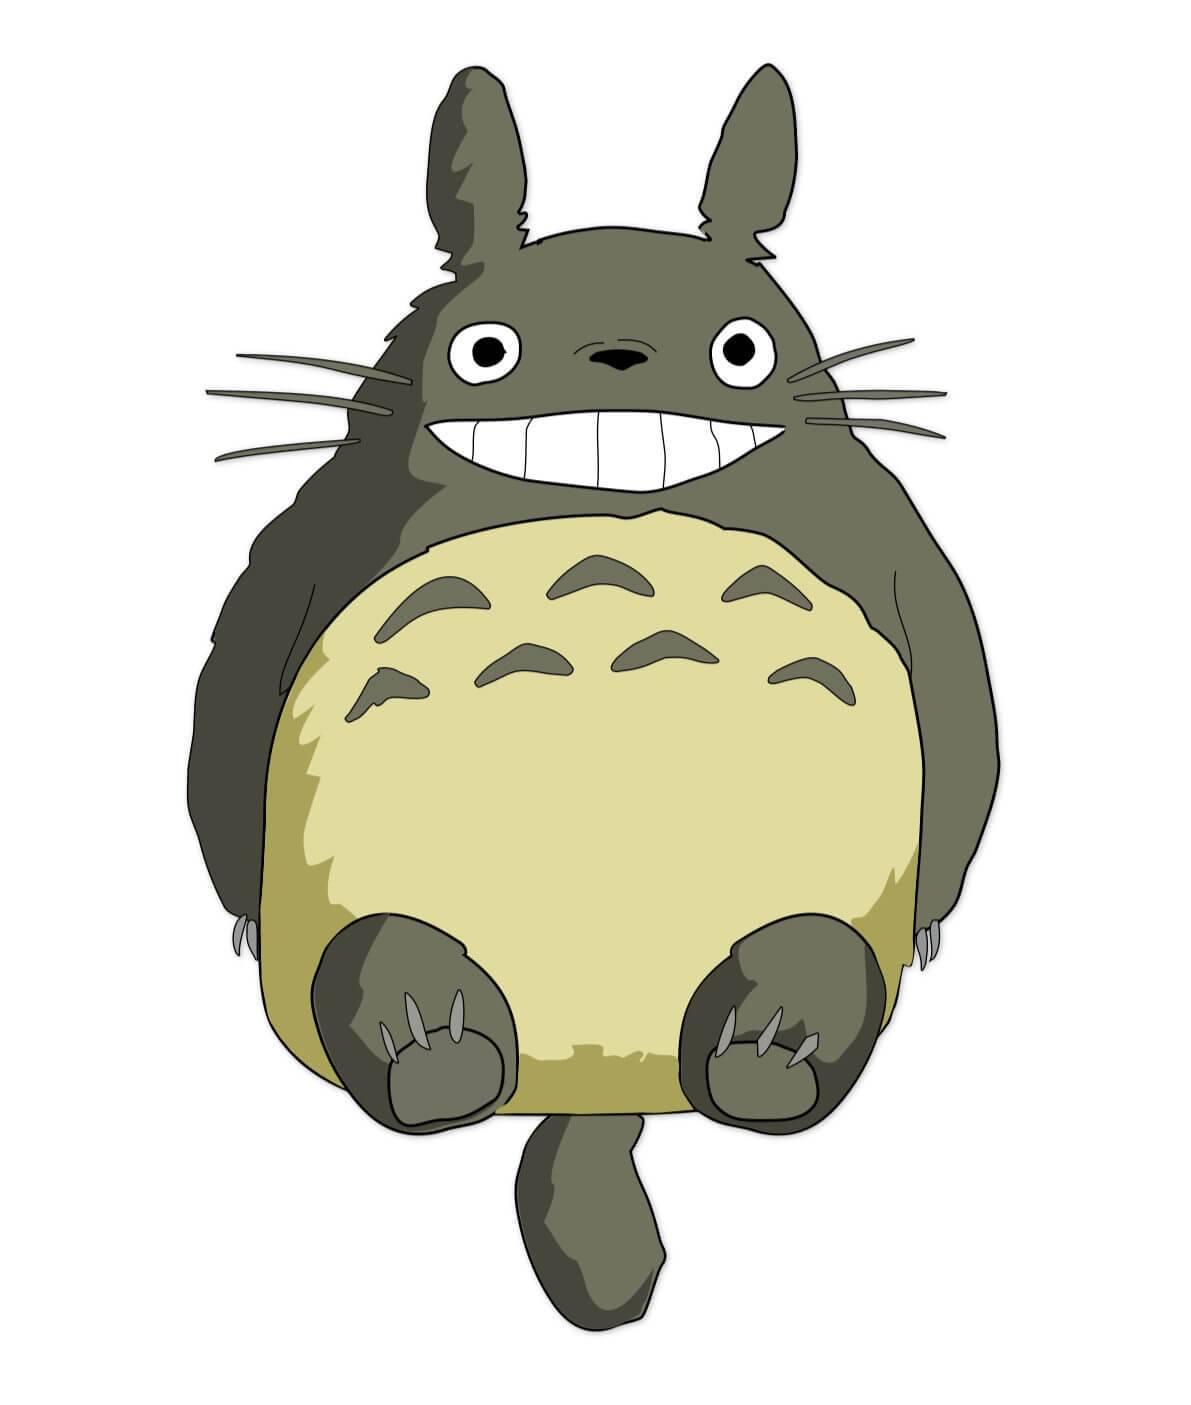
My background image is Totoro:
Set to the same color as the background image, the effect is as follows:
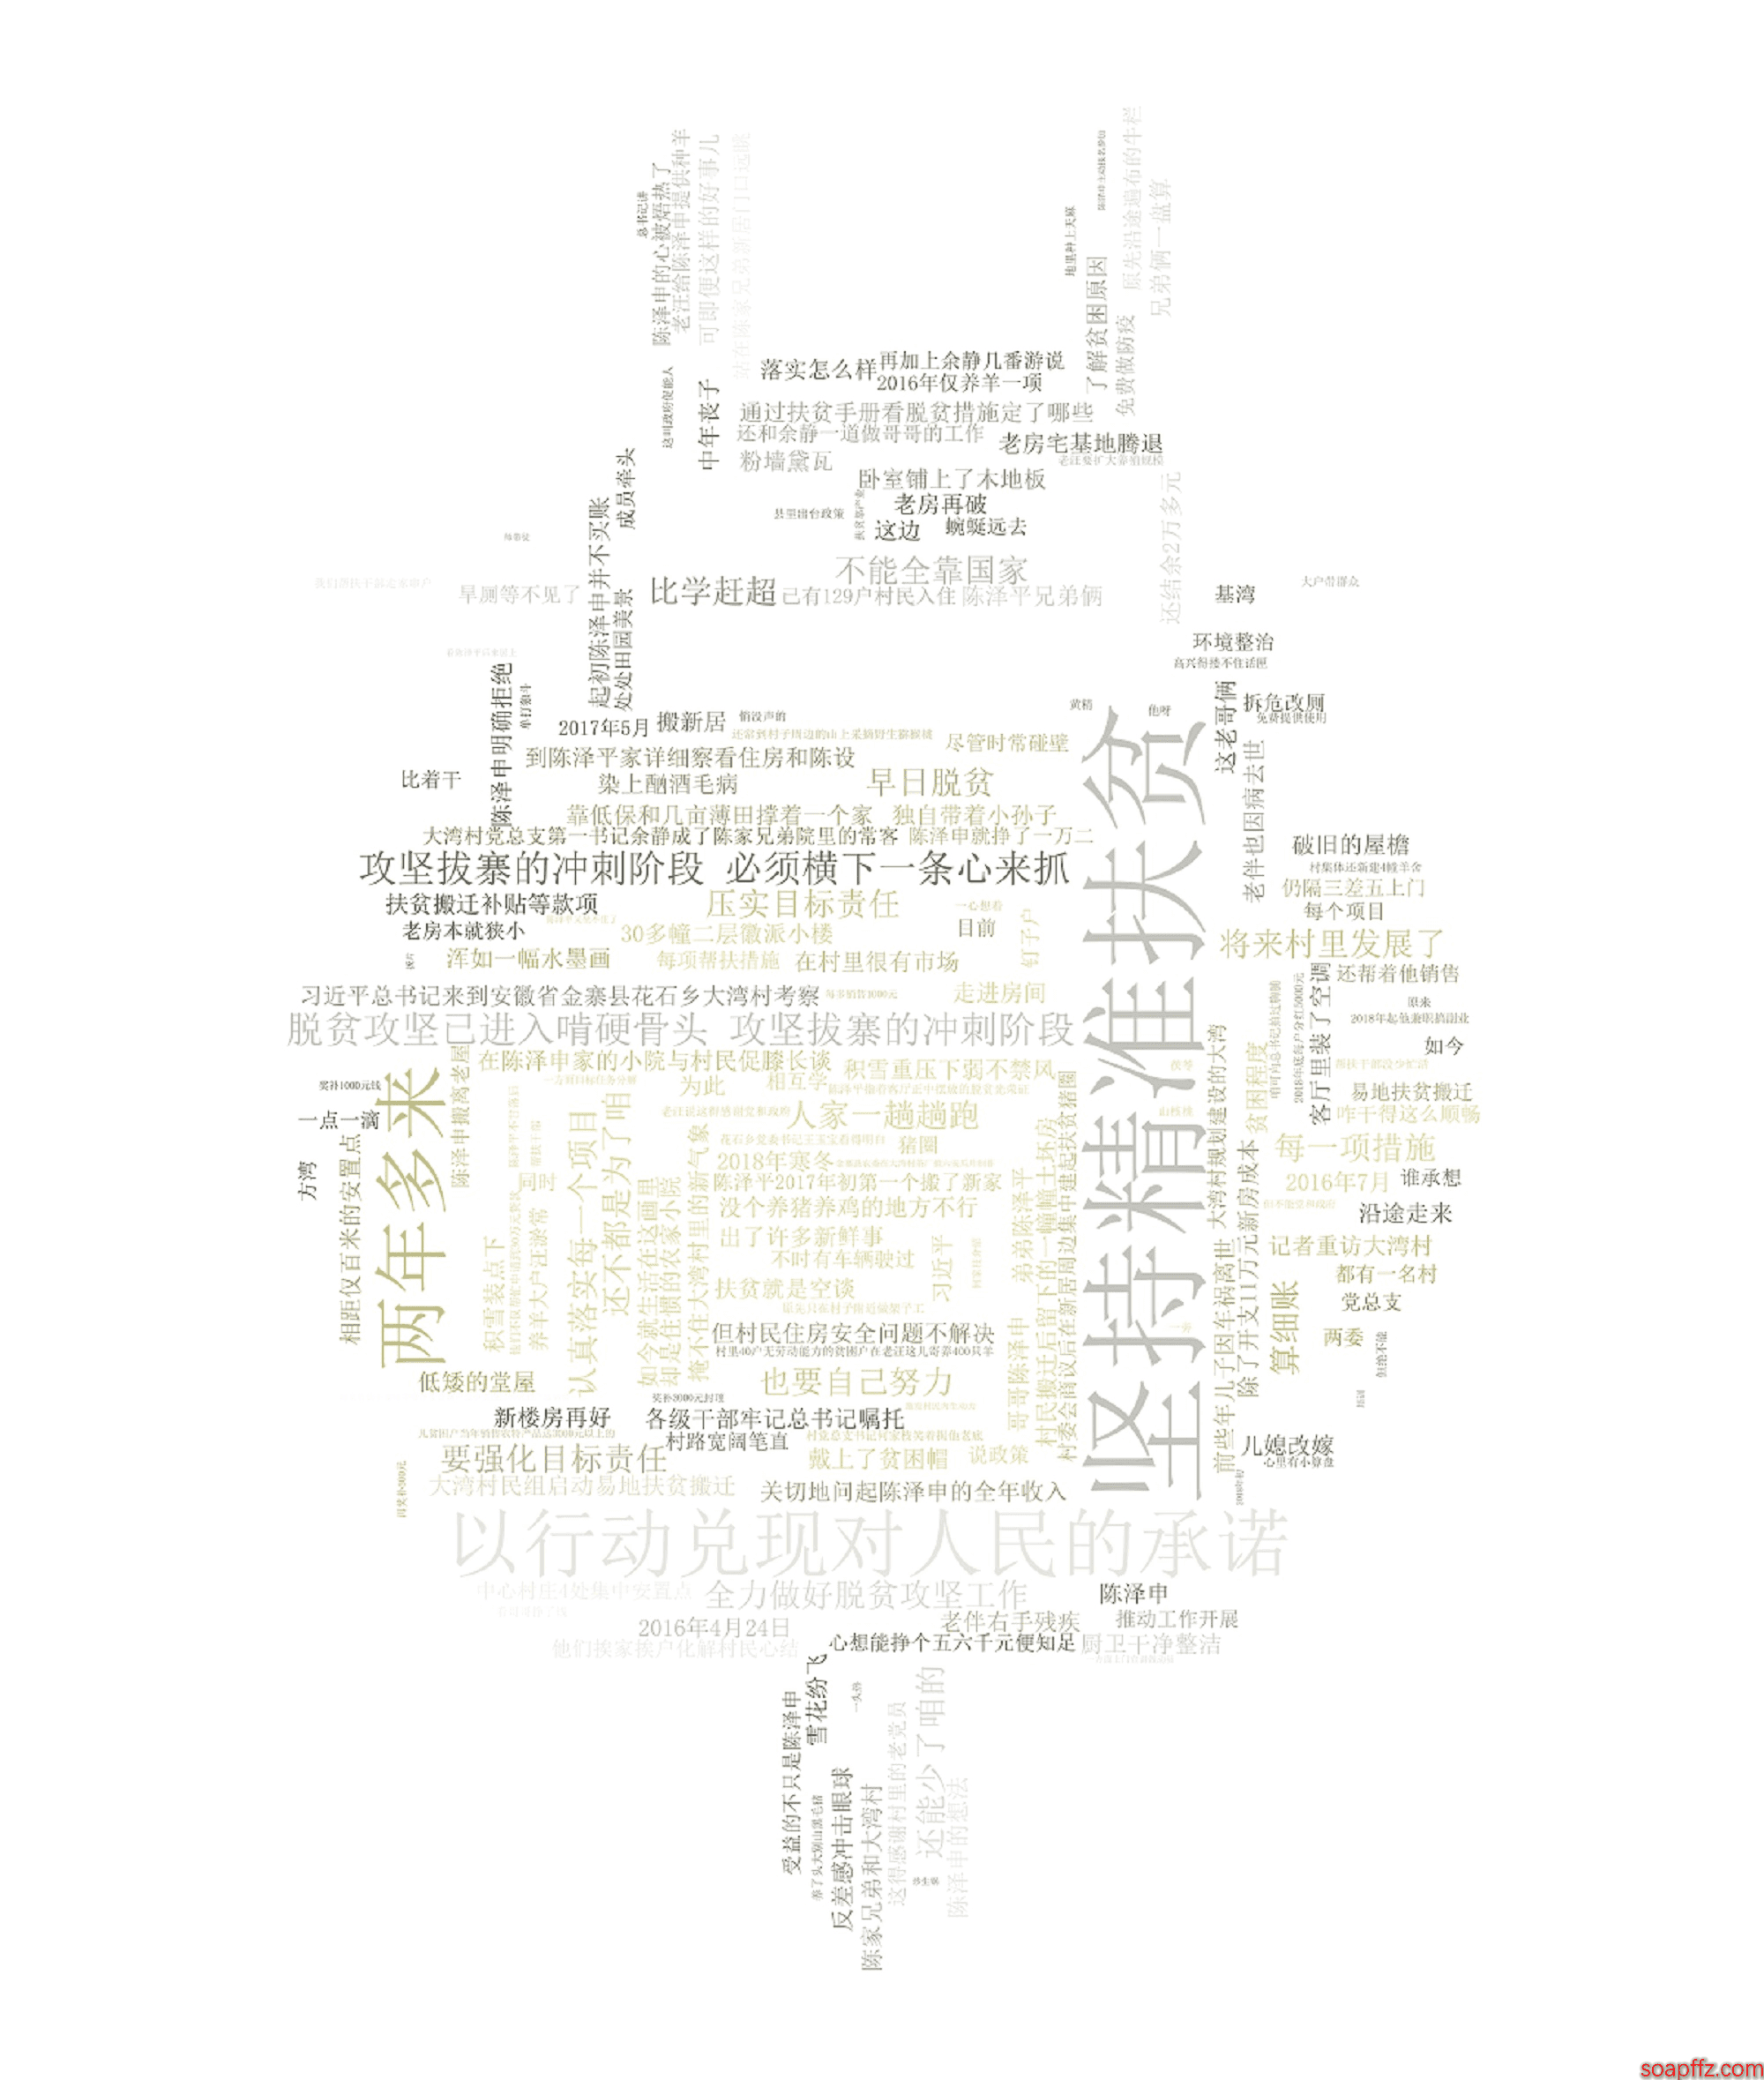
emmmm, as we can see, the words in the image are all in large chunks, which needs to be solved by word segmentation.
Also, it doesn't look very good. Let's comment out the line that sets the word cloud color to the color of the image and take another look:
emmm, it seems that the choice of background image is very important; it is best to have clear layers, contain large areas of white, and have good colors. Let's move on to word segmentation.
pkuseg Word Segmentation Code Implementation#
Using the default model and default dictionary for word segmentation.
import pkuseg
seg = pkuseg.pkuseg()    # Load model with default configuration
text = seg.cut('I love Tiananmen Square in Beijing')   # Perform word segmentation
print(text)
Output: ['I', 'love', 'Tiananmen', 'Square', 'in', 'Beijing']
For other usage methods, please refer to the GitHub address. We will use Zhang Xiaolong's 30,000-word speech for statistics, with the following steps:
- Download the speech content, save it to a txt file, and then load the content into memory.
- Use pkuseg to perform word segmentation on the content and count the top 20 most frequent words.
import pkuseg
from collections import Counter
import pprint

content = []
with open("yanjiang.txt", encoding="utf-8") as f:
    content = f.read()

seg = pkuseg.pkuseg()
text = seg.cut(content)
counter = Counter(text)
pprint.pprint(counter.most_common(20))
Output:
[(',', 1441),
 ('的', 1278),
 ('。', 754),
 ('一个', 465),
 ('是', 399),
 ('我', 336),
 ('我们', 335),
 ('你', 229),
 ('了', 205),
 ('在', 189),
 ('会', 179),
 ('它', 170),
 ('微信', 164),
 ('有', 150),
 ('人', 147),
 ('做', 144),
 ('里面', 115),
 ('这个', 111),
 ('自己', 110),
 ('用户', 110)]
What the heck, what are these? Don't worry, actually, there is a concept in the field of word segmentation called stop words. Stop words are words that have no specific meaning in context, such as this, that, you, I, and punctuation marks, etc. Because no one searches for these meaningless stop words, to improve the effectiveness of word segmentation, we need to filter out these stop words. We can find a stop word library online.
The second version of the code:
import pkuseg
from collections import Counter
import pprint

content = []
stopwords = []
new_text = []
with open("yanjiang.txt", encoding="utf-8") as f:
    content = f.read()
seg = pkuseg.pkuseg()
text = seg.cut(content)
with open("stopword.txt", encoding="utf-8") as f:
    stopwords = f.read()
for w in text:
    if w not in stopwords:
        new_text.append(w)
counter = Counter(new_text)
pprint.pprint(counter.most_common(20))
Output:
[('微信', 164),
 ('用户', 110),
 ('产品', 87),
 ('一种', 74),
 ('朋友圈', 72),
 ('程序', 55),
 ('社交', 55),
 ('这是', 43),
 ('视频', 41),
 ('希望', 39),
 ('游戏', 36),
 ('时间', 34),
 ('阅读', 33),
 ('内容', 32),
 ('平台', 31),
 ('文章', 30),
 ('AI', 30),
 ('信息', 29),
 ('朋友', 28),
 ('就像', 28)]
It looks much better than the first time because the stop words have been filtered out. However, the top 20 high-frequency words we selected are still inaccurate; some words that should not be segmented have been split, such as "朋友圈" (Friend Circle), "公众号" (Public Account), "小程序" (Mini Program), etc. We consider these as a whole.
For these proper nouns, we only need to specify a user dictionary, and the words in the user dictionary will not be split during segmentation. We will perform segmentation again:
Many tutorials on public accounts use a list:
lexicon = ['小程序', '朋友圈', '公众号']
seg = pkuseg.pkuseg(user_dict=lexicon)
text = seg.cut(content)
However, this will report the following error:
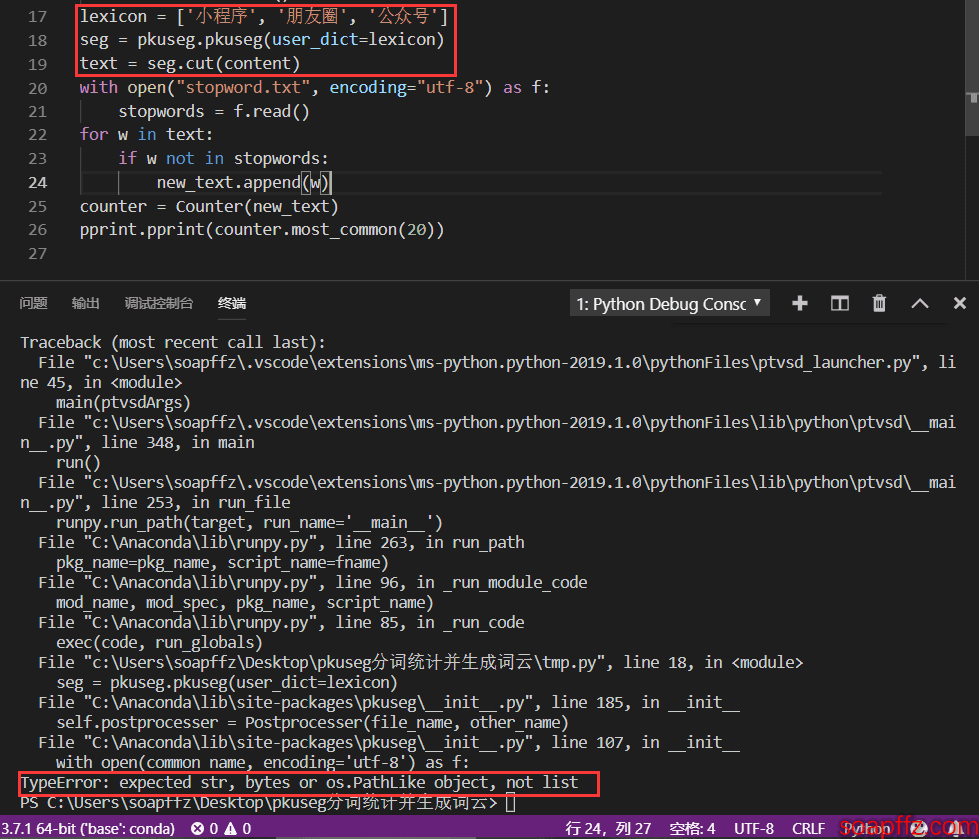
So I will use the official method, using a custom dictionary:
seg = pkuseg.pkuseg(user_dict='dict.txt') # Load model, specify user dictionary
text = seg.cut(content)
The content of dict.txt is:
小程序
朋友圈
公众号
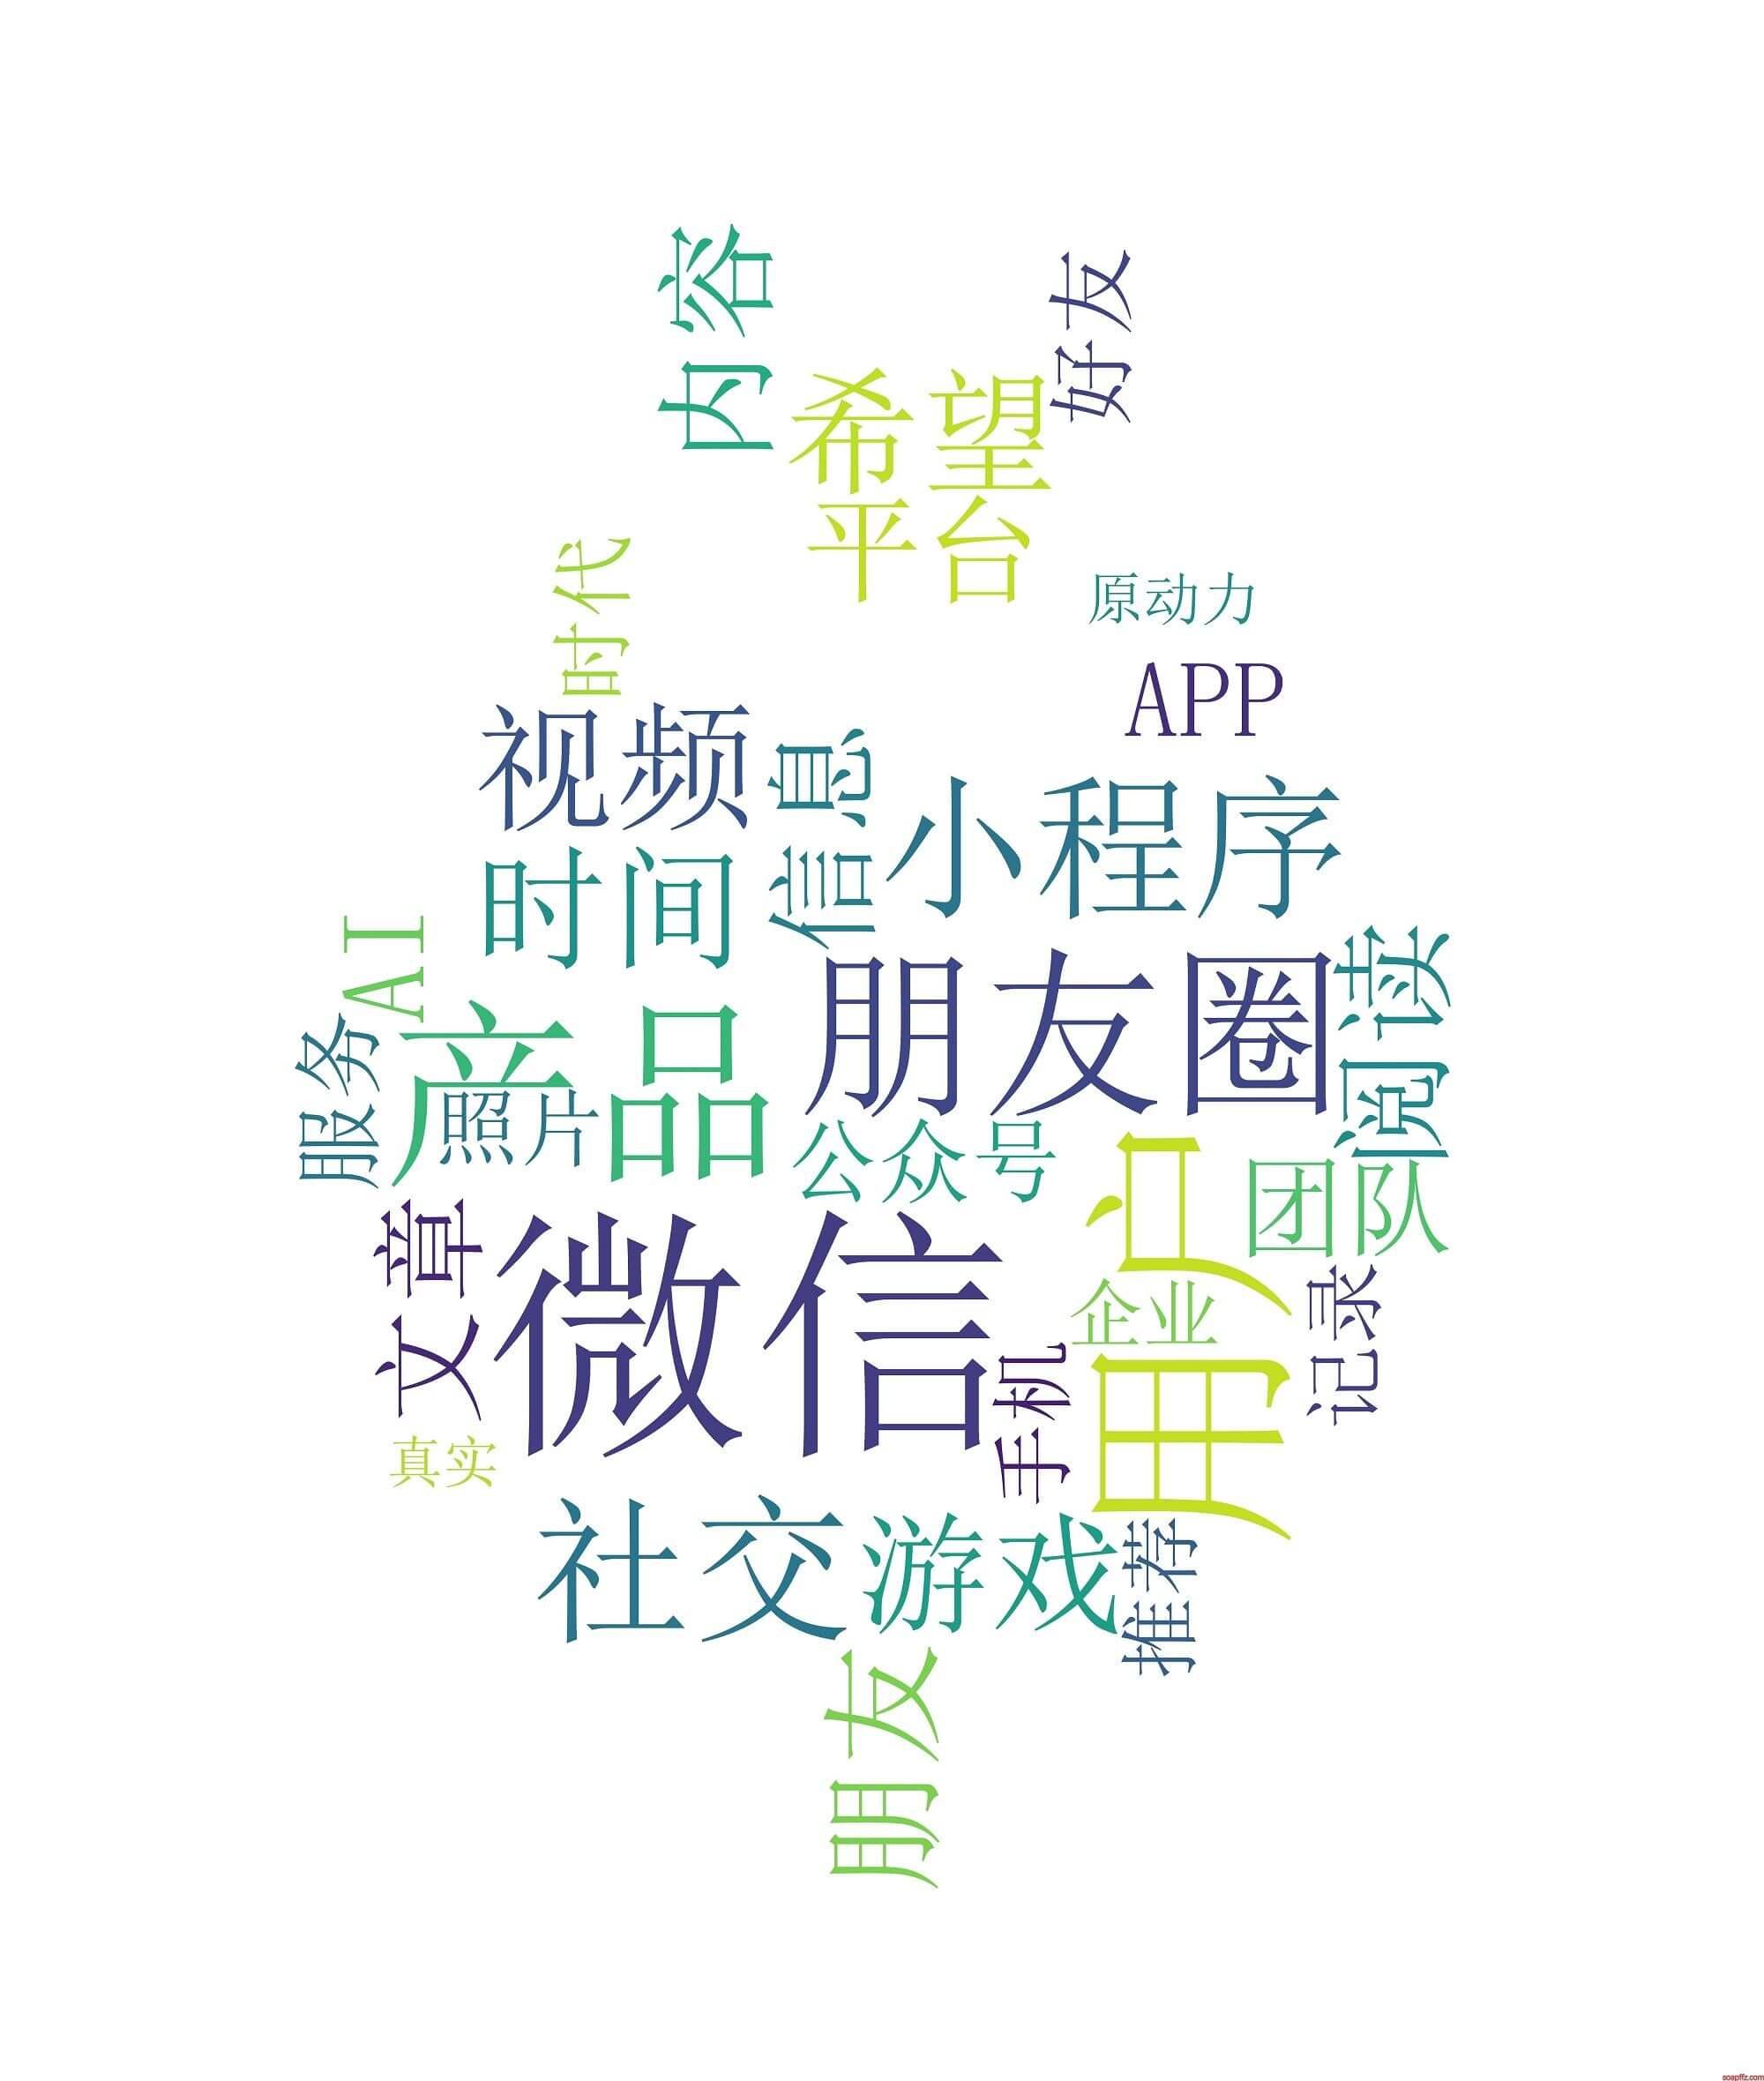
Note to leave a line at the beginning; the first line's content will not be read. The final output of the top 50 high-frequency words is as follows:
Word Segmentation Statistics of Zhang Xiaolong's Speech.py Output:
[('微信', 164),
 ('用户', 110),
 ('产品', 89),
 ('朋友圈', 72),
 ('社交', 55),
 ('小程序', 53),
 ('视频', 41),
 ('希望', 39),
 ('时间', 38),
 ('游戏', 36),
 ('阅读', 33),
 ('朋友', 32),
 ('内容', 32),
 ('平台', 31),
 ('文章', 30),
 ('AI', 30),
 ('信息', 29),
 ('团队', 27),
 ('APP', 26),
 ('公众号', 25)]
As we can see, the most frequently mentioned words in Zhang Xiaolong's speech are "user," "friend," "original motivation," "value," "sharing," "creativity," "discovery," etc. These words embody the spirit of the internet.
The word segmentation program roughly ends here. Next, we will combine word segmentation and word cloud generation.
Framework Integration#
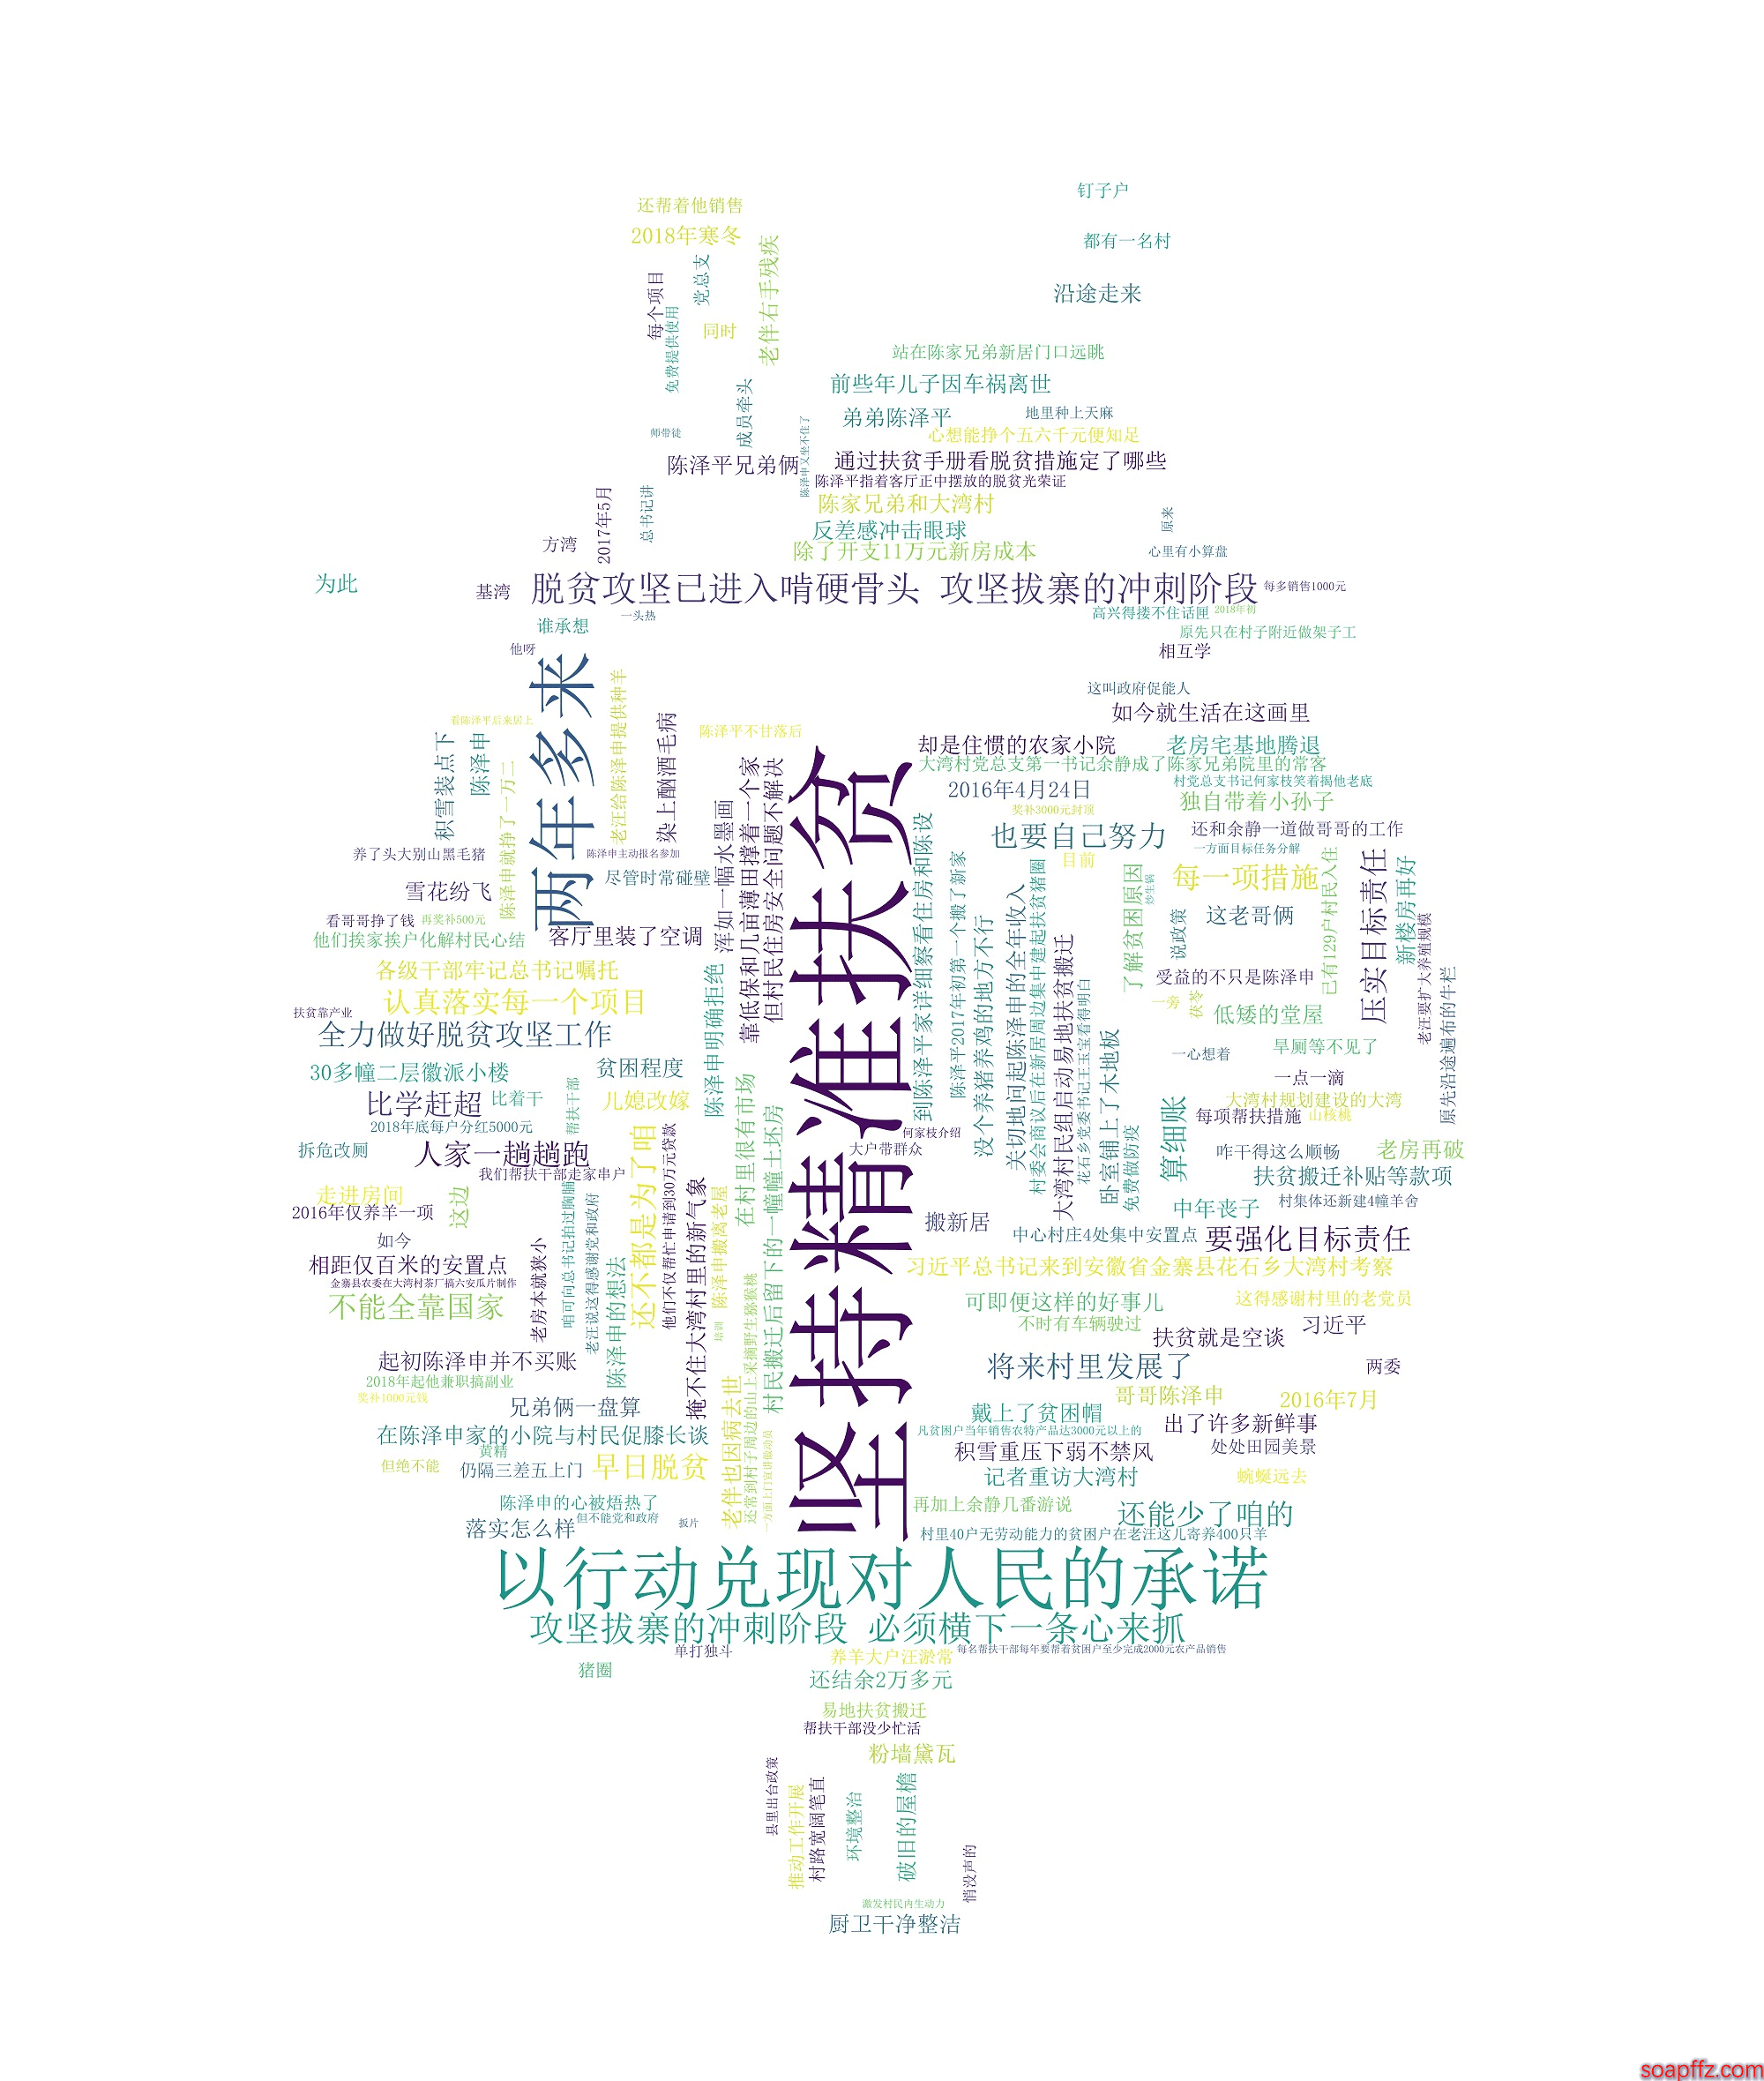
We will combine the above wordcloud code and pkuseg code together and use generate_from_frequencies() to generate the word cloud based on word frequency. The code is as follows:
pkuseg Word Segmentation Statistics and Word Cloud Generation.py code:
#!/usr/bin/python
# -*- coding: utf-8 -*-
'''
@author: soapffz
@function: pkuseg word segmentation statistics and generate word cloud
@time: 2019-01-31
'''

import pkuseg
from collections import Counter
from wordcloud import WordCloud, ImageColorGenerator
import matplotlib.pyplot as plt
from os import path

tmp_content = []
stopwords = []
with open("yanjiang.txt", encoding="utf-8") as f:
    seg = pkuseg.pkuseg(user_dict='dict.txt')
    text = seg.cut(f.read())
with open("stopword.txt", encoding="utf-8") as f:  # Load stop words
    stopwords = f.read()
for w in text:
    if w not in stopwords:  # Record words that are not in the stop words
        tmp_content.append(w)
counter = Counter(tmp_content).most_common(30)  # Get the top 30 most frequent words
content = {}
for i in range(len(counter)):  # Convert the top 30 most frequent words and their counts into a dictionary
    content[counter[i][0]] = counter[i][1]
# print(content) # Print the top 30 most frequent words and their counts dictionary

# Set the export location of the word cloud image to the current user's desktop
pic_path = path.join(path.expanduser("~")+"\\"+"Desktop"+"\\")
bak_pic = plt.imread("totoro.jpg")
wordcloud = WordCloud(
    font_path="simsun.ttc",  # Set font; this is for Win10, Win7 font suffix is ttf, please find it yourself
    mask=bak_pic,  # Set background image; setting width and height has no effect after setting a background image
    background_color="white",  # Background color is white
    prefer_horizontal=0.7,  # Frequency of horizontal word layout is set to 0.7 (default is 0.9)
    scale=5,  # Canvas magnification is set to 15 (default is 1)
    margin=2  # Margin is set to 2
).generate_from_frequencies(content)  # Generate word cloud based on word frequency
wordcloud.recolor(color_func=ImageColorGenerator(bak_pic))  # Set word cloud color to the color of the image
# Save the generated word cloud image to the current user's desktop; if generated again, it will overwrite the previous one
wordcloud.to_file(path.join(pic_path+"wordcloud.jpg"))
plt.imshow(wordcloud)  # imshow() function: displays an image on a 2D coordinate axis
plt.axis("off")  # Do not display axes
plt.show()  # Display the image
The effect is as follows:
Of course, such code is too ugly. I will try to create a visual GUI for it when I have time.
All code and example files download link: https://www.lanzous.com/i31rsdc