Port Scanning and Service Identification#
This section focuses on the common parameter combinations of nmap, which I have always wanted to understand, and I take this opportunity to organize it while writing this article.
This article first introduces port scanning on a known host, and finally supplements the issues left over from previous articles:
Using nmap zmap massca to scan a Class C segment.
Yujian High-Speed TCP Full Port Scanning Tool#
It is a pure port scanning tool.
The tool mainly targets detailed full port detection within a segment of IP addresses. I won't provide the download link as it's easy to find. You can use the software to scan the real IP of my website and see the results:
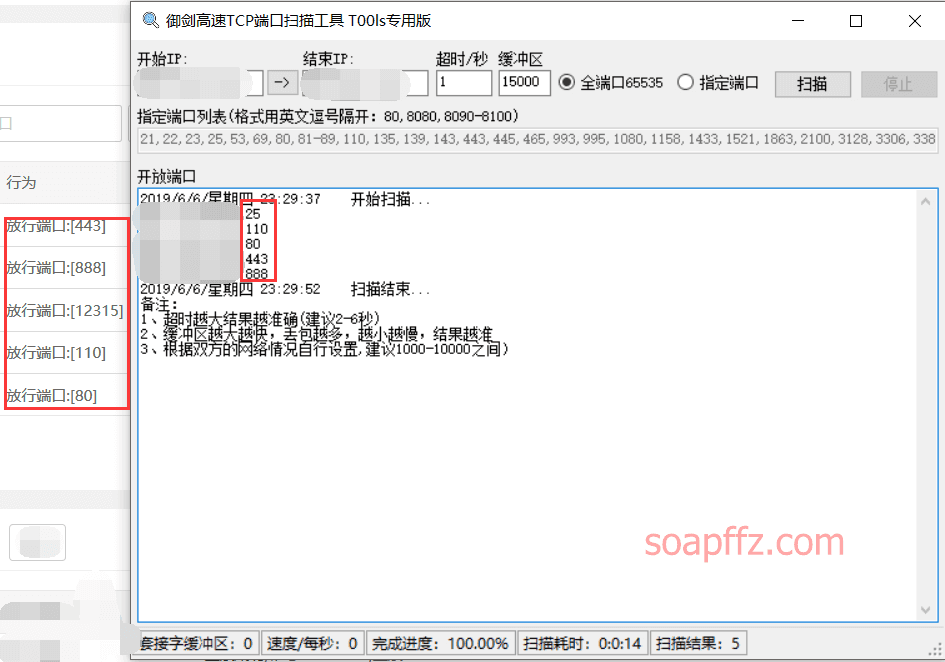
There are still some ports that cannot be scanned, but the speed is still very fast.
censys.io#
This is an online server scanning website that can scan the server information of a website. For now, let's categorize it as a port scanning tool:
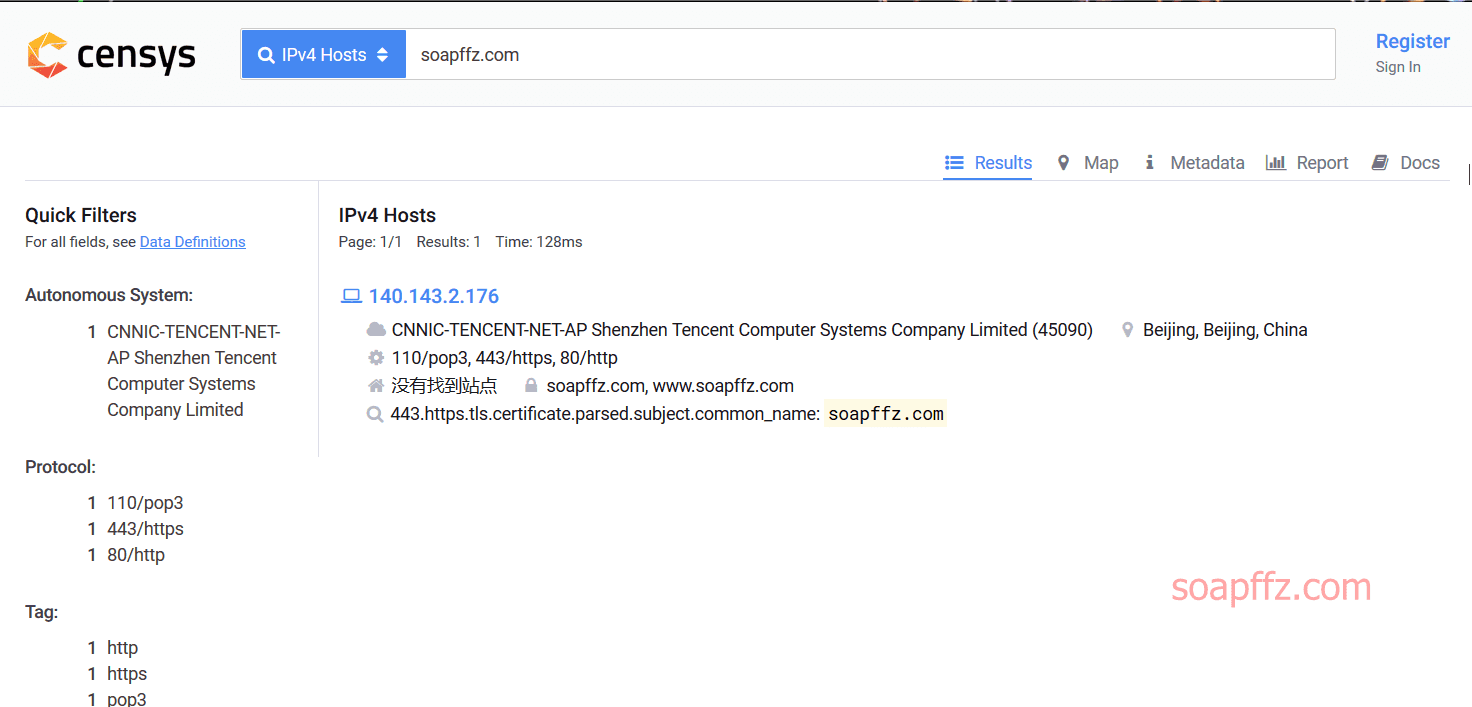
The scanning speed is still very fast, and it identified that I am using Tencent Cloud's CDN, scanning the real IP of the server and three ports (although not all were scanned), which is worth recommending!
nmap#
If you search for nmap usage online, due to the different usage by various experts and the changes in parameter functions with nmap version updates,
you may see different explanations and usages of certain parameters from different experts (people who have fallen into pitfalls are always particularly concerned about the pitfalls they have encountered).
So, directly check the official documentation: https://nmap.org/book/man.html
Although the official Chinese documentation is also available, it is based on the Nmap4.5.0 version, while the version of Nmap at the time of writing this article is 7.70.
Therefore, to see the latest usage, it's better to use Google Chrome to translate the English documentation.
nmap Installation and Configuration#
Linux, such as Kali, comes pre-installed, so I won't discuss it. Here we download the portable version for Windows:
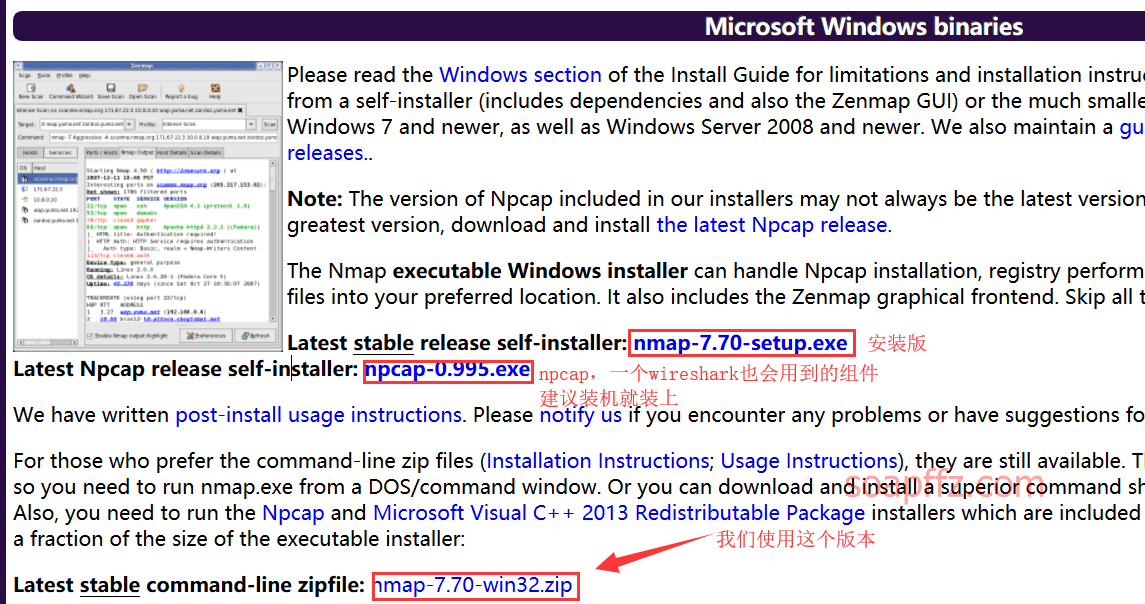
After downloading, we first configure the environment variables so that we don't have to enter the nmap directory every time to open the command line:

nmap Parameter Explanation#
nmap has six common port states:
Open means that an application on the target computer is listening for connections/packets on that port.
Closed means that no application is listening on the port.
Filtered means that a firewall, filter, or other network obstacle is blocking the port, preventing Nmap from determining if it is open or closed.
Unfiltered means that when the port responds to Nmap's probes, Nmap cannot determine if it is open or closed.
Open|Filtered, Closed|Filtered means that nmap cannot determine which of the two states the port is in.
The following parameters are translated from the official documentation, and I will explain them part by part.
Reference articles:
- nmap Super Detailed User Guide
- The King of Port Scanning - nmap Introductory Lecture (1)
- The King of Port Scanning - nmap Introductory Lecture (2)
Select Target:
You can pass hostnames, IP addresses, networks, etc.
For example: scanme.nmap.org, microsoft.com / 24, 192.168.0.1; 10.0.0-255.1-254
-iL <inputfilename>: Input from a list of hosts/networks
-iR <num hosts>: Select random targets
--exclude <host1[,host2][,host3],...>: Exclude hosts/networks
--excludefile <exclude_file>: Exclude list from a file
This is quite simple:
- Scan a website:
nmap soapffz.com - Scan an internal network segment:
nmap 192.168.2.0/24ornmap 192.168.2.3-5
The parameters here for selecting targets are basically not used.
Host Discovery:
-sL List scan, only lists the specified target IPs without performing host discovery.
-sn Like -sP, only uses ping scanning for host discovery, does not scan the target host's ports.
-Pn Treats all specified hosts as up, skipping the host discovery process.
-PS TCP SYN ping, sends an empty TCP packet with the SYN flag set, default port is 80, can specify other ports.
-PA TCP ACK ping, sends an empty TCP packet with the ACK flag set, default port is 80, can specify other ports.
-PU UDP ping, sends an empty UDP packet to the specified port, can penetrate firewalls that only filter TCP.
-PR Uses ARP ping.
-n/-R -n skips DNS resolution to speed up scanning, -R performs reverse DNS resolution on target IPs, which is slower.
-dns-servers Custom DNS resolver address.
--system-dns: Uses the OS's DNS resolver.
-traceroute Traces the route to the target host.
-sn and -Pn are opposites; the former uses ping scanning and disables port scanning, while the latter disables ping scanning. Why are there these two options?
Because if a host blocks ping requests, Nmap may think that the host is not powered on. This would prevent Nmap from performing further checks, such as port scanning, service version identification, and operating system identification. To overcome this issue, Nmap's host detection feature needs to be disabled. After specifying this option, Nmap will assume that the target host is powered on and will perform a full set of detection tasks. Therefore, generally speaking, we prefer to use the latter of these two options.
It is generally recommended to use the -Pn option.
Additionally, DNS resolution can waste some time. Although it defaults to resolving DNS sometimes, I recommend setting it to -n to never perform DNS resolution to save resolution time.
Scanning Methods:
-sS / sT / sA / sW / sM: TCP SYN / Connect() / ACK / Window / Maimon scanning.

-sS TCP SYN scan, since it does not require fully opening a TCP connection, this technique is often referred to as half-open scanning. The biggest advantage of this technique is that very few systems can log this. However, you need root privileges to customize SYN packets (administrator privileges on Windows).
-sT TCP connect() scan, establishes a TCP three-way handshake connection for information transfer. This type of scan is easily detectable, and a large number of connection requests and error messages will be logged on the target host. Generally not recommended.
-sA ACK scan, the principle is to send an ACK packet to the target host. Regardless of whether the target host's port is open, it will return an RST packet. By judging the TTL in the RST packet, it can determine whether the port is open. A TTL value less than 64 indicates the port is open, while greater than 64 indicates it is closed. This advanced scanning method can often be used to bypass firewalls.
-sW Window scan, very similar to ACK scanning.
-sM The probe packet is FIN/ACK. According to RFC 793 (TCP), a response RST packet should be returned regardless of whether the port is open or closed. However, Uriel noted that many BSD-based systems simply drop this probe packet if the port is open.

-sU: UDP scan, the only method for UDP scanning.

Although the results of UDP scanning are not as reliable as those of TCP scanning, penetration testers cannot underestimate UDP scanning, as UDP ports represent potentially valuable service programs. However, the biggest problem with UDP scanning is performance. The Linux kernel limits the sending of ICMP Port Unreachable messages to once per second. At this rate, a complete scan of 65536 UDP ports on a host will take more than 18 hours.
Optimization methods mainly include:
1. Conducting concurrent UDP scans;
2. Prioritizing common ports;
3. Scanning behind firewalls;
4. Enabling the --host-timeout option to skip hosts that respond too slowly.
If we need to find out which UDP ports are open on the target host, to speed up the scan, we can only scan ports 53 (DNS) and 161 (SNMP).
You can use the command nmap -sU 192.168.56.103 -p 53,161.

-sN / sF / sX: TCP Null, FIN, and Xmas scans.

NULL scan does not set any control bits; FIN scan only sets the FIN flag; Xmas scan sets the FIN, PSH, and URG flags. If the target host returns a response with the RST flag, it indicates that the port is closed; if the target host does not respond at all, the port is open|filtered.

NULL scanning is a reverse scanning method that sends a packet with no flags to the server and waits for the server's response. This scanning method is much more covert than the previously mentioned scanning methods, but its accuracy is also lower. Its main use is to determine whether the operating system is Windows, as Windows does not comply with RFC 793 standards and returns RST packets regardless of whether the port is open or closed.

However, while NULL has some uses, it also has the following drawbacks:
1. The accuracy of the NULL method is not high; the port status returned is not very accurate.
2. To obtain the operating system of the target host, you can use the parameter (-O) to get a more accurate judgment for some operating systems by adding the parameter (-osscan-guess).
3. NULL scanning is easily filtered.

--scanflags <flags>: Custom TCP scan flags.
-sI <zombie host[:probeport]>: Idle scan.

After using the -sI option, scanning packets will be sent through the specified zombie host. The local machine does not directly communicate with the target host. If there is an IDS in the other party's network, the IDS will consider the scanning host to be the zombie host.

-sY / sZ: SCTP INIT / COOKIE-ECHO scans.

SCTP INIT scan is similar to TCP SYN scan; it also opens a half-open connection instead of establishing a complete SCTP association. If the target port replies with an INIT-ACK packet, it indicates that the port is open; if it replies with an ABORT packet, the port is closed; if there is no reply, the port will be marked as filtered. Of course, if an ICMP unreachable message (type 3, code 0, 1, 2, 3, 9, 10, or 13) is received, it will also be marked as filtered.
If the target port is open, the SCTP COOKIE ECHO packet that was not previously initiated will be discarded; if the port is closed, an SCTP ABORT packet will be returned. Therefore, this scanning technique cannot distinguish between filtered and open; it can only identify closed ports.

-sO: IP protocol scan.
-b <FTP relay host>: FTP bounce scan.
From the parameter explanation, we can see that the -sT option is the default and the least recommended. Generally, we use half-open scanning -sS.
When a firewall is suspected, we can use the -sA or -sW options to attempt to bypass the firewall during scanning.
Additionally, we can use the -sU UDP scanning method to probe common UDP ports, which may yield unexpected results.
Scanning Ports and Methods:
-p <port range>: Only scan specified ports.
For example: -p22; -p1-65535; -p U:53,111,137, T:21-25,80,139,8080, S:9
--exclude-ports <port range>: Exclude specified ports from the scan.
-F: Fast mode - scans fewer ports than the default scan, generally only scanning 100 common ports.
-r: Scans ports sequentially from low to high.
--top-ports <number>: Scans the <number> most common ports, for example, to scan the 300 most common ports: --top-ports 300.
--port-ratio <ratio>: Scans ports that are <ratio> more common.
Personally, I suggest using the --top-ports 1000 option when quickly reviewing host ports.
When you want a complete scan report, you still need to scan all ports with -p1-65535.
Service/Version Detection:
-sV: Probe open ports to determine service/version information.

Since not all Nmap detections will receive feedback, the intensity of the detection needs to be set. There are three levels in service detection.
The higher the level, the more attempts are made during the detection process, increasing the likelihood of identifying the service.

--version-intensity <level>: Set from 0 (light) to 9 (attempt all probes).
--version-light: Limit to the most likely probes (intensity 2).
--version-all: Attempt every probe (intensity 9).

--version-trace: Display detailed version scanning activity (for debugging).
The -sV option is recommended, but the subsequent -A option includes this functionality.
Script Scanning:
-sC: Equivalent to --script=default.
--script=<Lua scripts>: <Lua scripts> is a comma-separated list of directories, script files, or script categories.
--script-args=<n1=v1,[n2=v2,...]>: Provide arguments for the script.
--script-args-file=filename: Provide NSE script args from a file.
--script-trace: Display all data sent and received.
--script-updatedb: Update the script database.
--script-help=<Lua scripts>: Display help about the script.
<Lua scripts> is a comma-separated list of script files or script categories.
The -sC option is recommended, but the subsequent -A option includes this functionality.
Operating System Detection:
-O: Enable OS detection.
--osscan-limit: Limit OS detection to promising targets.
--osscan-guess: More aggressively guess the operating system.
The --osscan-guess option may come in handy when you want to know the operating system of the other party's host.
Timing and Performance:
Use the <time> option in seconds, or append 'ms' (milliseconds), 's' (seconds), 'm' (minutes), or 'h' (hours) (e.g., 30m).
-T <0-5>: Set timing template (higher is faster).

paranoid (0): Scanning period of 5 minutes, and does not send multiple sets of data in parallel. This mode of scanning will not be detected by IDS.
sneaky (1): Scanning period of 15 seconds, and does not send multiple sets of data in parallel.
polite (2): Scanning period of 0.4 seconds, and does not send multiple sets of data in parallel.
normal (3): This mode sends multiple packets to multiple targets simultaneously, which is Nmap's default mode, balancing scanning time and network load automatically.
aggressive (4): In this mode, Nmap scans each designated host for only 5 minutes before moving on to the next host. It waits no more than 1.25 seconds for a response.
insane (5): In this mode, Nmap scans each designated host for only 75 seconds before moving on to the next host. It waits no more than 0.3 seconds for a response.
Fast scanning also has drawbacks; scanning too quickly can easily be detected and logged by firewalls and IDS, as most firewalls will recognize overly rapid port scans as scanning attempts and block them.

--min-hostgroup / max-hostgroup <size>: Parallel host scan group size.
--min-parallelism / max-parallelism <numprobes>: Probing parallelization.
--min-rtt-timeout / max-rtt-timeout / initial-rtt-timeout <time>: Specify probe round-trip time.
--max-retries <tries>: Maximum number of retransmissions for port scan probes.
--host-timeout <time>: Give up on the target after this time.
--scan-delay / -max-scan-delay <time>: Adjust delay between probes.
--min-rate <number>: Send packets at a rate of at least <number> per second.
--max-rate <number>: Send packets at a rate of no more than <number> per second.
In terms of timing and performance, it is generally unnecessary to specify parallel quantities and packet sending speeds in such detail.
The default timing template is -T3, which is normal, without any optimizations.
Firewall/IDS Evasion and Defense:
-f; --mtu <val>: Fragment packets (optionally with a given MTU), this option can avoid detection of our probing packets by the other party.

After specifying this option, Nmap will use packets with a data body of 8 bytes or even smaller.

-D <decoy1,decoy2[,ME],...>: Use decoys to disclose scans; this option should specify fake IPs, i.e., the IPs of the decoys.

When this option is enabled, Nmap will mix some packets with fake source addresses (decoy) when sending probe packets. This feature aims to conceal the real IP of the local machine. In other words, the logs of the other party will still record the real IP of the local machine. You can use RND to generate random fake IP addresses, or use RND:number to generate <number> fake IP addresses. The specified decoy hosts should be online; otherwise, it may easily crash the target host. Additionally, using too many decoys may cause network congestion. Especially when scanning a client's network, you should avoid this situation.

-S <IP_Address>: Spoof source address.

The principle of source address spoofing is to scan the target host by disguising your IP as another IP to deceive the target host's tracking.
Assuming you want to disguise as 1.1.1.1: parameter -S 1.1.1.1 uses 1.1.1.1 for scanning, making the firewall mistakenly believe that the scanning behavior is from 1.1.1.1.
When using this, be sure to use it with -e, as you need to specify the return IP address in addition to the IP you want to disguise.

-e <iface>: Use the specified interface.
-g / -source-port <portnum>: Use the given port number.
--proxies <url1,[url2],...>: Relay connections through HTTP/SOCKS4 proxies.
--data <hex string>: Attach custom payload to sent packets.
--data-string <string>: Attach custom ASCII string to sent packets.
--data-length <num>: Append random data to sent packets.
--ip-options <options>: Send packets with specified IP options.
--ttl <val>: Set the IP time-to-live field.
--spoof-mac <mac address/prefix/vendor name>: Spoof your MAC address.
--badsum: Send packets with a bogus TCP/UDP/SCTP checksum.
When you have detected a possible firewall, you can use the -F option to reduce the size of the probing packets to bypass the firewall.
The -D option to construct fake IPs is also frequently used. The RND option to generate random fake IP addresses is not recommended, as if the generated IP corresponds to a decoy host that is off or non-existent, it will not be able to send scanning commands to the target host, easily causing the target host to crash.
It is recommended to directly ping the IP of a website (except for websites that prohibit pinging) and use the website's IP as the decoy host.
Using Me represents your real address; for example, quickly scanning nmap.org using both the IP of the soapffz.com website and my computer's real IP:
nmap -F -D 140.143.2.176,ME nmap.org
Output Report:
-oN / -oX / -oS / -oG <file>: Normal output scan, XML, s | <rIpt kIddi3, and Grepable format, respectively for the given filename.
-oA <basename>: Output in three main formats at once.

-oN: Normal output, does not display runtime information and warning messages.
-oX: The generated XML format file can be converted to HTML format and can also be parsed by Nmap's graphical user interface, making it easy to import into databases.
So it is recommended to save the results as XML files.
-oS: Output similar to interactive tool output.
-oG: Generate a file convenient for Grep usage. Although this file format is outdated, it is still very popular. The content of this file consists of comments (starting with #) and information lines. The information lines contain six fields, with field names and values separated by colons and fields separated by tabs. The field names are Host, Ports, Protocols, Ignored State, OS, Seq Index, IP ID Seq, and Status. This file format is convenient for organizing scan results using UNIX commands like grep or awk.
For convenience, using the -oA option can output the scan results in standard format, XML format, and Grep format at once, stored in .nmap, .xml, and .gnmap files.

-v: Increase verbosity level (use -vv or higher for better effect).
-d: Increase debugging level (use -dd or more for better effect).
--reason: Show the reason for a port being in a specific state.
--open: Only show open (or possibly open) ports, which is highly recommended.
--packet-trace: Show all packets sent and received.
--iflist: Print host interfaces and routes (for debugging).
--append-output: Append to rather than clobber the specified output file.
--resume <filename>: Resume an aborted scan.
--stylesheet <path/URL>: XSL stylesheet for converting XML output to HTML.
--webxml: Reference stylesheet from Nmap.Org for more portable XML.
--no-stylesheet: Prevent association of XSL stylesheet with XML output.
It is recommended to use the -open -vv options to output detailed information and only include open or possibly open ports.
For report output, it is suggested to use -oX to generate an .XML report, or directly use the -oA option to output .nmap .xml .gnmap reports at once.
Miscellaneous:
-6: Enable IPv6 scanning.
-A: Enable OS detection, version detection, script scanning, and traceroute.
--datadir <dirname>: Specify custom Nmap data file location.
--send-eth / -send-ip: Send using raw Ethernet frames or IP packets.
--privileged: Assume the user has full privileges.
--unprivileged: Assume the user lacks raw socket permissions.
-V: Print version number.
-h: Print this help summary page.
When you use the -A option, it is equivalent to using the following four commands simultaneously:
Service version identification (-sV)
Operating system identification (-O);
Script scanning (-sC);
Traceroute (–traceroute).
As for the NSE scripts for vulnerability detection, this article does not cover them, as this article focuses on port and service scanning. Vulnerability scanning will be discussed in the next article on vulnerability scanners.
Common nmap Scans#
When nmap is running, if we can "break" like in other programming, just press the d key on the keyboard. If you want to know the progress of the run, you can press the X key.
We will use the parameters learned above to scan my website (assuming we have bypassed the CDN to obtain the real IP, as scanning CDN nodes is meaningless).
The expected result is:
To obtain all open ports, guess the services running on those ports, and guess the server version information with as little time as possible.
Yes, I hit myself.jpg
First, try the default -sT scanning method, quickly scan 100 common ports and print detailed information:
nmap -sT -F -vv 140.143.2.176
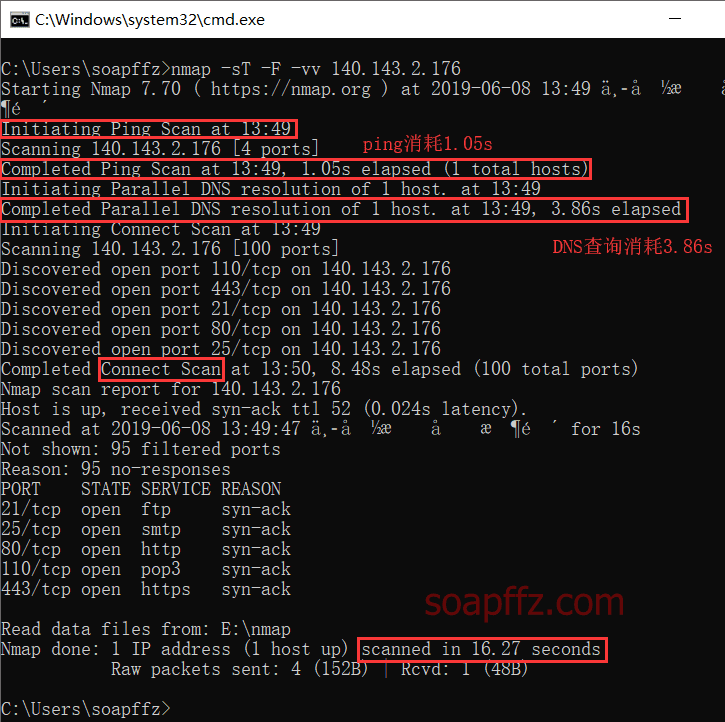
- From the results, we can see that using
pingtook 1.05s, andDNSqueries took 3.86s. 2. I scanned theIPdirectly; why do you need to queryDNS? The scanning method is a complete TCP three-way handshake.
Next, try disabling ping, using TCP SYN scanning, which is half-open scanning, to attempt to get service and version information for each port, scanning the common 1000 ports, and disabling DNS queries:
nmap -vv -Pn -sS -T4 -sV --top-ports 1000 -n 140.143.2.176
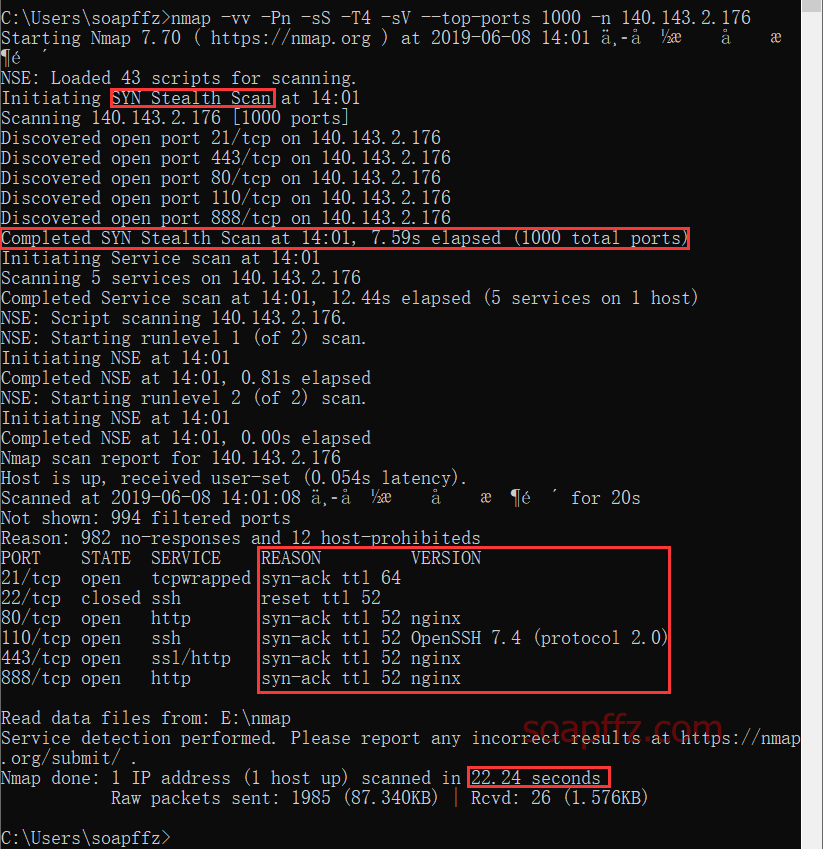
- You can see that the scanning method has changed to
SYN Stealth Scan, i.e., SYN secret scanning. 2. After increasing the number of scanned ports, we found one more port888. 3. Additionally, after adding the-sVoption, the scan report includes an additional columnVERSION, which is the service version.
The time taken only increased slightly, but the scan results were more comprehensive than the previous one.
Building on that, we use the -sA ACK scanning method, using a faster method to scan all ports and probe the operating system as much as possible:
nmap -vv -Pn -sA -T5 -sV -p1-65535 -O --osscan-guess -n 140.143.2.176
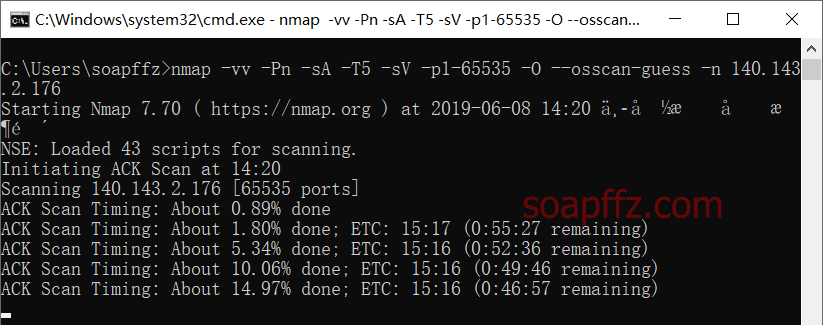
You can see that under the same conditions, the -sA option takes more time than -sS.
Therefore, it is generally only recommended to use the -sA option when there is a firewall on the other side that you want to bypass; using -sS is usually sufficient.
The time consumption ranking for the three probing methods sA/sW/sM: sM > sW > sA.
The other three scanning methods sN/sF/sX have not been used yet; they will be introduced later when needed.
Finally, here is the most efficient nmap command I know to scan all ports and detailed information while saving time:
nmap -v -Pn -sS -T5 -sV -p1-13000 --version-light -O --osscan-guess -n 140.143.2.176
The results are as follows (to save time, I only scanned the first 13000 ports):
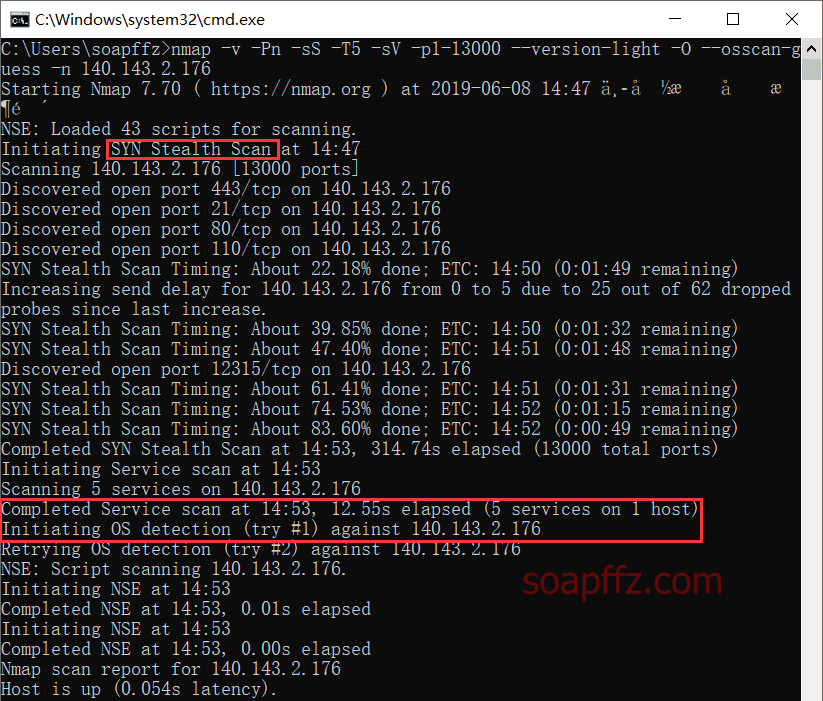
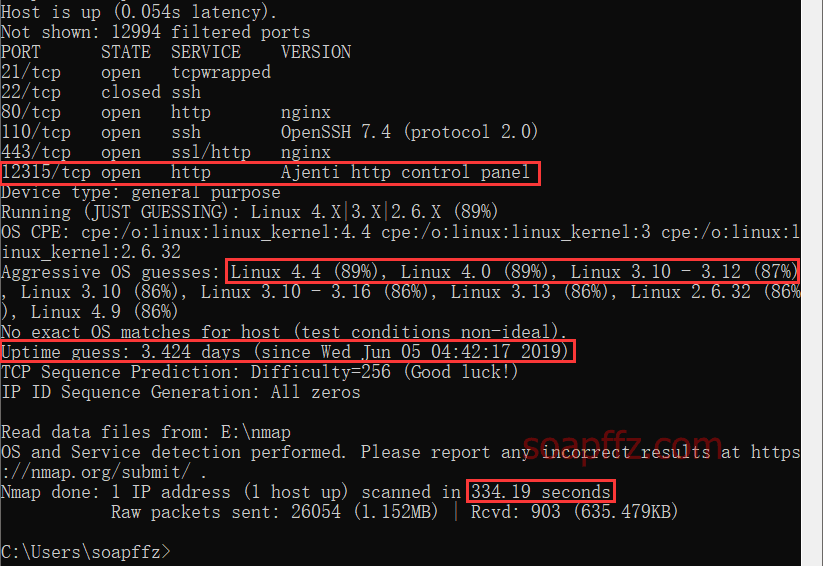
Indeed, my 12315 port is not in the common ports, and it was only scanned when I specified the range.
The operating system is most likely guessed to be Linux4.4 or Linux4.0, but in reality, it is 3.10.

However, this command is not perfect, as I specified a range. I hope to scan all ports as quickly as possible.
But even -sS is not very effective; from the above two examples, we can see that nmap is not very good at full port scanning.
It can be used in conjunction with the stateless port scanner Masscan introduced later to achieve "precision guidance."
zmap#
ZMap is an open-source network scanning tool that helps researchers quickly conduct full network detection. With just one machine and sufficient upstream network speed, it can reach the theoretical speed of gigabit Ethernet and scan the entire IPv4 address space in 45 minutes.
It is a tool developed by the founder of censys.io that we introduced earlier.
GitHub address:
Github Repo not found
The embedded github repo could not be found…
zmap does not support Windows, so we will use an Ubuntu Desktop 18.04.1 LTS to install and use zmap.
Execute: sudo apt install zmap -y to complete the installation.
Common parameters are as follows:
-p, –target-port=port: The TCP port number to scan (e.g., 443).
-o, –output-file=name: Output scan results to a file.
-b, –blacklist-file=path: Blacklist file, i.e., addresses excluded from the scan. There are examples in the conf/blacklist.example file, with one subnet per line, e.g., 192.168.0.0/16.
-n, –max-targets=n: The upper limit of detections, which can be a number like -n 10000 or a percentage of the scanned address space.
-N, –max-results=n: Exit the scan after receiving a certain number of results.
-t, –max-runtime=secs: Maximum scanning (packet sending) time.
-r, –rate=pps: Set the packet sending rate (packets/sec).
-B, –bandwidth=bps: Set the packet sending bandwidth (bits/second).
-c, –cooldown-time=secs: Time to wait for responses (default=8).
-T, –sender-threads=n: Number of threads for sending packets (default is 1).
-P, –probes=n: Number of probes sent to each IP (default is 1).
-s, –source-port=port|range: Source port(s) for sending packets.
-S, –source-ip=ip|range: Source IP(s) for sending packets, which can also be a range of IP addresses.
-G, –gateway-mac=addr: The MAC address of the gateway for sending packets.
-i, –interface=name: Network interface.
–list-probe-modules: List available probe modules.
-M, –probe-module=name: Select probe module (default is tcp_synscan).
–probe-args=args: Set parameters for the probe module.
–list-output-fields: List the selected output module.
Output options: ZMap allows users to define and write their own output modules. Output modules are responsible for processing the return results of the probe modules and displaying them to the user.
–list-output-modules: List all output modules.
-O, –output-module=name: Set the output module.
–output-args=args: Set parameters for the output module.
-f, –output-fields=fields: List the selected output module.
–output-filter: Output module filter; additional options.
-C, –config=filename: Read a configuration file that may contain special options.
-q, –quiet: Quiet mode.
-g, –summary: Print configuration and results summary after scanning.
-v, –verbosity=n: Log level (0-5, default is 3).
-h, –help: Display help.
-V, –version: Print version.
Although the -p option of zmap specifies the port, it cannot use parameters like 1-65535.
The use of zmap is more inclined to scan whether a specific port is open on specified hosts within a specified range, such as:
zmap -p 80 1.2.3.4 10.0.0.3: Scan the 80 port of the IPs 1.2.3.4 and 10.0.0.3.
zmap -p 80 10.0.0.0/8 192.168.0.0/16: Scan the 80 port of two subnets.
zmap -p 80: Find hosts on tcp/80 on the Internet and output to stdout.
zmap -N 5 -B 10M -p 80: Find 5 HTTP servers, scanning at 10 Mb/s.
Using zmap to temporarily scan the C segment of baidu.com: 123.125.114.1/24 on port 8080:

It can basically finish in 1 second, but this does not quite fit the goal of this article to scan all ports of a specified host, so I will not continue to elaborate.
Masscan#
Masscan claims to be the fastest internet port scanner, capable of scanning the entire internet in six minutes.
Although masscan can be used on Windows, it requires configuring MinGW and other compilation environments, so we will also use the Ubuntu environment for demonstration.
Installation method:
sudo apt-get install git gcc make libpcap-dev -y
git clone https://github.com/robertdavidgraham/masscan
cd masscan
make
If you want to use the masscan command anywhere, execute:
cd ~
cp masscan/bin/masscan /bin
Common options for masscan:
-p: Specify the ports to scan; if specifying multiple ports, separate them with commas.
--rate: Specify the packet sending rate based on your actual bandwidth; I have a 20M fiber connection, generally setting it to 1000 is sufficient. For a 1-2 Mbps VPN, setting it to 100 is about right; these are rough estimates.
--open-only: Only show open ports.
--banners: Get banners.
-c: Use a custom scan configuration file.
--ping: Whether to ping the target before scanning.
-oL: Save scan results to the specified file.
--excludefile: Exclude IP segments from scanning.
First, let's introduce the original goal of this article, which is to scan all ports of a specified IP:
masscan -p1-65535 140.143.2.176
Using this command, the speed is much slower than nmap's -sS, because by default,
Masscan's scanning speed is 100 packets per second, which is quite slow.
You can also use the --rate option and specify a value. Let's compare the results of using the default 100 packet sending speed and increasing the sending rate:
masscan -p1-65535 140.143.2.176 --rate 1000 > 1.txt
masscan -p1-65535 140.143.2.176 > 2.txt


As you can see, the number of packets sent is inversely proportional to the number of ports scanned.
Other parameters, saving, loading configurations, etc., are not particularly noteworthy; the core is simply specifying ports to scan.
Summary of Port Scanning and Service Identification#
If you only need to scan common ports, using the Yujian High-Speed TCP Full Port Scanning Tool or censys.io is completely sufficient.
Of course, if conditions allow, it is highly recommended to use nmap. The explanations and usages of the above parameters can be summarized into the following points:
The default scanning method -sT is not recommended; it is advisable to use the -sS option.
The default timing level is -T3; for daily scans, -T4 can be used.
The -A option scans too many things; generally, using -sV and -O --osscan-guess is sufficient.
During port scanning,
Additionally, nmap has many usages, such as the host discovery part that I have not compared one by one. I will return to update this article when I use them.
Of course, nmap's -sS scanning of common ports and guessing the corresponding service information, combined with masscan without changing the rate for full port scanning,
can basically meet the original intention of this article - scanning all ports and information of a specified server.
The article ends here.