事情起因#
代办事项之 - 搭建电脑本地 ip 代理池
最终希望实现的效果:设计一个GUI客户端,能方便地爬取代理,随机使用代理,换代理,清空代理等等,点一下换一下ip
素材获取:在Python 目录中查看《多线程爬取西刺高匿代理并验证可用性》这篇文章
改写爬取西刺代理的 py 代码#
发现三个月前写的代码自己都难以接受,遂总结如下 (不会总结的程序员不是好的安全小白):
| 问题 | 改进方法 |
|---|---|
| 用了不合适的进程库 Pool ().apply_async 导致多进程时不能把存储的列表留住所以采用了文件读写的方式使得代码非常杂乱 | 重新理解进程和线程的适用性并采用了多线程队列 |
| 使用大量 I/O 操作导致不同环境的适配问题 | 采用 MongoDB 数据库存储 |
| 代码可重利用性不高 | 在类中使爬虫操作和数据库插入操作分开,且数据库插入函数可重复利用,使得代码简洁许多 |
| 没有处理代码异常 | 在容易出错的地方增加了代码异常处理 try except |
参考教程:
全代码:
#!/usr/bin/python
# -*- coding: utf-8 -*-
'''
@author: soapffz
@fucntion: 多线程爬取西刺高匿代理并存储到mongodb数据库
@time: 2019-04-20
'''
import pymongo  # mongodb数据库操作
from threading import Thread  # 多线程
from fake_useragent import UserAgent  # 假的useragent
import requests  # 请求站点
from lxml import etree  # 解析站点
import re  # re解析库
import telnetlib  # telnet连接测试代理有效性
import timeit  # 计算用时


class multi_threaded_crawl_proxies(object):
    def __init__(self):
        try:
            # 连接mongodb,得到连接对象
            client = pymongo.MongoClient('mongodb://localhost:27017/')
            self.db = client.proxies  # 指定proxies数据库,这个类都使用这个数据库
            print("连接数据库成功!")
        except Exception as e:
            print("数据库连接失败:{}".format(e))
        self.ua = UserAgent()  # 用于生成User-Agent
        self.crawl_progress()

    def crawl_progress(self):
        # 爬取操作
        try:
            # 可添加多个爬取的函数的启动函数在此处
            self.xici_nn_proxy_start()
        except Exception as e:
            print("程序运行错误:{}\n程序退出!".format(e))
            exit(0)

    def xici_nn_proxy_start(self):
        xici_t_cw_l = []  # 爬取线程列表
        self.xici_proxies_l = []  # 用于存放验证过的代理字典,字典包含ip、端口、ip类型、地址
        for i in range(1, 21):  # 爬取20页代理
            t = Thread(target=self.xici_nn_proxy, args=(i,))
            xici_t_cw_l.append(t)  # 添加线程到线程列表
            t.start()
        for t in xici_t_cw_l:  # 等待所有线程完成退出主线程
            t.join()
        self.db_insert(self.xici_proxies_l, "xici")  # 插入数据库

    def xici_nn_proxy(self, page):
        # 西刺代理爬取函数
        url = "https://www.xicidaili.com/nn/{}".format(page)
        # 这里不加user-agent会返回状态码503
        req = requests.get(url, headers={"User-Agent": self.ua.random})
        if req.status_code != 200:
            print("ip被封了!此页爬取失败!")
            exit(0)
        else:
            print("正在爬取第{}页的内容...".format(page))
            content = req.content.decode("utf-8")
            tree = etree.HTML(content)
            # 用xpath获得总的ip_list
            tr_nodes = tree.xpath('.//table[@id="ip_list"]/tr')[1:]
            for tr_node in tr_nodes:
                td_nodes = tr_node.xpath('./td')  # 用xpath获得单个ip的标签
                speed = int(re.split(r":|%", td_nodes[6].xpath(
                    './div/div/@style')[0])[1])  # 获得速度的值
                conn_time = int(re.split(r":|%", td_nodes[7].xpath(
                    './div/div/@style')[0])[1])  # 获得连接时间的值
                if(speed <= 85 | conn_time <= 85):  # 如果速度和连接时间都不理想,就跳过这个代理
                    continue
                ip = td_nodes[1].text
                port = td_nodes[2].text
                ip_type = td_nodes[5].text.lower()
                td_address = td_nodes[3].xpath("a/text()")
                address = 'None'
                if td_address:  # 有的地址为空,默认置为空,获取到则置为对应地址
                    address = td_address[0]
                proxy = "{}:{}".format(ip, port)
                try:
                    # 用telnet连接一下,能连通说明代理可用
                    telnetlib.Telnet(ip, port, timeout=1)
                except:
                    pass
                else:
                    self.xici_proxies_l.append(
                        {"ip": ip, "port": port, "ip_type": ip_type, "address": address})

    def db_insert(self, proxies_list, collection_name):
        if proxies_list:
            # 传入的列表为空则退出
            collection = self.db['{}'.format(collection_name)]  # 选择集合,没有会自动创建
            collection.insert_many(proxies_list)  # 插入元素为字典的列表
        else:
            print("代理列表为空!\n程序退出!")
            exit(0)


if __name__ == "__main__":
    start_time = timeit.default_timer()
    multi_threaded_crawl_proxies()
    end_time = timeit.default_timer()
    print("程序运行结束,总用时:{}".format(end_time-start_time))
效果如下:


[19-04-26 更新]
修改注册表参数#
那么代理有了,我们需要修改 windows 本地的代理,搜了一下,了解到:
win能通过IE浏览器的代理设置来代理访问外网- 网上大部分文章介绍的 IE 代理位置是在
HKEY_CURRENT_USER\Software\Microsoft\Windows\CurrentVersion\Internet Settings
- 但是据参考文章 1 的作者说,真正修改的地方应该是
HKEY_CURRENT_USER\Software\Microsoft\Windows\CurrentVersion\Internet Settings\Connections
也就是上面那个位置中的Connections项,我们在 IE 代理中设置一个127.0.0.1:80的代理:
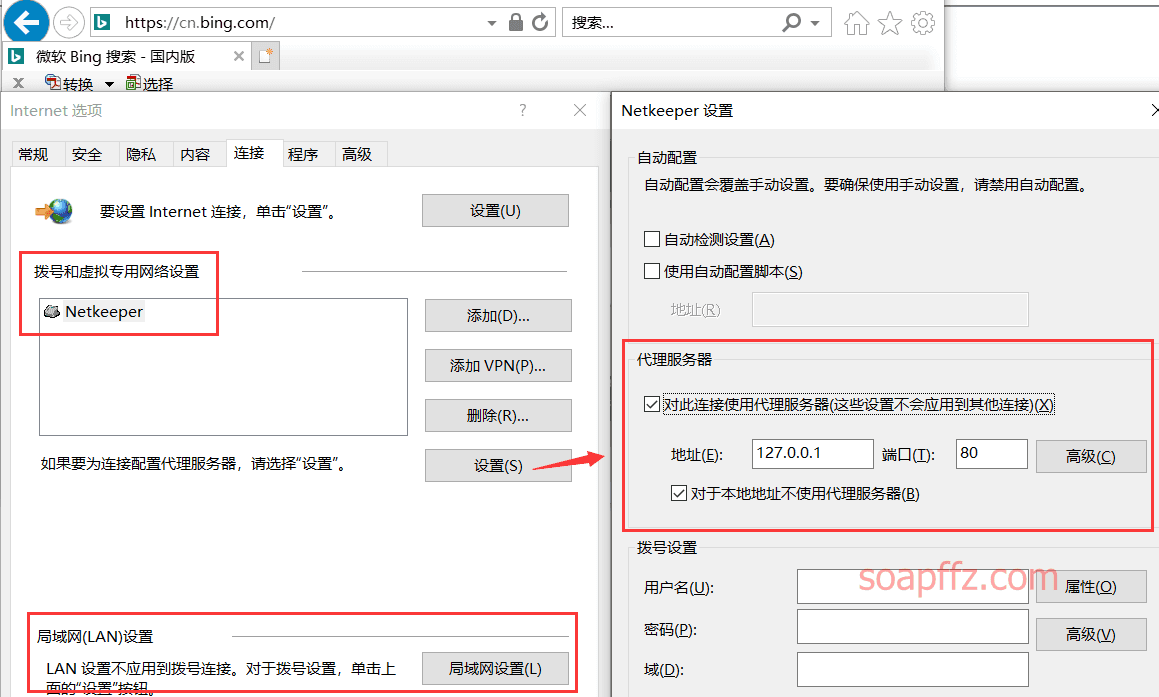
打开代理是这样的:
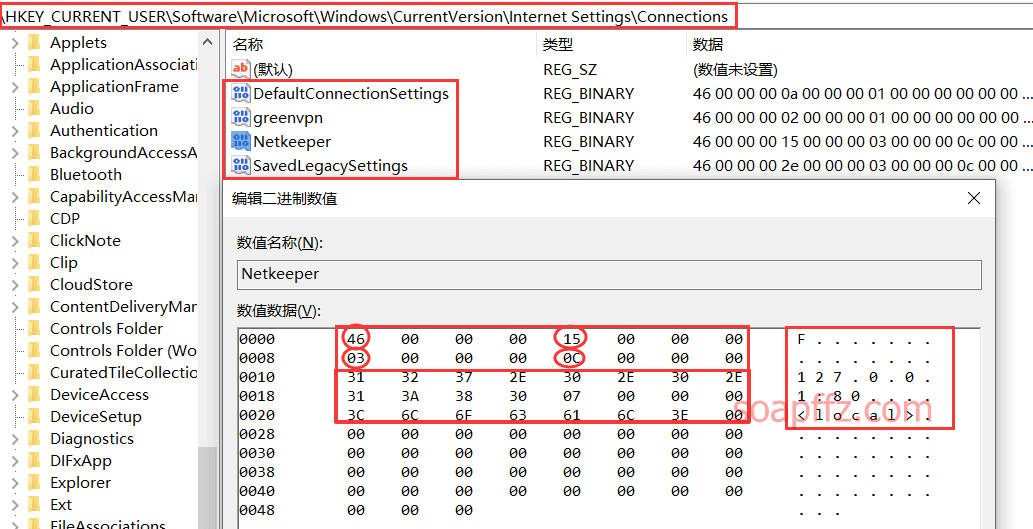
注册表导出是这样的:
Windows Registry Editor Version 5.00

[HKEY_CURRENT_USER\Software\Microsoft\Windows\CurrentVersion\Internet Settings\Connections]
"DefaultConnectionSettings"=hex:46,00,00,00,0a,00,00,00,01,00,00,00,00,00,00,\
  00,00,00,00,00,00,00,00,00,00,00,00,00,00,00,00,00,00,00,00,00,00,00,00,00,\
  00,00,00,00,00,00,00,00,00,00,00,00,00,00,00,00
"SavedLegacySettings"=hex:46,00,00,00,51,00,00,00,0b,00,00,00,0c,00,00,00,31,\
  32,37,2e,30,2e,30,2e,31,3a,38,30,07,00,00,00,3c,6c,6f,63,61,6c,3e,00,00,00,\
  00,00,00,00,00,00,00,00,00,00,00,00,00,00,00,00,00,00,00,00,00,00,00,00,00,\
  00,00,00,00,00,00,00,00
"Netkeeper"=hex:46,00,00,00,31,2c,30,30,0b,00,00,00,0c,00,00,00,31,32,37,2e,30,\
  2e,30,2e,31,3a,38,30,07,00,00,00,3c,6c,6f,63,61,6c,3e,00,00,00,00,00,00,00,\
  00,00,00,00,00,00,00,00,00,00,00,00,00,00,00,00,00,00,00,00,00,00,00,00,00,\
  00,00,00,00
"greenvpn"=hex:46,00,00,00,02,00,00,00,01,00,00,00,00,00,00,00,00,00,00,00,00,\
  00,00,00,00,00,00,00,00,00,00,00,00,00,00,00,00,00,00,00,00,00,00,00,00,00,\
  00,00,00,00,00,00,00,00,00,00
看到除了 ip 地址和端口,还有一些奇怪的十六进制字符串,根据参考文章 1 的介绍,大致参数如下:(图片来自参考文章 1)

再次感谢SolomonXie大佬的参考文章 1:
总结下也就这么几位:
46 00 00 00 00 00 00 开关 00 00 00 IP长度 00 00 00 IP地址 00 00 00 是否跳过本地代理 21 00 00 00 PAC地址
不知道大佬的是IE几,我的是IE11,与这个略有不同,大概如下:
46 00 00 00 自增位 00 00 00 开关 00 00 00 IP长度 00 00 00 IP地址 00 00 00 是否跳过本地代理
-
每个信息的分隔符是三个 00,即 00 00 00。
-
开关:主要代表 IE 设置中复选框的选中情况。使用代理为 03,不使用为 01,对本地使不使用代理与这个开关无关,只取决于最后的是否跳过本地代理部分。你也可以设置好你的设置然后打开注册表查看
-
自增位:不知道是从哪个值开始自增,就算设置不改变的情况,重新点击确定这个自增值都会开始自增,索性直接设置为 00 即可,后来的效果也证实了把这个自增位设置为 00 是毫无影响的
-
IP 长度:十六进制,包括。和:,比如我设置
127.0.0.1:80是 12 位的,注册表中的值为0C -
IP 地址:直接把 IP 按照每个字符转十六进制就好了。
-
是否跳过本地代理:如果没勾选,则全为 0,如果勾选了选项,值为:
07 00 00 00 3c 6c 6f 63 61 6c 3e
此处注意,如果你看到这里并且已经开始编码,那么注意注册表中导入的十六进制值是没有空格和逗号的
-
这段除了前面的 07 剩余的意思为:,这是固定值,无需修改
-
最后全补为 0 即可,设置了 ip 地址的项的总长度为 224,没设置的总长度为 167
所以根据以上内容,按照我的情况:设置代理对本地不代理的注册表值应该如下:
46 00 00 00 00 00 00 00 03 00 00 00 IP长度 00 00 00 IP地址 00 00 00 07 00 00 00 3c 6c 6f 63 61 6c 3e
只需 ip 地址转为十六进制字符串,算一下长度传入即可
注册表修改部分的代码:
注意注册表中导入的十六进制值是没有空格和逗号的
#!/usr/bin/python
# -*- coding: utf-8 -*-
'''
@author: soapffz
@fucntion: 利用修改注册表设置系统代理
@time: 19-04-26
'''
import IPy  # 判断ip是否合法
import re
import subprocess  # 执行cmd命令


def setproxy(hex_value):
    # 传入整理好的十六进制代理设置
    try:
        vpn_name = "Netkeeper"  # 你的专用网络的名字
        subprocess.run('REG ADD "HKEY_CURRENT_USER\Software\Microsoft\Windows\CurrentVersion\Internet Settings\Connections" /v "{}" /t REG_BINARY /d "{}" /f'.format(
            vpn_name, hex_value), shell=True, stdout=subprocess.PIPE)
        print("导入注册表成功!")
    except Exception as e:
        print("修改注册表报错:{}\n程序退出!".format(e))
        exit(0)


def registry_value_construction(ip, port, proxy_switch, local_proxy_switch):
    # 注册表值构造
    switch_options = {"1": "03", "0": "01"}  # 代理开关选项
    local_switch_options = {
        "1": "070000003c6c6f63616c3e", "0": ""}  # 本地代理开关选项
    # 端口合法性检查的正则表达式
    port_regular_expression = r'^([0-9]|[1-9]\d|[1-9]\d{2}|[1-9]\d{3}|[1-5]\d{4}|6[0-4]\d{3}|65[0-4]\d{2}|655[0-2]\d|6553[0-5])$'
    if not re.search(port_regular_expression, port):  # 如果端口不在0-65535之间,则报错
        print("端口不符合类型\n程序退出!")
        exit(0)
    if not ip:  # ip为空的情况,就忽略端口的设置,直接全部置为0
        former = "4600000000000000{}00000000000000{}".format(switch_options.get(
            proxy_switch), local_switch_options.get(local_proxy_switch))  # 填充代理开关选项和本地代理开关选项进入
        # 补全一部分00,不然导入不进去,下同
        value = former + "00"*int((112-int(len(former)))/2)
        print("ip为空的注册表参数值构建完成!")
    else:
        try:
            IPy.IP(ip)  # 注册表中能随便填ip和端口,但是我们不允许,如果ip不正确或为空则会直接报错退出
            # hex()方法转换出来的数字是0x开头的且ip长度站两位
            ip_len = hex(len(ip)+len(port)+1).split("x")[-1].zfill(2)
            ip = bytes(ip, 'ascii').hex()  # 获得ip的十六进制字符串
            port = bytes(port, 'ascii').hex()
            former = "4600000000000000{}000000{}000000{}3A{}{}".format(switch_options.get(
                proxy_switch), ip_len, ip, port, local_switch_options.get(local_proxy_switch)).lower()
            value = former+"00"*int((150-int(len(former)))/2)
            print("注册表参数值构建完成!")
        except Exception as e:
            print("程序报错:{}\n程序退出!".format(e))
            exit(0)
    return value


if __name__ == "__main__":
    ip = "127.0.0.1"  # 设置代理ip
    port = "80"  # 设置代理端口
    proxy_switch = "1"  # 设置代理开关,"1"为开启代理,"0"为不开启代理
    local_proxy_switch = "1"  # 设置本地代理开关,"1"为开启,对本地不适用代理,"0"为关闭,对本地使用代理
    hex_value = registry_value_construction(
        ip, port, proxy_switch, local_proxy_switch)  # 这个函数返回代理设置参数的十六进制字符串
    setproxy(hex_value)  # 将十六进制字符串传入函数去设置
[19-05-03:修改了其中的 ip_len 语句]
部分功能解释:
-
由于 IPy 调用的 ip 合法性检测功能在 ip 为空时也会报错,所以先判断 ip 是否为空;非空的话则忽略端口值,除了开关以外都置为 0
-
代码中使用的检测端口合法性的正则表达式检测的是
0-65535,备忘录一下1024-65535的正则表达式如下:
^(1(02[4-9]|0[3-9][0-9]|[1-9][0-9]{2})|[2-9][0-9]{3}|[1-5][0-9]{4}|6[0-4][0-9]{3}|65[0-4][0-9]{2}|655[0-2][0-9]|6553[0-5])$
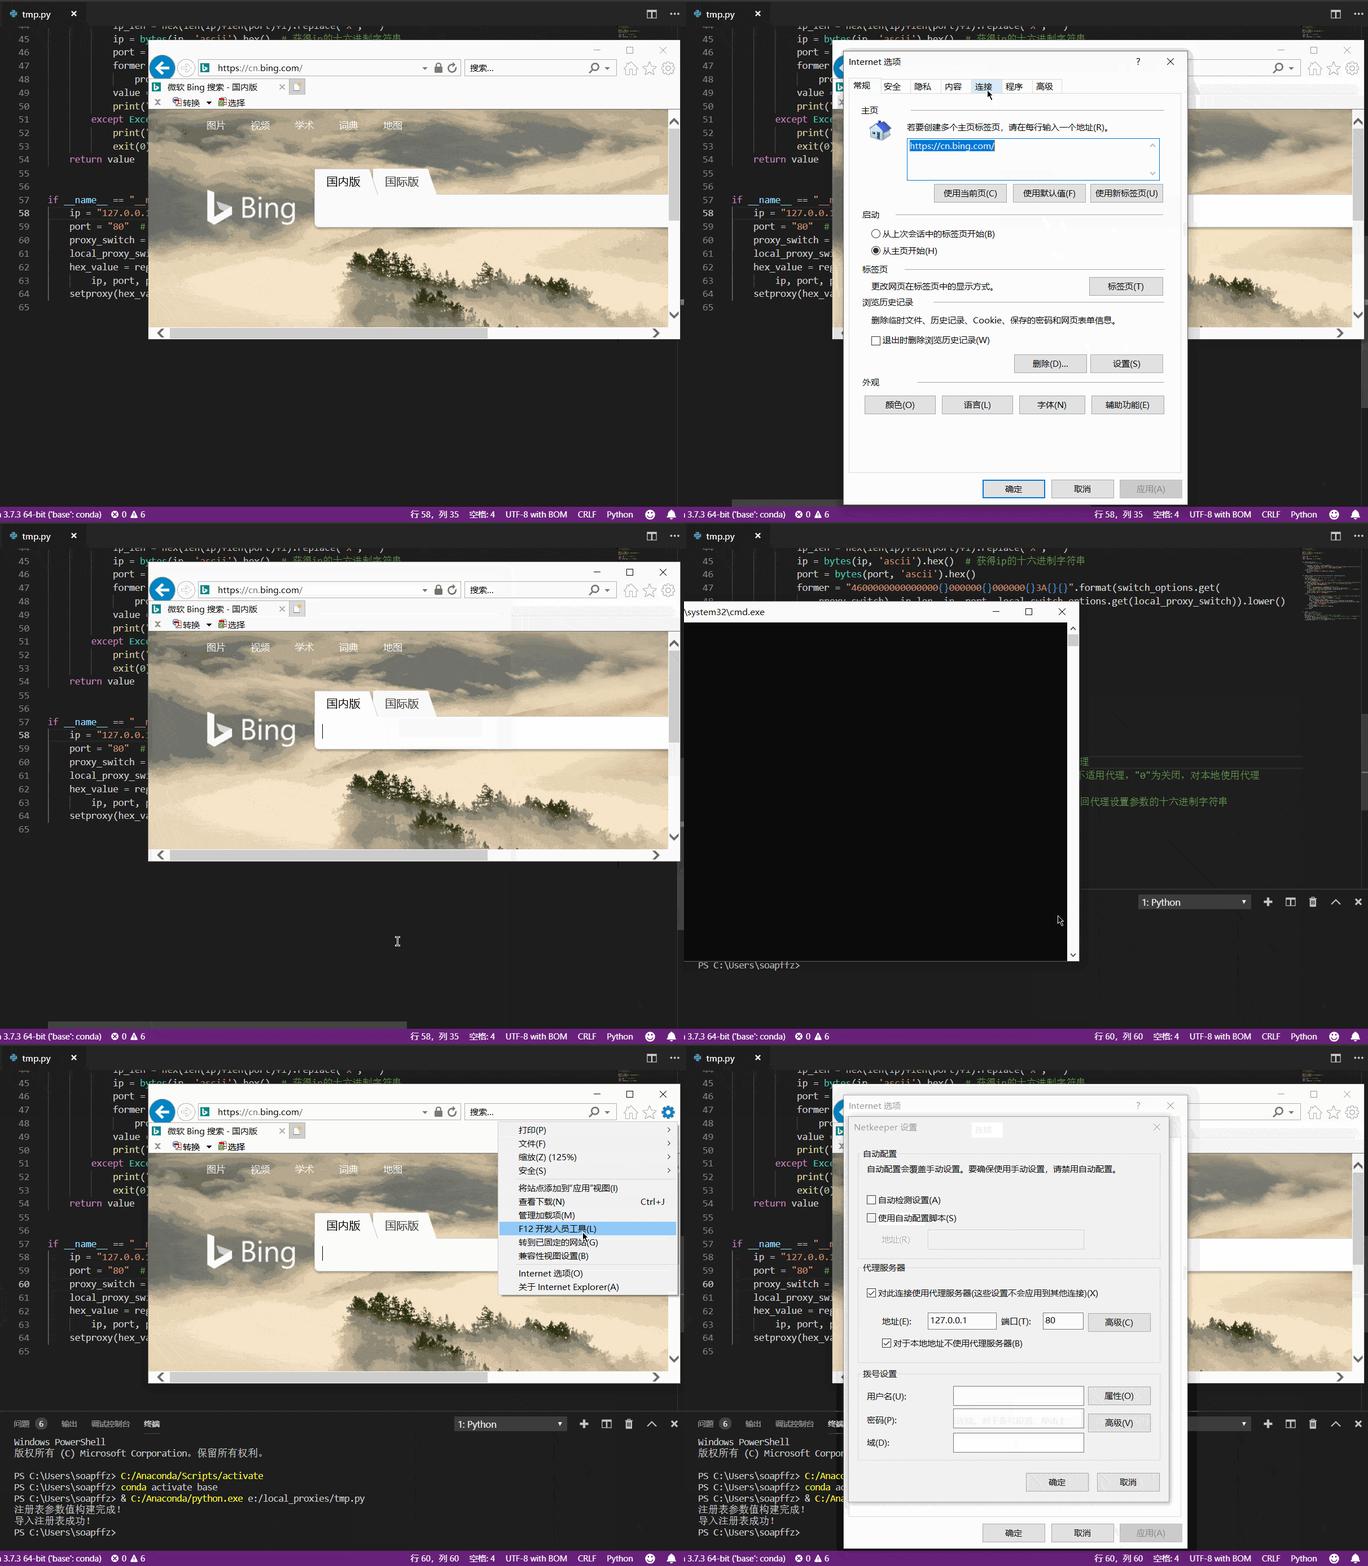
效果演示如下 (电脑点击看大图):
[19-05-03 完结]
写了几天深度学习的项目,思绪有点乱,今天摸个鱼把前面写好的 win 本地代理客户端的编写思路整理一下
UI 设计#
前情提要:前面我已经完成了多线程爬取西刺代理的代码改写以及通过注册表改系统代理这两部分
一直使用命令行很不爽,这个功能用 GUI 实现起来会很适合,经过多方比较选择了pyqt5(才不是因为有可视化设计界面比较方便)
安装#
我的环境:Win10+Anaconda3+pip/conda清华源
好像spyder这个库是需要pyqt5这个库做支持的,直接安装pyqt5会提示你更新到的版本太高,spyder不高兴了,于是:
pip install spyder
pip install pyqt5
基本页面介绍#
安装完了pyqt5,如果你没有在安装Anaconda3时勾选添加到环境变量,那么根据你自己python包安装的位置自行添加环境变量
如果你Anaconda默认添加了环境变量,直接在命令行输入designer即可打开,界面及基本介绍如下 (电脑点击图片看大图):
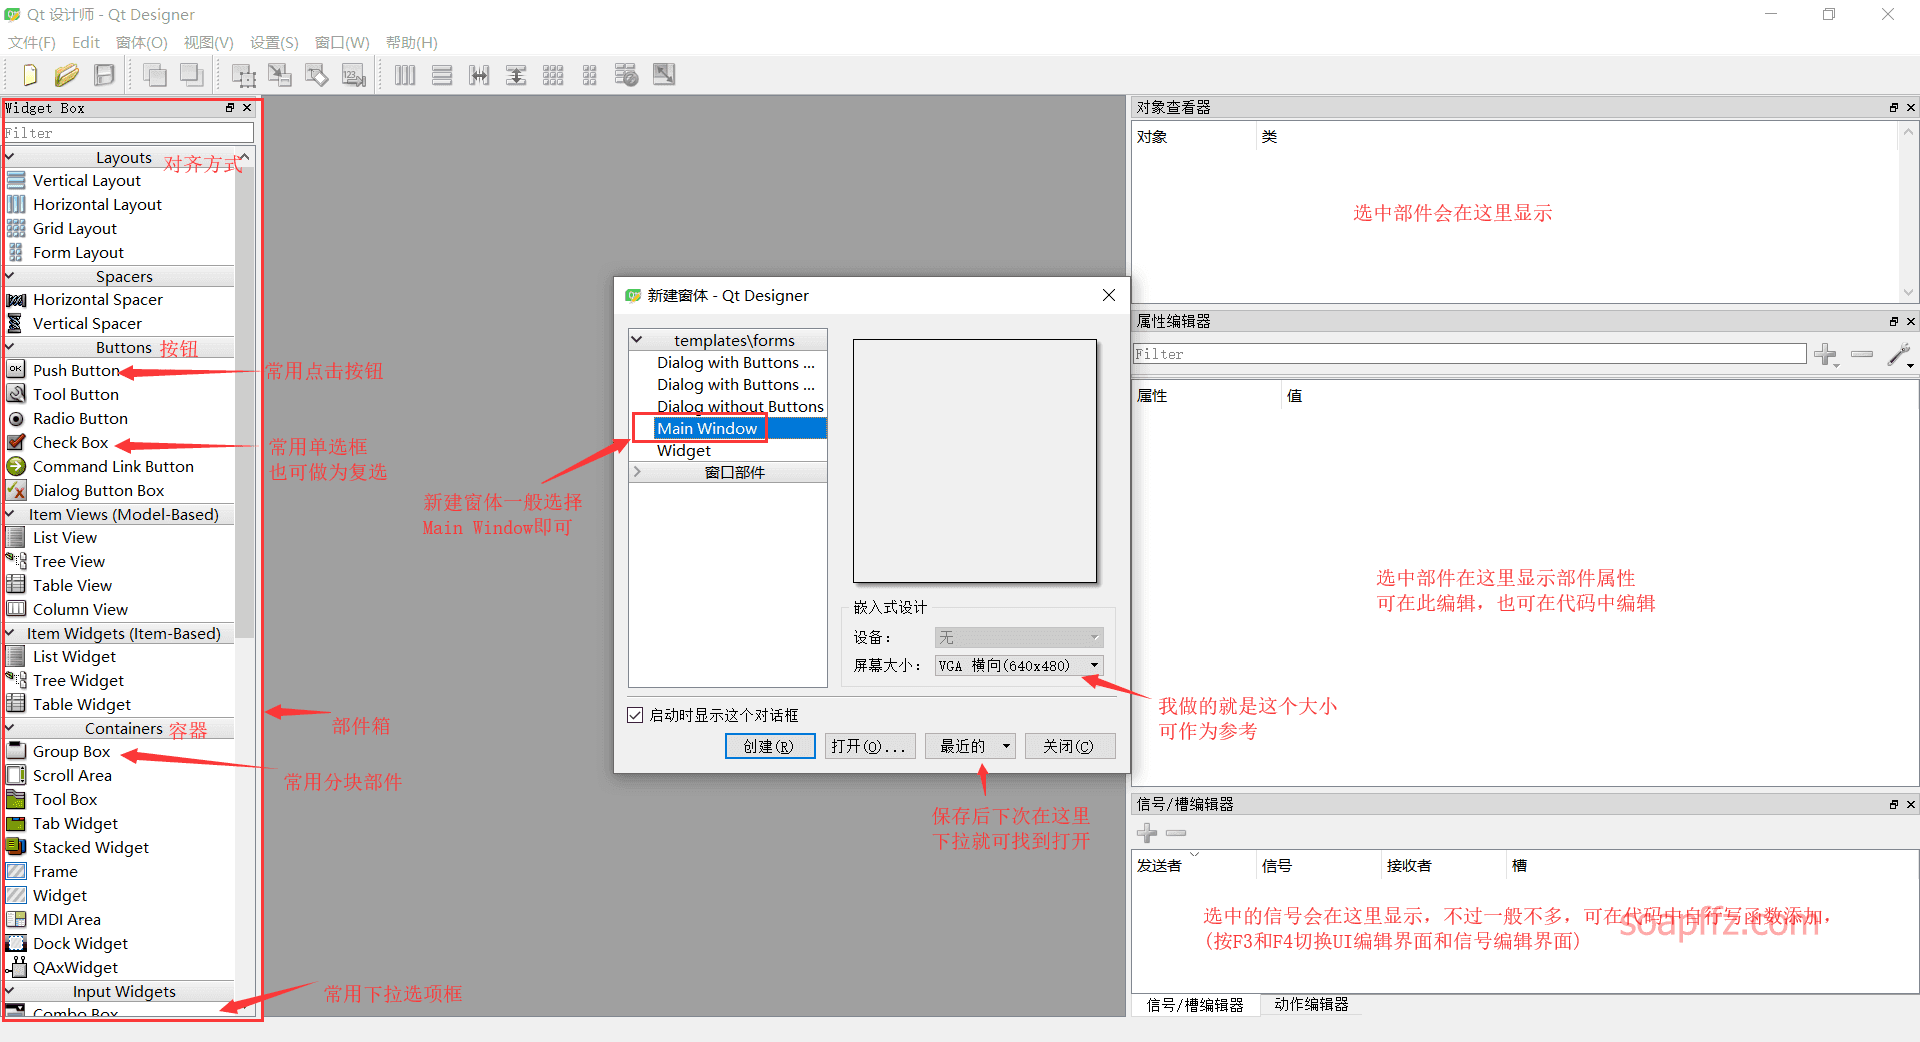
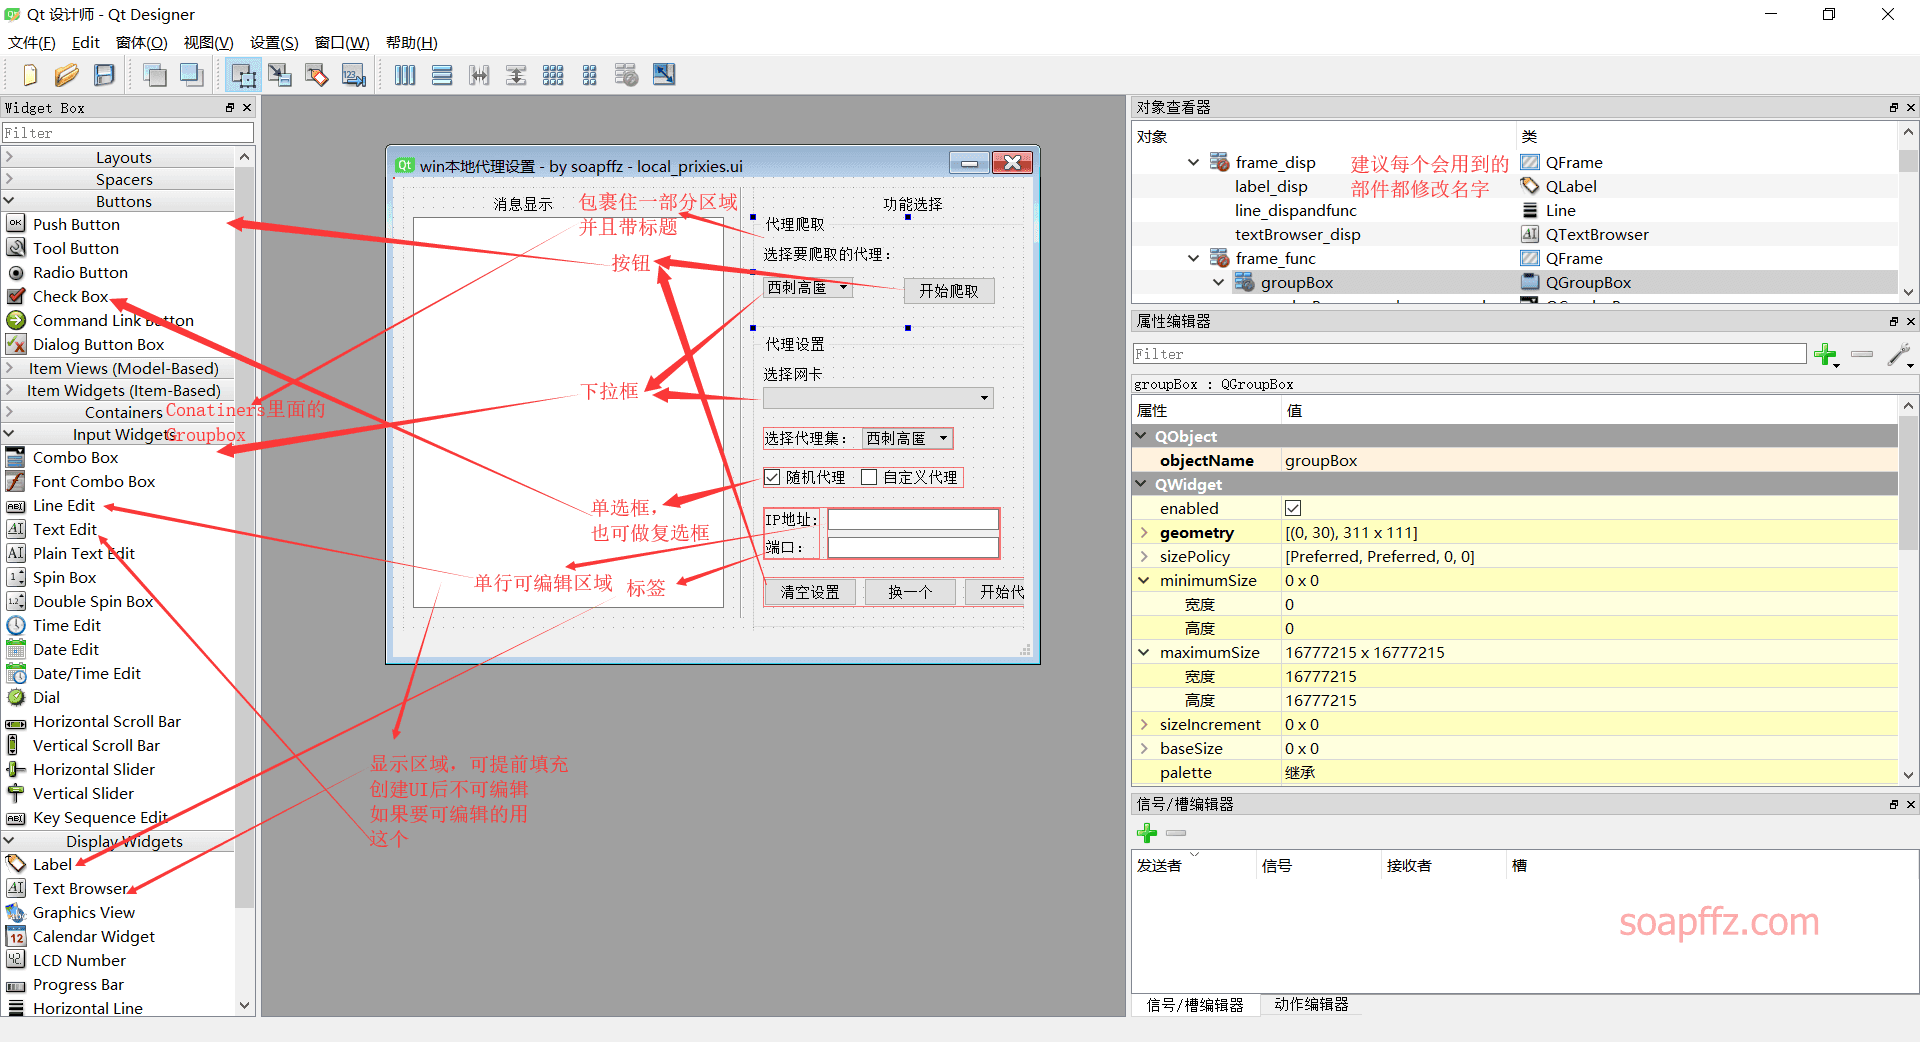
UI 全靠自己设计,建议在MainWindow上把你的几个功能区用Containers部件中的Frame部件分隔开,这样有利于后面你处理每个功能区
速成可参考:PyQT5 速成教程 - 2 Qt Designer 介绍与入门
这个翻滚吧挨踢男大佬的文章还是很通俗易懂的:Python 菜鸟教程全目录
signal&slot#
PyQt5 有一个独特的 signal&slot (信号槽) 机制来处理事件。信号槽用于对象间的通信。signal 在某一特定事件发生时被触发,slot 可以是任何 callable 对象。当 signal 触发时会调用与之相连的 slot。
也就是说你需要设计谁是发送方,谁是接收方,这里举个例子:
** 在designer中按F3和F4切换 UI 设计界面和信号和槽编辑界面 **
拖动信号发送方到信号接收方上就会弹出信号和槽编辑界面,我们这里拖动的是一个combobox到一个textbrowser上:

** soapffz的建议,初期每个不同部件的常用方法都点一遍,导出Python代码查看语句构建,后期只设计 UI,其他的所有信号和槽都在逻辑部分的代码中自行编写,实现 UI 与逻辑分离 **
参考文章:还是翻滚吧挨踢男大佬的文章:PyQt5 学习笔记 05----Qt Designer 信号槽
代码导出#
那么基本的 UI 设计完了,我们给代理爬取的下拉框添加一个信号槽作为例子来说明导出的代码的构成,如图所示:

在界面右下角也可看到:

我的环境安装完pyqt5之后在cmd即可执行pyuic5 -o xx.py xx.ui指令
如果你测试pyuic5不能执行,自行百度,演示如下:

导出的代码构成是这样的:
# -*- coding: utf-8 -*-

# Form implementation generated from reading ui file 'local_prixies.ui'
#
# Created by: PyQt5 UI code generator 5.11.3
#
# WARNING! All changes made in this file will be lost!

from PyQt5 import QtCore, QtGui, QtWidgets

class Ui_MainWindow(object):
    def setupUi(self, MainWindow):
        MainWindow.setObjectName("MainWindow")
        MainWindow.resize(640, 480)
        MainWindow.setMinimumSize(QtCore.QSize(640, 480))
        MainWindow.setMaximumSize(QtCore.QSize(640, 480))
        各种部件的大小,位置,长宽高等属性
        self.retranslateUi(MainWindow)
        添加的信号和槽在这里
            self.comboBox_proxychoose_crawl.currentTextChanged['QString'].connect(self.textBrowser_disp.append)
        QtCore.QMetaObject.connectSlotsByName(MainWindow)

    def retranslateUi(self, MainWindow):
        _translate = QtCore.QCoreApplication.translate
        MainWindow.setWindowTitle(_translate("MainWindow", "win本地代理设置 - by soapffz"))
        self.label_funcchoose.setText(_translate("MainWindow", "功能选择"))
        各种部件内的内容
导出的代码只有一个类,肯定要实例化这个对象才能启动,此处需要引入重要内容:UI 与代码逻辑分离
UI 与代码逻辑分离#
1. 不分离状态
在导出的 py 文件中添加如下代码 (确保你的类名字也是 UI_MainWindow):
if __name__ == "__main__":
    import sys
    app = QtWidgets.QApplication(sys.argv)
    MainWindow = QtWidgets.QMainWindow()
    MyWindow = Ui_MainWindow()
    MyWindow.setupUi(MainWindow)
    MainWindow.show()
    sys.exit(app.exec_())
即可在导出的py文件中启动该界面 (大 GIF):
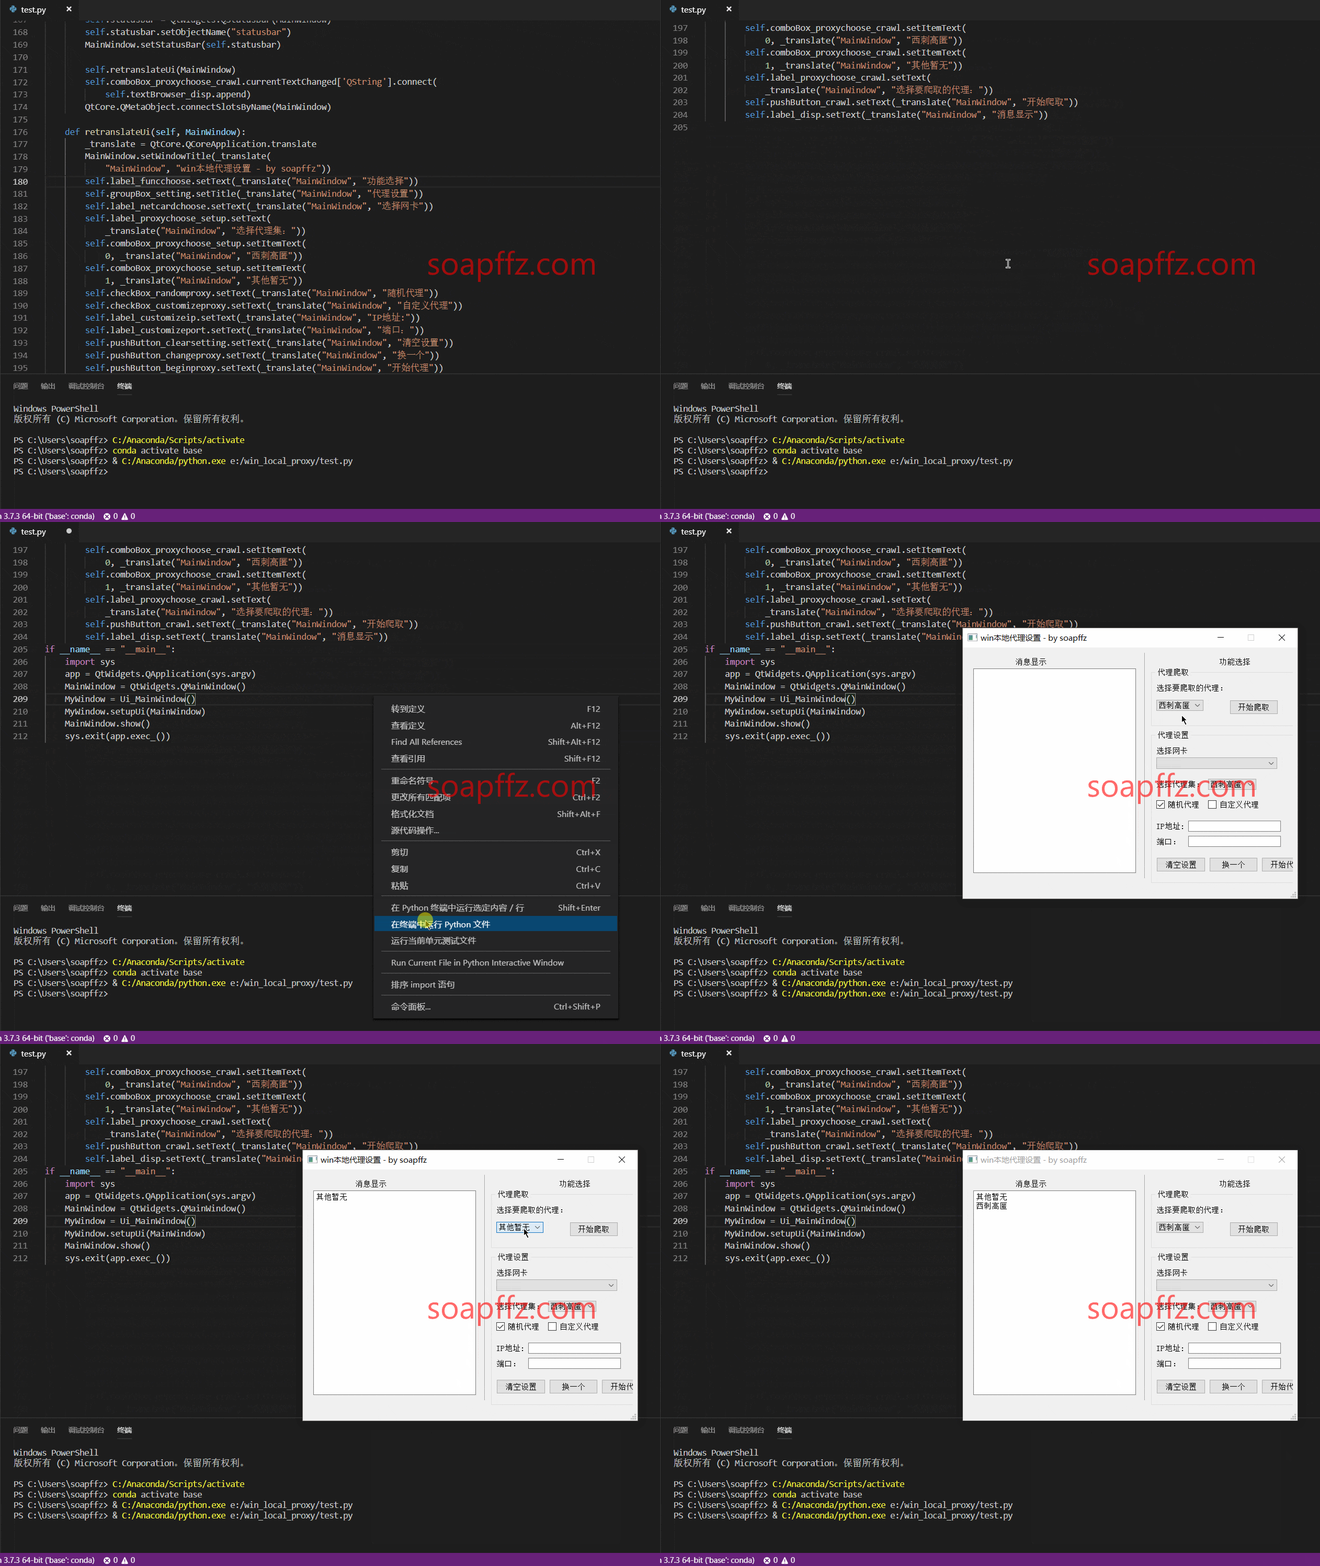
2. 分离状态
新建一个 mainwindow.py文件,主要实现界面的实例化以及界面所有逻辑实现以实现 UI 与逻辑的分离,在其中添加如下代码 (假定你导出的py文件的名字叫做ui.py):
from PyQt5 import QtCore, QtGui, QtWidgets
from ui import Ui_MainWindow


class MainWindow(QtWidgets.QMainWindow, Ui_MainWindow):
    def __init__(self):
        super().__init__()
        # 实例化UI界面
        self.setupUi(self)
        # 实例化之后,self拥有UI_Mainwindow的所有属性
        # 在此处编辑所有的信号槽以及剩下的UI部分,实现UI与代码逻辑分离
新建一个main.py文件,主要用于启动,在其中添加如下代码:
from PyQt5 import QtCore, QtGui, QtWidgets
from mainwindow import MainWindow
from sys import argv
from sys import exit as sys_exit

if __name__ == "__main__":
    app = QtWidgets.QApplication(argv)  # 获取命令行参数
    mainWindow = MainWindow()  # 创建界面实例
    mainWindow.show()  # 显示界面
    sys_exit(app.exec_())
然后执行main.py即可看到界面,小建议:
- 熟悉之后在
designer中只编写UI,不写任何信号和槽,全部在mainwindow.py中注释的地方添加 - 初始化界面时需要的参数也放在
mainwindow.py中,此处举个例子:
在代理爬取部分的combobox中,我们需要添加西刺高匿和其他暂无这两个下拉选项,我们不用在UI设计时就写进去,可以在mainwindow.py中通过初始化时将代理名称列表添加进去来实现,代码如下:
mainwindow.py
from PyQt5 import QtCore, QtGui, QtWidgets
from ui import Ui_MainWindow


class MainWindow(QtWidgets.QMainWindow, Ui_MainWindow):
    # 为了剥离ui和逻辑,基本的逻辑操作我们都在这个类中完成
    def __init__(self):
        # 初始化的部分直接放在这个函数里
        super().__init__()
        # 实例化UI界面
        self.setupUi(self)
        # 代理的名字,如果有新的代理函数在此加入名字
        self.proxyname_l = ["西刺高匿", "其他暂无"]
        self.ui_remaining_part()

    def ui_remaining_part(self):
        # 除了基本的ui界面,在这个函数中设置每个部件的初始值以及实例化每个对象
        # 将代理的名称列表插入两个代理的combobox中
        self.comboBox_proxychoose_crawl.addItems(self.proxyname_l)
        self.comboBox_proxychoose_setup.addItems(self.proxyname_l)
所以初始化UI时需要的其他参数以及实例化其他功能型类的语句我都是写在mainwindow.py在实例化了setupUI之后的
** 这样我们就只需要在设计UI时修改重要部件的别名,就能在mainwindow.py中愉快地编辑对应部件的剩下的属性以及信号和槽,即使UI界面稍微有所变动,也不会影响到原来的代码逻辑,从而实现了UI与代码逻辑的分离 **
参考文章:PyQt5 如何让界面和逻辑分离简介
信号和槽传递额外参数#
信号和槽传递额外参数的重要性不亚于上面提到的UI和代码逻辑分离
上面我们已经说了,在设计UI时只管设计就好,剩下的信号和槽我们都在代码逻辑部分实现,那么就要求我们能熟练掌握每个部件的所能触发的事件以及有哪些槽,部件触发事件传递信号和槽的格式基本如下:
self.部件.事件.connect(槽)
比如我们上面的 gif 演示的改变代理爬取的下拉框,就把下拉框变化的内容输出到显示区域对应的语句如下:
self.comboBox_proxychoose_crawl.currentTextChanged['QString'].connect(self.textBrowser_disp.append)
.connect里面的槽能收到来自前面的事件所发出的信号,那么接收到的信号是什么呢?举几个常见例子:
- 如果是
按钮.按钮被点击, 那么槽接收到的是 `` - 如果是下拉框。检测下拉框改变选项
,那么槽接收到的就是下拉框改变选项后下拉框中的值 ` - 如果是
单选框checkbox.状态改变,那么槽接收到的是单选框状态改变到的状态的信号数值,2是选中,0是未选中,1是半选
这些是我写代码中查询资料得到的,那么如果用到了从来没用过的部件,想迅速知道某个部件某个事件改变后传递的信号有哪些,你可以这样做:
class MainWindow(QtWidgets.QMainWindow, Ui_MainWindow):
    # 为了剥离ui和逻辑,基本的逻辑操作我们都在这个类中完成
    def __init__(self):
        super().__init__()
        self.setupUi(self)
        self.部件.事件.connect(self.自定义的函数)

    def 自定义的函数(self, parameter):
        print(parameter)
这样你每次触发你选中的部件的对应事件,传递的参数就会被打印出来
也就是说每个部件在触发某个事件的时候,都会带着自身的某个参数,但是经过实验,后面的 connect 只能是没带括号的某个函数
也就是说是不能带其他参数的,那么如果我们想要自定义这个传递的参数怎么办呢?
** 我们使用lambda就可以带参数了 **
举个例子,我现在有两个按钮bt1和bt2,当我点击其中一个之后,我想知道我点击的是 bt 几,代码如下:
        self.pushbutton_1.clicked.connect(lambda:self.whichbt(1))
        self.pushbutton_2.clicked.connect(lambda:self.whichbt(2))
    def whichbt(slef,i):
        print("我现在打印了{}号按钮".format(i))
这样.connect后面的函数就能带括号且在括号中可以带多个参数了,你也可以传递它自身:
        self.checkBox_1.stateChanged.connect(lambda: self.which_checkbox(self.checkBox_1, 1))
        self.checkBox_2.stateChanged.connect(lambda: self.which_checkbox(self.checkBox_2, 2))

    def which_checkbox(slef, part, i):
        part.setChecked(False)
        print("checkbox{}的状态改变了,但我现在把它置为未选中了".format(i))
但是又要传递本来的参数,又要传递额外的参数,我不知道怎么实现,知道的大佬可以留言告知一下
参考文章:pyqt 信号和槽传递额外参数
重要的部分我们介绍完了,来介绍几个我编写代码中遇到的小问题以及解决方案
行输入#
我除了设置随机代理之外还添加了自定义代理,那么用户自定义输入ip和port,肯定需要做第一步的验证,在寻找中找到了一篇优质文章:PyQt5 基本控件详解之 QLineEdit(四)
从中学习到了对文本框输入限制的设置方法,最终ip和port部分代码如下:
# 设置ip默认不可写,ip地址掩码;但是此处只是限制输入类型为数字,还需验证ip合法性
self.lineEdit_customizeip.setInputMask('000.000.000.000;_')
self.lineEdit_customizeip.setReadOnly(True)
# 设置端口默认不可写,以及限制端口为0-65535
# 设置文本允许出现的内容
port_reg = QtCore.QRegExp(r"^([0-9]|[1-9]\d|[1-9]\d{2}|[1-9]\d{3}|[1-5]\d{4}|6[0-4]\d{3}|65[0-4]\d{2}|655[0-2]\d|6553[0-5])$")
# 自定义文本验证器
pportregValidator = QtGui.QRegExpValidator(self)
# 设置属性
pportregValidator.setRegExp(port_reg)
# 设置验证器
self.lineEdit_customizeport.setValidator(pportregValidator)
self.lineEdit_customizeport.setReadOnly(True)
ip设置后一打开就能看到掩码的输入框:

因为我输入除了我限制的部分以外都输不进去,也不会在文本框中显示,就不放实操效果了
两个 checkbox 的互斥#
我使用的是Check Box来选择代理方式是随机代理还是自定义代理,默认是不互斥的
参考文章:PyQt5 系列教程(15):单选按钮
单选按钮默认为 autoExclusive(自动互斥)。如果启用了自动互斥功能,则属于同一个父窗口小部件的单选按钮的行为就属于同一个互斥按钮组的一部分。当然加入 QButtonGroup 中能够实现多组单选按钮互斥。
此处为了实现随机代理和自定义代理两个按钮的互斥,我们把它添加到一个 QButtonGroup (找不到说 checkbox 也能用 QButtonGroup 的那篇文章了) 以实现互斥,代码如下:
# 把两个checkbox放到一个互斥的QButtonGroup里面,起到单选效果
self.btgp_mutuallyexclusive = QtWidgets.QButtonGroup(self.groupBox_setting)
self.btgp_mutuallyexclusive.addButton(self.checkBox_randomproxy)
self.btgp_mutuallyexclusive.addButton(self.checkBox_customizeproxy)
看一下没添加到QButtonGroup之前的效果:

看一下添加之后的:

给窗口关闭时绑定事件#
我希望在退出时能触发清空代理函数,这样即使程序关闭也不影响我们正常使用,找到一篇参考文章:
他排版很乱,实现的效果是当点击关闭按钮时,触发弹框问你是不是确认要关闭
通过单击窗口标题栏中的关闭按钮或调用 close () 方法来关闭窗口时,closeEvent (self,event) 方法被调用。 通过 event 参数可获得 QCloseEvent 类的一个对象。 为了防止窗口关闭,必须通过该对象调用 ignore () 方法,否则调用 accept () 方法。
下面的例子为:单击关闭按钮将显示一个标准对话框,要求确认是否关闭该窗口。 如果用户单击 “是” 按钮,则关闭窗口;如果用户单击 “否” 按钮,则仅关闭对话框,窗口不会被关闭。
代码如下:
import sys
from PyQt5 import QtWidgets


class MyWindow(QtWidgets.QWidget):
    def init(self):
        QtWidgets.QWidget.init(self)
        self.resize(300, 100)

    def closeEvent(self, e):
        result = QtWidgets.QMessageBox.question(
            self, "关闭窗口确认", "真的要关闭窗口?", QtWidgets.QMessageBox.Yes | QtWidgets.QMessageBox.No, QtWidgets.QMessageBox.No)
        if result == QtWidgets.QMessageBox.Yes:
            e.accept()
            QtWidgets.QWidget.closeEvent(self, e)
        else:
            e.ignore()


if __name__ == "__main__":
    app = QtWidgets.QApplication(sys.argv)
    window = MyWindow()
    window.show()
    sys.exit(app.exec_())
实现的效果如下:

那么我们绑上点击关闭时清空代理的函数即可:
def closeEvent(self, e):
    # 点击关闭按钮时清空设置
    QtWidgets.QWidget.closeEvent(self, self.pbp_of_clearsetup())
功能性代码优化#
虽然功能性代码我早就完成了,但这次在写代码逻辑时发现了原来代码不完善的地方以及一些功能还没有实现,这里补充说明一下
爬取代理及数据库操作#
写爬取代理的时候只写了爬取和存入数据库的部分,但是我们还需要的功能如下:
点击开始代理时,需要从数据库中读取ip和端口并存入对应代理专门用来存储读取数据的列表中,点击换一个时,丢弃当前代理,从列表中再随机选一个,当换了代理集时把存储列表清空,下次点击开始代理时重新从数据库中读取并存到对应列表,这就保证了我们新爬取的代理能被用到
我把爬取代理和从数据库读取代理两个功能放在了一个函数,这样避免了数据库连接等代码的重复,部分代码如下:
try:
    # 读取对应集合中ip和port信息
    collection_dict_l = self.db["{}".format(collection_name)].find({}, {
        "_id": 0, "ip": 1, "port": 1})
    for item in collection_dict_l:
        # 去重操作
        if item not in proxies_l:
            # 添加到对应的集合列表中,列表中元素形式为ip和port的字典
            proxies_l.append(item)
    return proxies_l
except Exception as e:
    return("程序报错:{}".format(e))
参考文章:Python Mongodb 查询文档
其他参考文章:
- python 字典由 value 查 key 参考文章:Python 基础 —— 字典中由 value 查 key 的几点说明
- 用 winreg 获取注册表中的值函数部分参考文章:Python 模块_winreg 操作注册表
- PYQT5 (3) 多线程 QProgressBar 卡死的问题
- pymongo 的 find 直接输出 list
google的时候找到51testing.com的一份文档,感觉应该还挺全的:下载地址- 一份国人翻译的 Pyqt5 教程,虽然没看,备忘录一下:PyQt5-Chinese-tutorial
设置代理部分#
这个真的被自己坑到了
在原来的代码的构建注册表函数中,在过滤了 ip 为空和端口不合法性之后,我们构建参数值的代码如下:
try:
    IPy.IP(self.ip)  # 注册表中能随便填ip和端口,但是我们不允许,如果ip不正确或为空则会直接报错退出
    ip_len = hex(len(self.ip)+len(self.port)+1).replace('x', '')
    ip = bytes(self.ip, 'ascii').hex()  # 获得ip的十六进制字符串
    port = bytes(self.port, 'ascii').hex()
    former = "4600000000000000{}000000{}000000{}3A{}{}".format(switch_options.get(
        self.proxy_switch), ip_len, ip, port, local_switch_options.get(self.local_proxy_switch)).lower()
    hex_value = former+"00"*int((150-int(len(former)))/2)
    print("注册表参数值构建完成!")
except Exception as e:
    print("程序报错:{}\n程序退出!".format(e))
    exit(0)
其中这行构建ip长度的十六进制值的代码:
ip_len = hex(len(self.ip)+len(self.port)+1).replace('x', '')
没有处理好在 ip+:+ 端口的长度超过 15 位的时候的情况:
- 127.0.0.1:80:12 位,ip_len=0C
- 110.110.110.110:65535:21 位,ip_len=015
参数值有如下变化:
代理开关0000000C
代理开关000000015
中间就多了一个 0!导致传进去之后会乱掉,参数值由4600...会莫名其妙地变为04600...,导致代理不生效
于是我们将ip_len语句改为:
# hex()方法转换出来的数字是0x开头的且ip长度站两位
ip_len = hex(len(ip)+len(port)+1).split("x")[-1].zfill(2)
就解决了问题,这个故事告诉我们一定要细心
完结#
最终效果如下
1.. 爬取代理部分:
数据库为空,且 ip 最近被封的状态 (电脑点击看大图):
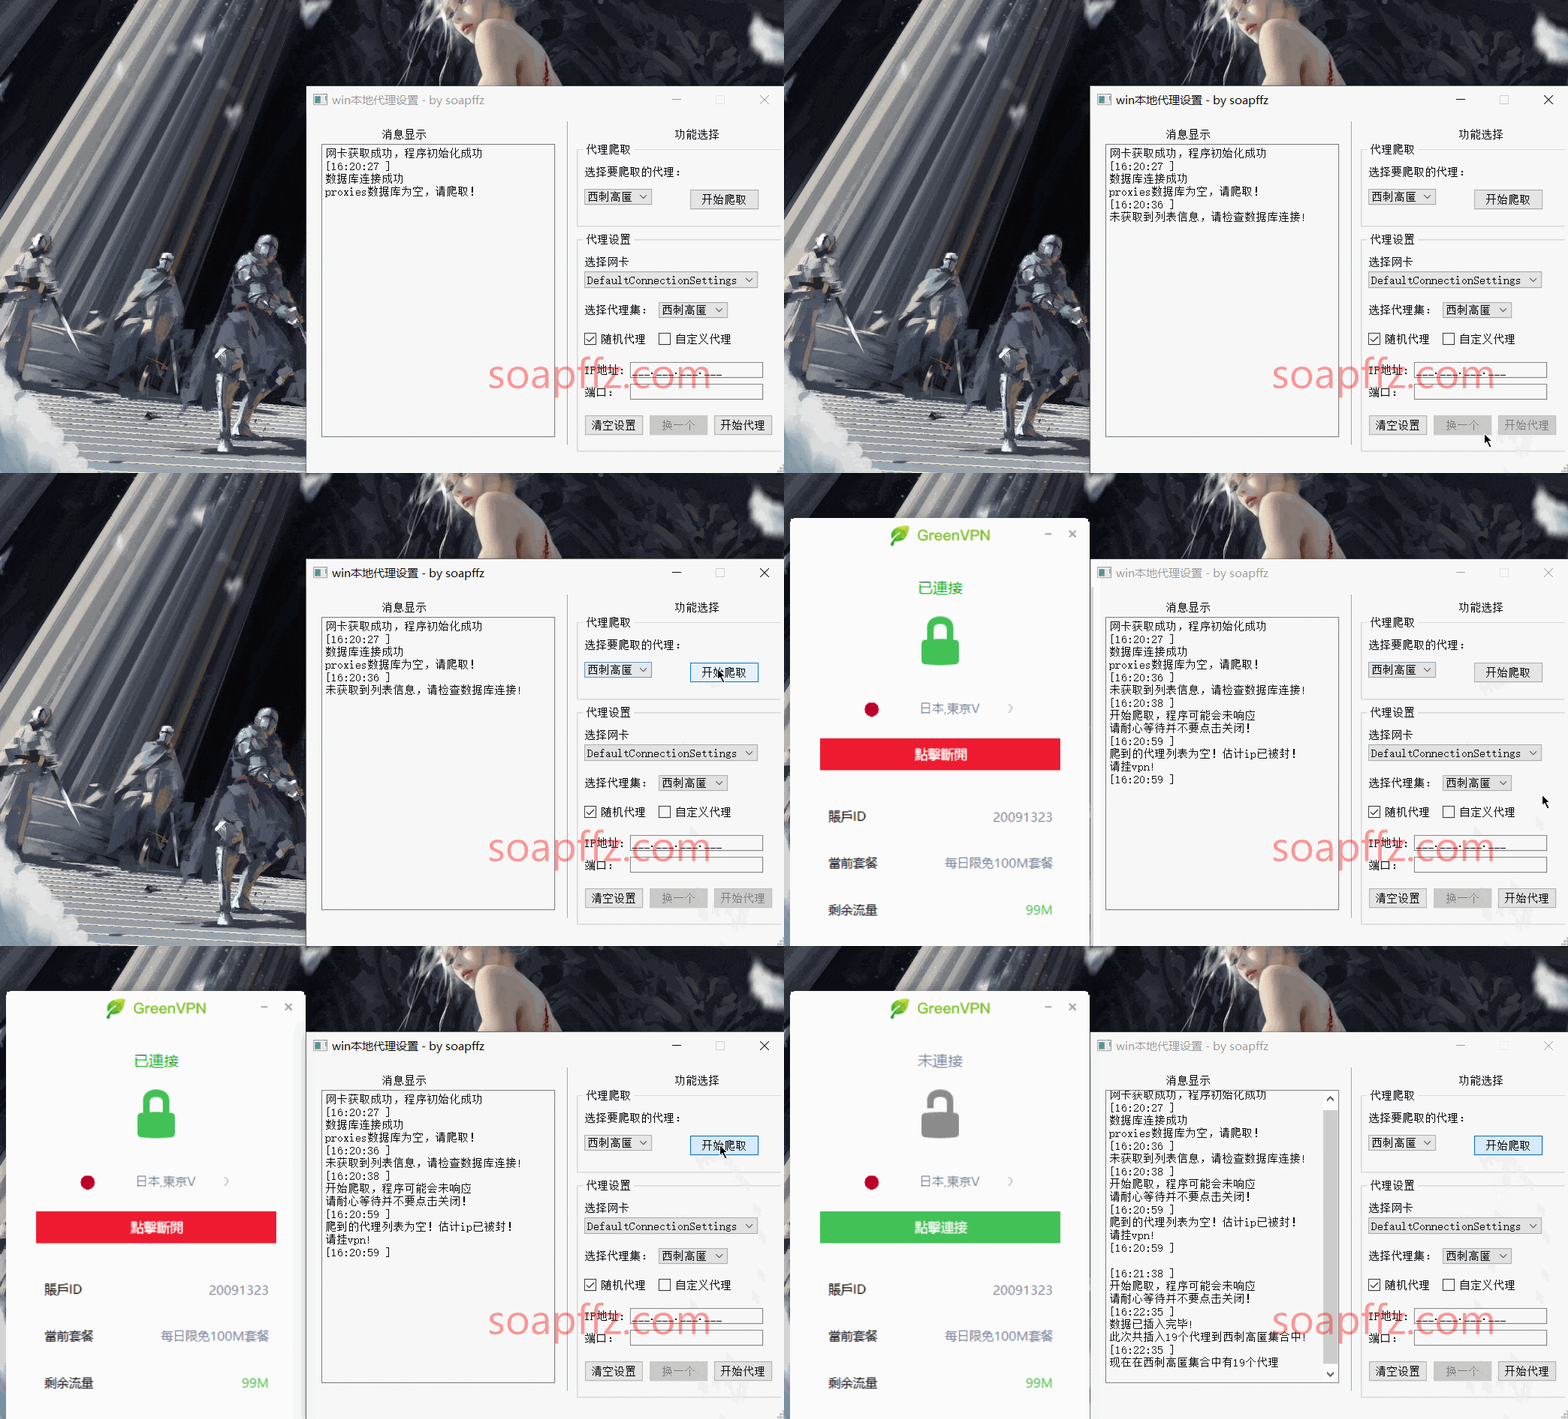
注:此为交替暂停开始录制的效果,抽取了大部分帧以减小 gif 体积,实际事件参照软件显示区域时间戳
2. 代理部分 (电脑点击看大图):
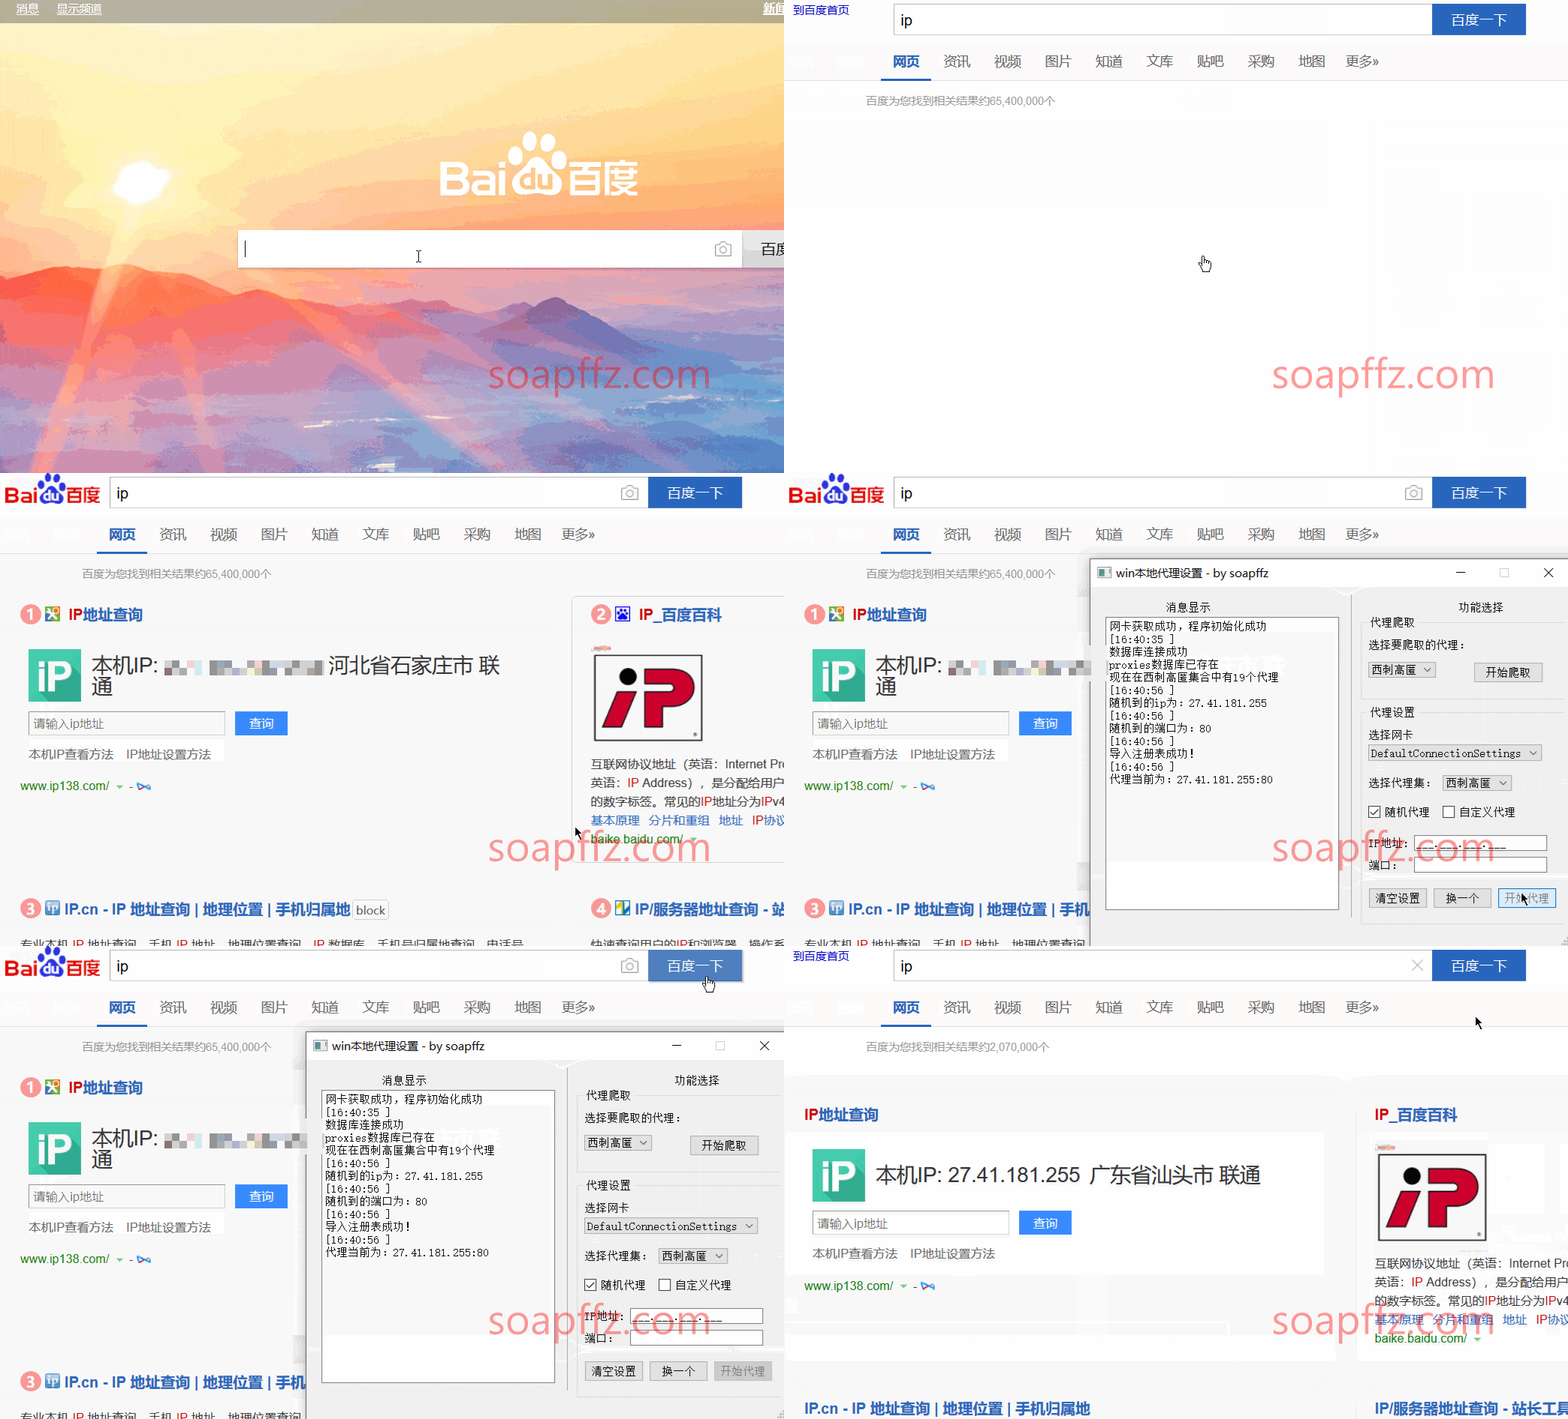
- 为了保护自己,原 ip 打码了
- 代码目前还没完全完善,可能会碰到连接速度不好的 ip,此 gif 为遇到了连接速度不错的代理,为最理想状态,在发布
github项目时会加入先验证在连接的功能 - 注:此为交替暂停开始录制的效果,抽取了大部分帧以减小 gif 体积,实际事件参照软件显示区域时间戳
全代码太多了就不放了,等这几天的深度学习的项目写完再把这个项目开源到github作为自己的第一个开源项目
大家也可以去给我点个star,提个issues什么的
最后po一张自己在构思时用画图画的UI设计图:

现在的软件界面:

本文完~